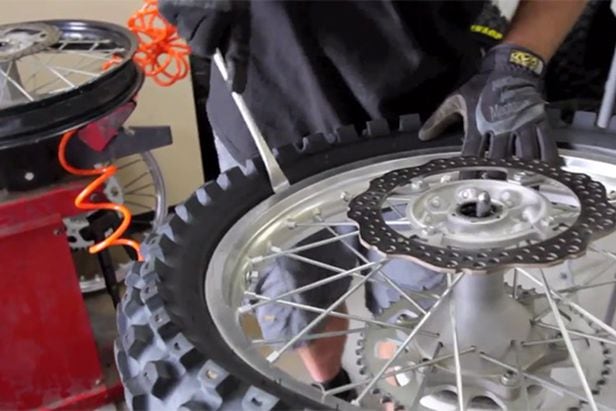
Changing a motorcycle tire might seem tricky, but you can do it yourself with the right steps. Imagine saving time and money by handling this task at home.
If your tire is worn out or damaged, waiting for a mechanic isn’t your only option. You have the power to get back on the road faster than you think. This guide will walk you through how to remove a motorcycle tire safely and easily.
Stick with me, and you’ll gain the confidence to tackle this job like a pro. Ready to learn? Let’s dive in.
Tools Needed
Removing a motorcycle tire requires specific tools. Using the right tools makes the job safer and easier.
Before starting, gather all necessary equipment. This helps avoid delays and problems during removal.
Essential Equipment
You need some basic tools to remove a motorcycle tire. These are important for loosening and taking off the tire safely.
- Tire irons or tire levers to pry the tire off the rim
- Valve core remover to release the air from the tire
- Bead breaker to separate the tire bead from the rim
- Wrenches or socket set to remove the wheel from the motorcycle
- Lubricant to help slide the tire off the rim
- Safety gloves to protect your hands
Optional Tools For Easier Removal
Some extra tools can make the tire removal process faster and less tiring. These are not required but helpful.
- Impact wrench to quickly remove wheel bolts
- Tire changing stand to hold the wheel steady
- Plastic rim protectors to avoid damage during prying
- Air compressor to reinflate the tire after fitting
- Bead lubricant spray for easier bead breaking

Credit: www.youtube.com
Preparing The Motorcycle
Removing a motorcycle tire needs careful preparation. Getting the bike ready keeps you safe and makes the work easier.
Start by making sure you have all the tools and a clean workspace. This helps you avoid mistakes and damage.
Securing The Bike
First, park the motorcycle on a flat, stable surface. Use a stand or blocks to stop it from moving.
Lock the handlebars to keep the front wheel straight. This adds extra stability while you work.
- Use a center stand or paddock stand if available.
- Place wheel chocks or blocks around the tires.
- Ensure the motorcycle cannot tip over or roll.
Removing The Wheel
Before removing the wheel, clean it to remove dirt and debris. This makes the process smoother.
Loosen the axle nut and any related fasteners. Support the wheel as you remove these parts carefully.
- Use the correct size wrench or socket.
- Keep track of all nuts, bolts, and spacers.
- Remove the wheel gently to avoid damage.
Deflating The Tire
Deflating a motorcycle tire is an important step before removing it. It helps avoid accidents and makes the tire easier to handle.
Always work slowly and carefully to keep yourself safe. Knowing where and how to release the air is key.
Locating The Valve Stem
The valve stem is the small tube where you add or release air. It sticks out from the rim of the wheel. Look around the tire’s edge to find it.
- The valve stem is usually made of metal or rubber.
- It has a small cap that protects it from dirt.
- Remove the cap carefully before deflating.
Releasing Air Safely
Release air slowly to avoid sudden bursts. Press the valve pin inside the stem gently with a small tool or your fingernail.
| Tool | Use | Tip |
|---|---|---|
| Valve core remover | Removes valve pin easily | Use to release air faster |
| Fingernail or small screwdriver | Presses valve pin | Release air slowly |
| Air compressor hose | Inflates tire | Remove before deflating |
Breaking The Bead
Breaking the bead is the first step to remove a motorcycle tire. The bead is the edge of the tire that seals tightly to the rim.
You need to separate the bead from the rim before you can take off the tire. This can be hard because the bead fits tightly.
Using A Bead Breaker
A bead breaker tool helps push the tire bead away from the rim. It makes breaking the bead easier and safer.
Place the bead breaker on the tire near the rim. Then press or hammer the tool to push the bead down.
- Set the tire on a flat surface
- Place the bead breaker on the tire sidewall
- Push or hit the tool to separate the bead
- Work around the tire to break the entire bead
Alternative Methods
If you do not have a bead breaker, you can use other tools. These methods need care to avoid damage.
One way is to use the motorcycle stand or a strong lever. Press the tire sidewall against the rim edge to break the bead.
- Lay the tire flat on the ground
- Use a strong block or stand to press the tire
- Apply force evenly around the tire
- Repeat until the bead separates from the rim
Removing The Tire From The Rim
Removing a motorcycle tire from the rim is a careful process. It requires the right tools and a good technique to avoid damage.
This guide explains how to take the tire off the rim safely and easily.
Positioning The Rim
Place the rim on a flat surface with the tire side up. Make sure it is stable and will not move while you work.
Check the tire valve and push it down to release any air completely before starting.
Using Tire Irons
Use tire irons to pry the tire bead away from the rim edge. Insert the first tire iron under the bead and hook it onto the rim.
Insert a second tire iron a few inches from the first. Work the irons around the rim to lift the tire bead over the rim edge.
- Use two tire irons together for better leverage
- Keep the tire irons close to the rim to avoid damage
- Move slowly to avoid pinching the tube (if present)
Lifting The Tire Off
Once one side of the tire bead is free, lift the tire off the rim by hand. Pull the tire away gently without forcing it.
Work your way around the rim until the tire is completely off. Check for any stuck spots and use the tire irons again if needed.
Inspecting The Rim And Tire
Before removing a motorcycle tire, inspect the rim and tire carefully. This helps find any problems that could cause trouble later.
Checking the rim and tire ensures safe removal and prevents damage. Take your time to look closely at all parts.
Checking For Damage
Look for cracks, bends, or dents on the rim. Damage can make the rim unsafe to use.
Check the tire for cuts, bubbles, or worn areas. These issues can cause leaks or blowouts.
- Examine the rim edge for cracks or sharp bends
- Look for dents that may affect tire seating
- Inspect tire sidewalls for cuts or bubbles
- Check tread for uneven wear or bald spots
Cleaning The Rim
Remove dirt and grease from the rim before taking off the tire. A clean rim helps the tire come off easily.
Use a soft brush and mild soap with water. Avoid harsh chemicals that can damage the rim.
- Wet the rim with water
- Apply mild soap or bike cleaner
- Scrub gently with a soft brush or cloth
- Rinse well and dry completely
Tips For Reinstallation
Reinstalling a motorcycle tire requires care and attention. Proper steps ensure safety and tire longevity. Follow these tips to make the process easier and better.
Focus on lubricating the bead and seating the tire correctly. These steps help the tire fit well on the rim and avoid damage.
Lubricating The Bead
Lubricating the tire bead makes it easier to seat on the rim. Use a proper lubricant to avoid damaging the rubber. This also helps the tire slide smoothly and seal tightly.
- Use a water-based bead lubricant or soapy water.
- Apply lubricant evenly around the tire bead.
- Avoid using oil or grease as they can harm the tire.
- Check the bead for any dirt or debris before lubricating.
- Do not overapply lubricant to prevent slipping during installation.
Seating The Tire Properly
Seating the tire means fitting the bead firmly against the rim. This step is key for a good seal and safe riding. Proper seating also prevents air leaks and uneven wear.
| Tip | Reason |
|---|---|
| Inflate the tire slowly | Allows the bead to seat evenly without damage |
| Check bead alignment | Ensures the tire sits correctly on the rim |
| Use a tire iron carefully | Prevents scratching or damaging the rim |
| Listen for the “pop” sound | Confirms the bead has seated properly |
| Inspect tire pressure | Maintains correct pressure for safe riding |

Credit: www.youtube.com

Credit: www.youtube.com
Frequently Asked Questions
How Do I Safely Remove A Motorcycle Tire?
First, deflate the tire completely to avoid accidents. Use tire irons to break the bead. Carefully pry the tire off the rim while protecting the rim from damage. Always work slowly and methodically for safety and precision.
What Tools Are Needed To Remove A Motorcycle Tire?
You need tire irons, a valve core remover, and bead breaker tools. A rim protector and lubricant help prevent damage. An air compressor is useful for reinflating the tire after installation. Having these tools makes the process easier and safer.
Can I Remove A Motorcycle Tire Without A Tire Changer?
Yes, you can remove it using tire irons and manual bead breaking. It requires patience and caution to avoid rim or tire damage. Using lubricant helps ease the process. However, a tire changer makes the job quicker and safer.
How Do I Protect My Motorcycle Rim During Tire Removal?
Use rim protectors or plastic inserts between tire irons and the rim. Apply lubricant to reduce friction. Work slowly to avoid scratches or dents. Protecting the rim maintains its integrity and appearance during the tire removal process.
Conclusion
Removing a motorcycle tire is easier than it seems. Follow the steps carefully and take your time. Use the right tools and work safely. Check the tire and rim for any damage before reinstalling. Practice makes perfect, so don’t worry if it takes time.
Regular tire care helps your motorcycle run smoothly. Now, you can handle tire removal with more confidence. Keep learning and stay safe on the road.