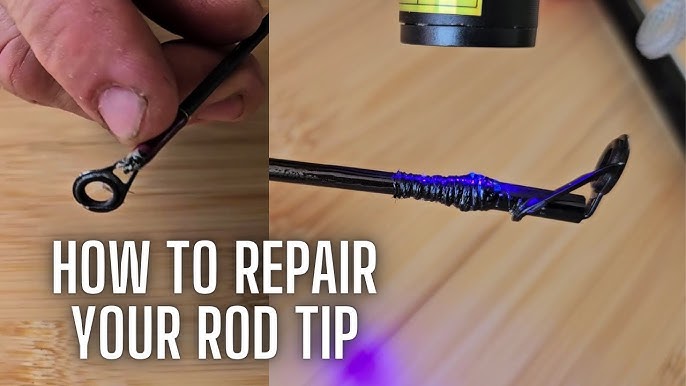
Have you ever been out fishing when suddenly your rod tip snaps? It’s frustrating and can ruin your day on the water.
But don’t worry—fixing a broken fishing rod tip is easier than you think. In this guide, you’ll learn simple, step-by-step methods to repair your rod quickly and get back to fishing without spending a fortune. Keep reading, and you’ll discover tips that save your gear and your fishing trip.
Tools And Materials Needed
Fixing a broken fishing rod tip requires some basic tools and materials. Having everything ready makes the repair easier and cleaner.
This list covers the most important items you will need to repair your fishing rod tip properly.
Replacement Rod Tip
You need a new tip to replace the broken one. Choose a tip that fits your rod’s size and style.
- Match the diameter of the old tip
- Pick the same material (metal, ceramic, etc.)
- Get the correct length for your rod
Rod Tip Glue Or Epoxy
Use special glue or epoxy designed for fishing rods. It holds the new tip firmly in place.
- Choose waterproof glue
- Use quick-drying epoxy for fast repairs
- Check if the glue works on metal and fiberglass
Sandpaper
Sandpaper helps clean and smooth the broken rod tip area. It makes the glue stick better.
- Use fine-grit sandpaper (around 400 grit)
- Sand the rod tip gently without damage
- Remove any old glue or rough edges
Pliers Or Tweezers
Pliers or tweezers help remove the broken tip and hold small parts. They give you better control.
- Use needle-nose pliers for small tips
- Hold the new tip while applying glue
- Be gentle to avoid damaging the rod
Cloth Or Paper Towels
Keep cloth or paper towels nearby to clean spills and wipe excess glue. It keeps the repair neat.
- Use damp cloth for cleaning
- Wipe glue drips quickly
- Prevent glue from sticking to unwanted spots
Tape (optional)
Tape can hold the new tip in place while the glue dries. Use light tape to avoid damage.
- Use masking or painter’s tape
- Wrap gently around the tip
- Remove tape after glue sets
Assessing The Damage
Before fixing a broken fishing rod tip, you must check how bad the damage is. This helps you decide if you can repair it or need a new tip.
Look closely at the broken area. Small cracks or loose pieces may be easy to fix. Large breaks might need more work.
Check The Break Type
There are different break types to know. Each needs a different repair method.
- Clean break – a neat, straight break on the tip.
- Crack – a small line or split in the rod tip.
- Frayed tip – rough or splintered ends.
- Loose tip – the tip is detached but still whole.
Measure The Broken Piece
Measure the length of the broken tip. This helps to find the right replacement or parts.
| Length of Break | Repair Options |
| Less than 2 inches | Use tip repair kit or glue |
| 2 to 6 inches | Replace tip section or use sleeve |
| More than 6 inches | Consider new rod tip or professional help |
Inspect The Guide Ring
Check the guide ring on the tip. If it is bent or missing, replace it during repair.
Removing The Broken Tip
Removing the broken tip of a fishing rod is the first step in fixing it. This part is delicate and needs care to avoid more damage.
Follow these instructions to safely remove the broken tip and prepare for repair.
Gather Necessary Tools
Before starting, collect tools that help you remove the broken tip cleanly and safely.
- A pair of sharp scissors or rod tip cutter
- Sandpaper (fine grit)
- Heat source like a lighter or hot water
- Protective gloves
- Cleaning cloth
Loosen The Broken Tip
Heat the broken tip area gently to soften any glue or adhesive inside the rod tip. This step makes removal easier.
Use a lighter briefly or dip the tip in hot water for a few minutes. Do not overheat to avoid damaging the rod.
Remove The Broken Piece
Hold the rod firmly and twist the broken tip gently. If it does not come off, use pliers covered with cloth to avoid scratches.
After removal, check inside the rod for leftover glue or debris. Clean it carefully with sandpaper or a cloth.
Prepare The Rod For New Tip
Use fine sandpaper to smooth the rod end. Remove rough edges and old glue.
Wipe the area clean with a cloth before attaching a new tip.
Choosing The Right Replacement Tip
Fixing a broken fishing rod tip needs the right replacement part. Choosing the correct tip helps keep your rod strong and balanced.
This guide helps you pick a replacement tip that fits your rod and fishing style.
Match The Tip Size
Measure the diameter of your rod’s broken tip. Replacement tips come in different sizes to fit various rods.
Choose a tip with the same or slightly smaller diameter. This ensures it fits tightly and works well.
Pick The Right Material
Replacement tips are usually made of metal or ceramic. Each material has benefits for fishing.
- Metal tips are strong and durable
- Ceramic tips reduce line friction
- Choose based on your fishing needs and rod type
Consider The Tip Style
Tips come in different shapes, like ringed or solid. The style affects how your fishing line moves.
Pick a tip style that matches your rod’s original tip for smooth casting and reeling.
Check The Rod Action Compatibility
Rod action means how much your rod bends. Fast action rods need stiffer tips, while slow action rods use more flexible tips.
Choose a tip that fits your rod’s action to keep the rod’s performance as it was.
Select The Right Attachment Method
Some tips slide over the rod, others use glue or screws. Use the same attachment method as your original tip.
- Slip-on tips fit over the rod end
- Glue-on tips require strong adhesive
- Screw-on tips use small screws for secure fit
Preparing The Rod For Repair
Fixing a broken fishing rod tip starts with good preparation. You need to get the rod ready before any repair work.
Proper preparation helps the repair last longer and work better. Take your time to do it right.
Clean The Broken Area
Remove dirt, old glue, and debris from the broken tip. Use a cloth or fine sandpaper to clean the area.
Cleaning helps the new glue stick well and keeps the repair strong.
Remove The Broken Tip
If the broken tip is still partly attached, gently remove it. Use heat or pliers carefully to avoid more damage.
Make sure the rod end is smooth and ready for the new tip.
Measure And Select A Replacement Tip
Measure the diameter of the rod tip where it broke. Choose a replacement tip that fits snugly.
- Use a ruler or caliper for accurate measurement
- Pick a tip that slides on without force
- If unsure, bring the rod to a fishing shop
Prepare Your Workspace
Work in a clean, well-lit area. Gather all tools and materials before starting.
- Have glue, sandpaper, and cleaning cloth ready
- Use gloves to keep the rod clean
- Protect your work surface with paper or cloth

Credit: www.reddit.com
Attaching The New Tip
Fixing a broken fishing rod tip needs care and the right tools. Attaching the new tip well helps your rod work like new.
Use the best method to join the new tip firmly. This guide shows how to attach it safely and securely.
Using Glue Or Epoxy
Glue or epoxy holds the new tip in place. Choose a strong adhesive that dries clear and is water-resistant.
Apply a small amount inside the tip opening. Avoid using too much glue to prevent mess and weak joints.
- Use a toothpick to spread glue evenly inside the tip
- Insert the rod tip carefully into the new tip
- Hold the tip steady until the glue starts to set
- Let the glue dry fully before using the rod
Securing The Tip Properly
Make sure the new tip fits tightly on the rod. A loose tip can fall off or affect casting accuracy.
Check the alignment of the tip with the guides on the rod. Straight alignment helps the line flow smoothly.
- Slide the tip onto the rod firmly but gently
- Align the tip so it matches the rod’s guides
- Use tape to hold the tip in place while glue dries
- Remove the tape once the glue is fully cured
Drying And Setting Time
Fixing a broken fishing rod tip needs patience. Drying and setting time are very important.
Knowing how long to wait helps the repair hold strong and last longer.
Choosing The Right Adhesive
The type of glue you use affects drying time. Some glues dry fast, others take longer.
Epoxy glue is common and strong but needs hours to set. Super glue dries quickly but may be less flexible.
- Epoxy glue: 4 to 6 hours drying time
- Super glue: 5 to 30 minutes drying time
- Polyurethane glue: 1 to 2 hours drying time
Preparing The Rod Tip For Drying
Keep the rod tip still after applying glue. Moving it can weaken the bond.
Use a clamp or tape to hold the tip steady. Make sure it stays in the correct position.
- Place the rod on a flat surface
- Use light pressure with tape or clamp
- Avoid touching the glued area
Ideal Drying Environment
The place where you let the glue dry matters. A warm, dry spot works best.
Avoid humid or cold areas. These can slow drying and weaken the fix.
- Room temperature around 70°F (21°C)
- Low humidity below 50%
- Good air circulation but no strong wind
Checking The Setting Time
Follow the glue instructions for how long to wait. Do not rush using the rod.
Test the repair gently after the set time. If it feels loose, wait longer before use.
- Read glue label for exact drying time
- Wait at least 24 hours for strong repair
- Handle rod carefully during first use

Credit: www.youtube.com
Testing The Repair
After fixing the broken fishing rod tip, you need to check if the repair is strong. Testing the repair helps ensure your rod works well again.
This step prevents surprises while fishing. It also shows if you need to improve the repair.
Visual Inspection
Look closely at the repaired tip. Check for cracks, gaps, or loose glue. A clean repair looks smooth and firm.
If you see any weak spots, fix them before testing with force.
Flex The Rod Gently
Bend the rod slowly to test the tip’s strength. The tip should bend without breaking or cracking.
Stop if you feel any unusual softness or hear cracking sounds.
Cast A Line Carefully
Try casting with the rod in a safe area. Use light pressure to see how the tip performs.
If the tip stays steady and does not wobble, the repair is good.
Check The Guide Alignment
Make sure the fishing line guide on the tip lines up correctly. A crooked guide can affect casting.
- Look along the rod from handle to tip
- Adjust the guide if it is out of line
- Secure the guide firmly with thread or glue
Test With Fishing Line Tension
Pull the fishing line with some force to simulate a catch. The tip should hold without slipping.
If the tip moves or feels loose, reinforce the repair and test again.
Tips For Preventing Future Breaks
Fishing rod tips are delicate and can break easily. Taking simple steps can help you protect your rod tip. This keeps your fishing gear ready for every trip.
Preventing breaks saves money and time. Use these tips to keep your rod tip strong and lasting longer.
Handle Your Rod With Care
Always carry your rod in a proper case or sleeve. Avoid leaning it against hard surfaces or stepping on it. Store the rod in a dry place away from heavy objects that might fall on it.
Avoid Overloading The Rod
Do not use a heavier line or lure than your rod can handle. Overloading puts extra stress on the tip and may cause it to snap. Check the rod’s recommended line weight and stick to it.
Regular Maintenance And Inspections
Inspect your rod tip regularly for cracks or wear. Clean the rod after each use to remove dirt and salt. Lubricate the guides and reel seat to keep everything working smoothly.
- Check for small cracks or splinters on the tip
- Wipe down the rod with a damp cloth after fishing
- Use mild soap and water for cleaning
- Dry the rod completely before storage
- Apply a light coat of oil to metal parts
Use Proper Techniques While Fishing
Do not bend the rod tip sharply. Cast smoothly without forcing the rod. When fighting a fish, keep steady pressure and avoid jerking the rod. These habits lower the risk of breaking the tip.
Protect The Tip During Transport
| Transport Method | Tip Protection Advice |
| Rod Tube or Sleeve | Always use a sturdy rod tube for trips. It shields the tip from impact. |
| Tackle Box | Do not place the rod tip under heavy gear inside the box. |
| Car Roof Rack | Secure the rod with soft straps and use a rod sock for extra protection. |
| Backpack Carry | Use a rod holder that keeps the tip safe and away from sharp objects. |

Credit: anglersresource.net
Frequently Asked Questions
How Do I Fix A Broken Fishing Rod Tip?
To fix a broken rod tip, remove the damaged tip first. Then, match a replacement tip size and glue it securely with rod epoxy. Allow it to dry fully before use. This restores the rod’s function and prevents further damage.
What Materials Are Needed To Repair A Fishing Rod Tip?
You need a replacement tip, rod glue or epoxy, sandpaper, and pliers. Sand the broken area smoothly before applying glue. These materials ensure a strong, lasting repair for your fishing rod tip.
Can I Repair A Fishing Rod Tip Without Professional Help?
Yes, you can repair it yourself using a replacement tip and epoxy glue. Follow step-by-step instructions carefully. DIY repair saves money and extends your rod’s life when done properly.
How Long Does It Take To Repair A Broken Rod Tip?
The repair process takes about 30 minutes, plus drying time. Glue or epoxy usually needs several hours to cure completely. Plan accordingly to ensure a strong and durable fix.
Conclusion
Fixing a broken fishing rod tip can save your gear and money. Small steps make the repair easy and quick. Use the right tools and materials for best results. Take your time and be careful during the process. Soon, your rod will be ready for fishing again.
Keep practicing these repairs to improve your skills. Enjoy fishing without worry about broken tips. Simple fixes can extend your fishing fun. Try repairing before buying a new rod. You can do it!