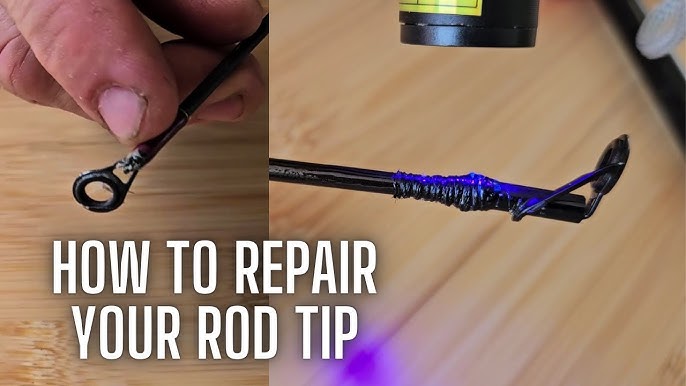
Have you ever been out fishing when suddenly your rod breaks? It’s frustrating, right?
But before you toss it aside or rush to buy a new one, there’s good news. You can fix your broken fishing rod yourself. Imagine saving money and getting back on the water quickly with a simple repair. In this guide, you’ll discover easy steps to bring your fishing rod back to life.
Keep reading, and you’ll learn how to handle common breaks, what tools you need, and tips to make your rod as good as new. Don’t let a broken rod ruin your fishing plans—take control and fix it today!
Identify The Damage
Finding the damage on a broken fishing rod is the first step to fix it. You need to look closely to see where the problem is.
Knowing the type and material of the rod helps you decide the best repair way. This guide shows how to check for damage carefully.
Check For Cracks And Breaks
Look over the rod slowly to find any cracks or breaks. Small cracks can get worse if not fixed early.
Use a bright light to see thin cracks. Run your fingers along the rod to feel any rough spots or splits.
- Check the rod tip carefully, as it breaks easily
- Look near the guides where stress is high
- Inspect the handle and reel seat for cracks
Assess The Rod Type And Material
Fishing rods come in different types like spinning or casting rods. Each needs a different fix method.
Materials like fiberglass, graphite, or composite affect how you repair the rod. Some need special glue or wraps.
- Fiberglass rods are strong but bend more
- Graphite rods are lighter but brittle
- Composite rods mix fiberglass and graphite traits

Credit: www.amazon.ca
Gather Repair Materials
Fixing a broken fishing rod needs the right materials. You must have tools and supplies ready before starting.
Picking the proper adhesives and wrapping will help the rod hold strong after repair.
Essential Tools And Supplies
Gather these tools and supplies to repair your fishing rod correctly and safely.
- Sandpaper or fine grit file to smooth broken edges
- Rod drying rack or holder for stability
- Sharp knife or scissors for trimming wraps
- Masking tape to secure parts temporarily
- Measuring tape for accurate wrap length
- Small brush for applying epoxy or adhesive
- Clamps or elastic bands to hold parts together
Choosing The Right Adhesives And Wrapping
Select adhesives that bond well with fiberglass or graphite rods. Wrapping materials must protect and strengthen the repair.
| Material | Description | Purpose |
| Epoxy Resin | Two-part adhesive that sets hard | Strong bond for broken rod sections |
| Super Glue (Cyanoacrylate) | Fast-drying adhesive | Quick fixes on small cracks |
| Rod Wrapping Thread | Thin nylon or polyester thread | Wraps around rod for strength |
| Heat-Shrink Tubing | Plastic tube shrinks with heat | Protects and seals the repair area |
| Varnish or Clear Coat | Protective finish | Seals thread wraps and adds shine |
Prepare The Rod For Repair
Fixing a broken fishing rod starts with proper preparation. Getting the rod ready helps the repair last longer.
Focus on the broken part first. Clean and remove anything loose before you begin fixing it.
Clean The Damaged Area
Use a soft cloth to wipe dirt and grime from the broken part. This makes the repair stronger.
If needed, use rubbing alcohol to remove tough stains. Let the area dry completely before moving on.
Remove Loose Fragments
Check the broken area for any loose pieces of rod or splinters. These can weaken the repair if left in place.
Gently pull off or trim away loose fragments with pliers or scissors. Be careful not to damage the rod more.
Fix Small Cracks And Splinters
Small cracks and splinters in fishing rods can weaken the rod. Fixing them early helps keep your rod strong. Use simple tools and glue for a quick repair.
Follow careful steps to apply glue and secure the repair. This will extend the life of your fishing rod and keep it safe to use.
Apply Epoxy Or Super Glue
Clean the cracked area with a soft cloth. Remove dirt and dust to help glue stick better. Apply a small amount of epoxy or super glue over the crack or splinter.
- Use a toothpick to spread glue inside cracks.
- Be careful not to add too much glue.
- Let the glue dry fully before moving the rod.
Wrap And Secure The Repair
After the glue dries, wrap the repaired spot to hold it tight. Use strong thread or fishing line to wrap the area firmly. This adds extra support.
| Material | Purpose | Tips |
| Thread or fishing line | Wraps crack tightly | Wrap evenly without gaps |
| Clear tape (optional) | Protects thread | Use after wrapping |
| Scissors | Cut thread | Trim ends cleanly |
Repair Complete Breaks
Fixing a complete break in a fishing rod takes care and the right tools. You need to join the broken pieces firmly. This guide helps you repair the rod so it works like new.
Follow these steps carefully to make sure your rod stays strong after the repair. Use proper materials and take your time aligning and sealing the break.
Align The Broken Sections
Start by matching the broken parts exactly. The rod pieces must fit together without gaps. Check the line guides to make sure they line up straight. Use tape or a clamp to hold the sections steady while you work.
Use A Rod Repair Sleeve Or Insert
A repair sleeve or insert strengthens the broken area. You can use a metal or fiberglass sleeve that fits inside or outside the rod. Slide the sleeve over the break to hold both parts tightly.
- Measure the break length to choose the right sleeve size.
- Trim the sleeve if it is too long.
- Clean the rod ends before placing the sleeve.
- Test fit the sleeve for a snug fit.
- Remove the sleeve and get ready for epoxy.
Epoxy Application And Wrapping
Use a strong epoxy to glue the rod and sleeve together. Spread the epoxy evenly on both rod ends and inside the sleeve. Push the pieces together and wipe off extra glue.
| Material | Purpose | Tips |
|---|---|---|
| Epoxy Resin | Bond the broken sections | Use slow cure for better work time |
| Rod Repair Sleeve | Strengthen joint | Choose correct diameter |
| Thread Wrapping | Secure epoxy and sleeve | Wrap tightly and evenly |
| Clear Finish | Protect wrap and epoxy | Apply thin coats after drying |
After gluing, wrap the break with strong thread. This keeps the joint tight while the epoxy cures. Let the rod dry fully before using it. Adding a clear finish over the wrap will protect the repair.

Credit: www.youtube.com
Reinforce And Finish
Fixing a broken fishing rod needs care to make it strong again. You must reinforce the break and finish it well.
This part helps your rod last longer and work like new after repair.
Add Protective Coating
Protective coating covers the repair and stops damage. It keeps water and dirt away from the fixed area.
Use clear epoxy or resin for the coating. It makes the rod smooth and strong again.
- Apply a thin layer over the repair
- Cover all cracks and joins
- Use a brush for even coating
- Wear gloves to keep hands clean
Allow Proper Drying Time
Drying time is important. It lets the coating harden fully and makes the repair strong.
Keep the rod still in a safe place while it dries. Avoid touching or moving it to stop damage.
- Check the product instructions for drying time
- Usually, allow 24 hours to dry completely
- Keep the rod away from dust and moisture
- Do not rush using the rod before drying
Test The Repaired Rod
After fixing your fishing rod, testing it is very important. This helps you see if the repair worked well.
Testing shows if the rod is strong and flexible enough for fishing again.
Check Flexibility And Strength
Bend the rod gently to check its flexibility. It should bend smoothly without cracking or feeling too stiff.
- Hold the rod firmly at the base.
- Slowly apply pressure to bend the tip.
- Look for any cracks or weak spots.
- Note how the rod returns to its normal shape.
- Make sure it feels strong enough to handle fish.
Make Adjustments If Needed
If the rod feels weak or too stiff, you need to adjust the repair. Fix any cracks or add more glue to weak spots.
| Problem | Cause | Adjustment |
|---|---|---|
| Rod is too stiff | Excess glue or tight wrapping | Remove some glue; loosen wrapping |
| Rod cracks when bent | Weak repair or damaged area | Apply stronger glue; reinforce with tape |
| Rod does not return to shape | Improper alignment or damage | Realign rod parts; re-glue joints |
Prevent Future Damage
Fixing a broken fishing rod is important, but preventing new damage saves time and money. Taking good care of your rod helps it last longer.
Simple habits can protect your fishing rod from breaking again. Proper storage and careful handling are key steps.
Proper Storage Tips
Store your fishing rod in a safe place to avoid damage. Keep it away from heavy objects that might fall on it.
Use a rod holder or rack to keep your rod straight and secure. Avoid leaning it against walls or leaving it on the floor.
- Store rods vertically or horizontally on a rack
- Keep rods in a cool, dry place to avoid warping
- Use rod covers or tubes for extra protection during travel
- Avoid storing rods near heat sources or direct sunlight
Handling And Maintenance Advice
Handle your fishing rod gently to prevent cracks or breaks. Avoid bending it too much or putting pressure on weak spots.
Clean your rod regularly to remove dirt and salt that can cause damage. Check guides and reel seats for wear and tear.
- Carry the rod in two pieces when possible to reduce stress
- Use a rod sock to protect the rod during transport
- Inspect guides and wraps for cracks and fix them quickly
- Dry the rod completely before storing to prevent rust

Credit: www.amazon.ca
Frequently Asked Questions
How Do I Fix A Broken Fishing Rod Tip?
To fix a broken rod tip, first remove the damaged tip carefully. Measure and purchase a replacement tip matching the rod size. Use hot glue or epoxy to attach the new tip. Allow it to dry fully before using the rod again.
Can I Repair A Cracked Fishing Rod Blank?
Yes, you can repair a cracked rod blank by sanding the damaged area. Apply a fiberglass wrap with epoxy resin over the crack. Let it cure completely to restore strength. This method helps prolong the rod’s life and prevents further damage.
What Tools Are Needed To Repair A Fishing Rod?
Essential tools include replacement tips, epoxy glue, sandpaper, a knife, and fiberglass wrap. These help remove damaged parts, smooth surfaces, and securely bond repairs. Having the right tools ensures a durable and professional-looking fishing rod repair.
Is Fishing Rod Repair Cost-effective Compared To Replacement?
Repairing a fishing rod is often cheaper than buying a new one. Small damages like broken tips or cracked blanks can be fixed easily. Repairing saves money and retains your favorite rod’s performance and feel. However, severe damage might require replacement.
Conclusion
Fixing a broken fishing rod is easier than you think. Gather your tools. Follow each repair step carefully. Ensure you have the right materials. Patience is key. Inspect your rod for any hidden damage. Practice makes perfect. Soon, you’ll be back to fishing.
Enjoy the calm of the water. Feel proud of your handiwork. Repair skills are useful for any angler. Keep learning and improving. Remember, a fixed rod lasts longer. Happy fishing adventures await!