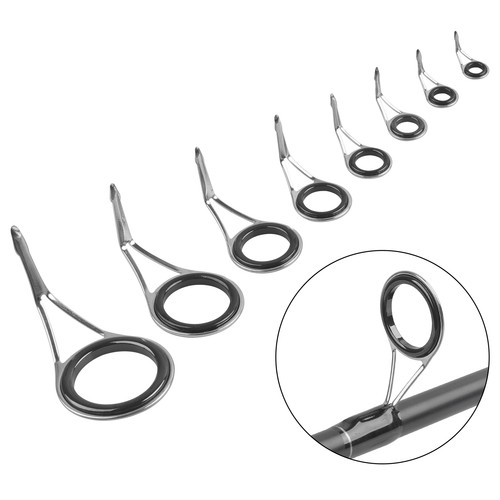
If you’ve ever noticed a damaged eye on your fishing rod, you know how frustrating it can be. That small ring plays a big role in casting smoothly and protecting your line.
Ignoring a broken or bent eye can lead to snapped lines and missed catches. But don’t worry—you don’t have to buy a new rod or pay for expensive repairs. In this guide, you’ll learn simple, step-by-step methods to fix your fishing rod’s eye quickly and effectively.
Keep reading to save your gear and get back to fishing with confidence.
Common Eye Damage Types
Fishing rod eyes are small but important parts. They guide the fishing line during casting and reeling.
Over time, eyes can get damaged from use or weather. This damage affects fishing performance.
Cracks And Breaks
Cracks and breaks happen when the eye hits hard objects or is bent too far. This damage can cut or snag the fishing line.
Small cracks may be hard to see but still cause problems. Broken eyes need to be replaced quickly to avoid line damage.
Loose Or Missing Eyes
Loose eyes wobble or move on the rod. Missing eyes leave gaps that can tangle the line or cause it to rub against the rod blank.
- Loose eyes usually result from worn wraps or glue failure.
- Missing eyes often happen after a strong impact or corrosion.
- Fix loose eyes by re-wrapping and gluing or replacing the entire guide.
- Replace missing eyes with new guides to keep the rod safe.
Corrosion And Rust
Corrosion and rust form when metal parts stay wet or are exposed to saltwater. This weakens the eye frame and roughens the ring inside.
| Cause | Effect |
| Saltwater exposure | Rust on metal parts |
| Improper drying | Corrosion and weakening |
| Old age | Surface roughness and cracks |
| Damage risk | Line fraying and breakage |

Credit: www.reddit.com
Tools And Materials Needed
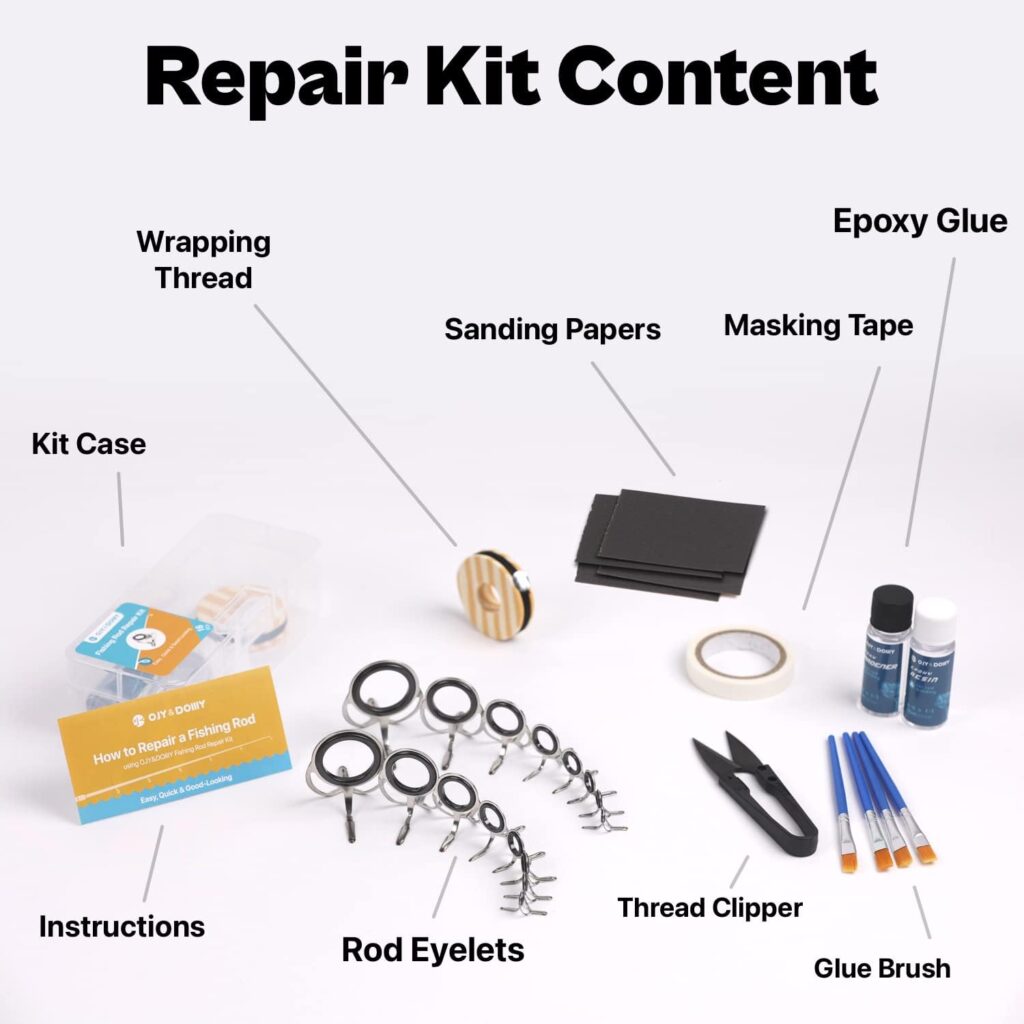
Fixing the eye on a fishing rod requires some specific tools and materials. You need the right parts to make a strong repair.
This guide explains what you need for replacement eyes, thread and glue, and basic tools.
Replacement Eyes
Replacement eyes are the small rings at the end of the rod that guide the fishing line. Choose eyes that match your rod size and type. You can find these at fishing stores or online.
- Pick the correct size for your rod tip.
- Buy a set with a metal or ceramic ring.
- Check if the eye fits the rod tip snugly.
- Have extra eyes in case of mistakes.
Thread And Glue
You need special thread and glue to attach the replacement eye firmly. The thread wraps around the rod and eye to hold it tight.
| Material | Purpose |
| Rod wrapping thread | Secures the eye to the rod |
| Epoxy glue | Coats the thread to protect and harden |
| Super glue (optional) | Helps hold the eye in place before wrapping |
Basic Tools
Besides materials, you need some basic tools to repair the eye on your fishing rod. These tools help with cutting, holding, and finishing the repair.
- Sharp scissors or a small knife to cut thread
- Tweezers to hold small parts
- Small paintbrush to apply glue or epoxy
- Sandpaper to smooth rough spots on the rod
- Clamps or tape to hold the eye while the glue dries
Removing The Damaged Eye
Fishing rods need maintenance for optimal performance. A damaged eye can affect your casting. Here is how to remove the damaged eye.
Follow these steps carefully to ensure your rod stays in good shape. Removing the eye properly is crucial.
Cutting Old Thread
The thread holds the eye to the rod. You need to cut it off carefully. Use a sharp blade for precise cuts.
Be gentle to avoid damaging the rod. Cutting too deep can harm the rod’s surface.
- Use a utility knife or blade
- Cut along the thread line
- Remove thread slowly
Cleaning The Rod Surface
After removing the old eye, clean the rod surface. This ensures the new eye attaches well.
Dirt and old glue can hinder the new eye’s fit. Clean the area thoroughly for best results.
- Use rubbing alcohol for cleaning
- Wipe with a soft cloth
- Ensure surface is smooth
Credit: collegeofems.com
Attaching The New Eye
Replacing the eye on a fishing rod requires careful attachment. The new eye must be positioned and secured firmly. Follow these steps for a strong and lasting fix.
Use the right tools and materials to ensure the eye stays in place during fishing. Attention to detail will help the rod perform well.
Positioning The Eye
Place the new eye in the same spot as the old one. Align it carefully along the rod’s length. Check that the eye ring is straight and centered.
- Match the height of the old eye on the rod.
- Keep the eye facing the same direction as before.
- Hold the eye steady to avoid shifting during wrapping.
Wrapping The Thread
Wrap the thread tightly around the rod and eye foot. This holds the eye firmly in place. Use even, smooth turns to build strong support.
| Wrapping Tip | Description |
| Start | Begin wrapping a few millimeters before the eye foot. |
| Tension | Keep thread tight but not so tight it cuts into the rod. |
| Layers | Wrap multiple layers for better strength and stability. |
| Finish | End wrapping a few millimeters past the eye foot. |
Applying Glue
Glue the wrapped thread to keep it from unraveling. Use a strong adhesive made for fishing rods or epoxy resin.
- Apply glue evenly over the thread wraps.
- Let the glue soak into the thread for better hold.
- Allow the glue to dry completely before using the rod.
Finishing Touches
Repairing the eye on a fishing rod takes care and patience. The final steps ensure the repair lasts long and works well.
These finishing touches protect the repair and help the rod perform like new again.
Smoothing The Wrap
After wrapping the thread around the eye, smooth the wrap carefully. Use your fingers or a soft cloth to press the thread down.
This removes bumps and makes the wrap tight and neat. A smooth wrap helps the coating stick better and looks clean.
Curing Time
Let the repair dry completely before using the rod. The curing time depends on the glue or epoxy used.
Usually, it takes 24 hours to fully cure. Keep the rod in a dry, warm place during this time.
- Check the product label for exact curing time
- Avoid moving the rod while drying
- Do not expose the repair to water before it cures
Testing The Repair
After curing, test the repaired eye gently. Check if it feels strong and holds the fishing line well.
Try bending the rod carefully to see if the repair stays solid. If it does, your repair is ready for fishing.
- Inspect the wrap for any loose threads
- Run the fishing line through the eye slowly
- Look for cracks or weak spots before fishing
Maintenance Tips To Prevent Damage
Fishing rods need care to last longer. The eye on the rod can get damaged easily. Proper maintenance helps keep it strong and safe.
Follow simple steps to avoid damage. Regular care saves money and time on repairs.
Regular Inspection
Check the rod’s eye often for cracks or bends. Look for signs of rust or loose parts. Early detection stops bigger problems.
Use a soft cloth to clean the eye after each use. Remove dirt and salt to keep it smooth.
- Look closely at the eye before and after fishing
- Check for cracks, bends, or rough edges
- Clean with a soft cloth to remove dirt and salt
- Replace damaged eyes quickly to avoid line damage
Proper Storage
Store your fishing rod in a safe place. Avoid places where the rod can bend or fall. Keep it dry to stop rust.
Use rod holders or racks to keep the rod straight. Cover the eye to protect it from dust and scratches.
- Keep rods upright or flat on a rack
- Avoid stacking rods on top of each other
- Store rods in a dry area with good airflow
- Cover the eye with protective caps or cloth
Avoiding Rough Handling
Handle the rod gently during use and transport. Avoid dropping or hitting the rod on hard surfaces. Rough handling can break the eye.
Be careful when casting and retrieving. Do not pull the line too hard if it snags. Use smooth and steady movements.
- Carry the rod with both hands for support
- Do not lean the rod against hard surfaces
- Use rod cases for travel and storage
- Release the line gently to avoid sudden jerks

Credit: www.jokersclays.com
Frequently Asked Questions
How Do I Know If My Fishing Rod Eye Is Damaged?
Check for cracks, bends, or missing rings in the eye. If the line frays or catches, the eye likely needs repair or replacement.
What Tools Do I Need To Repair A Fishing Rod Eye?
You will need replacement guides, epoxy glue, a small file, sandpaper, and a rod wrapping thread. These tools help secure the new eye properly.
Can I Repair A Fishing Rod Eye At Home?
Yes, repairing a rod eye at home is possible with the right tools and patience. Follow step-by-step guides for best results.
How Long Does It Take To Fix A Fishing Rod Eye?
Repairing a rod eye typically takes 30 to 60 minutes, including drying time for epoxy adhesive.
Conclusion
Fixing the eye on your fishing rod saves money and time. A strong, well-done repair keeps your rod working well. Use the right tools and materials for the best results. Take your time and follow the steps carefully. A good repair helps you catch more fish with less worry.
Keep your fishing gear ready for every trip. Practice these tips, and enjoy fishing without trouble. Simple fixes can make a big difference.