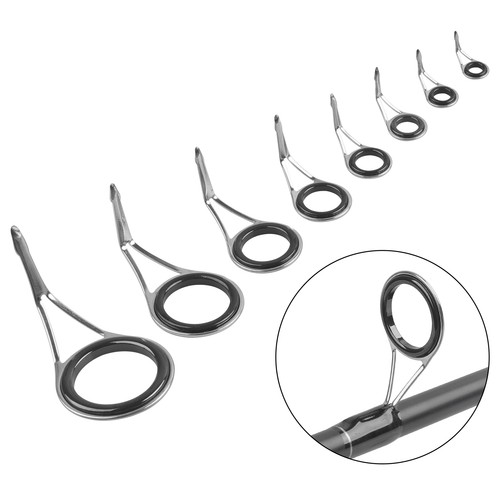
Have you ever been out fishing, only to notice the eye on your fishing rod is damaged or broken? It can be frustrating and might even ruin your entire trip.
But don’t worry—fixing this small part can save your rod and get you back on the water quickly. In this guide, you’ll learn simple, step-by-step tips to repair the eye on your fishing rod yourself. By the end, you’ll feel confident handling this common problem and avoiding costly replacements.
Ready to keep your fishing gear in top shape? Let’s dive in.
Tools Needed
Repairing the eye on a fishing rod requires some basic tools. Having the right tools makes the repair easier and more effective.
This guide lists the essential tools you will need to fix the eye of your fishing rod properly.
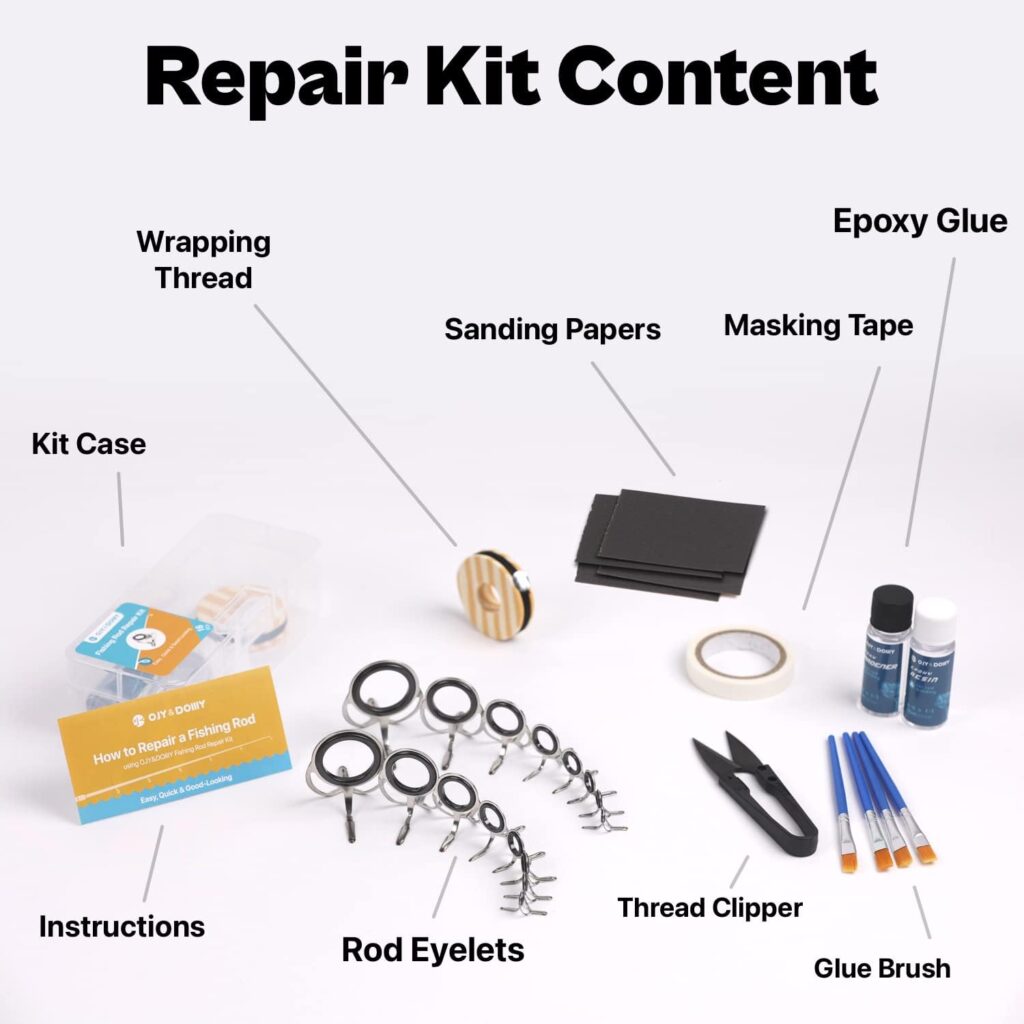
Replacement Rod Eye
You need a new rod eye that matches the size of the broken or damaged one. Measure the old eye before buying a replacement.
Rod Wrapping Thread
Rod wrapping thread holds the rod eye in place. Choose a strong thread that matches your rod’s color for a neat finish.
Epoxy Or Rod Finish
Epoxy or rod finish seals the thread and secures the rod eye. It protects the repair from water and wear.
Tools For Wrapping And Cleaning
- Small scissors or thread cutters to trim the wrapping thread
- Sandpaper to smooth the rod surface before wrapping
- Razor blade or knife to remove old thread and epoxy
- Brush to apply epoxy or rod finish
- Tape to hold the eye in place temporarily
Additional Tools
| Tool | Purpose |
| Heat Source (lighter or heat gun) | Helps cure epoxy faster |
| Measuring Tape | Measures rod eye size |
| Tweezers | Handles small thread ends |
| Cloth | Cleans rod surface before repair |

Credit: www.thehulltruth.com
Identifying Eye Damage
The eye on a fishing rod guides the fishing line along the rod. It helps to cast and reel in fish smoothly. Damage to the eye can cause line breaks or poor casting.
Knowing how to spot eye damage early can save your rod and improve fishing success. Look closely at the eye before each trip.
Types Of Damage
Fishing rod eyes can suffer from several types of damage. These include cracks, chips, bends, and corrosion. Each type affects the rod’s performance differently.
- Cracks:Tiny breaks in the eye surface that can cut the fishing line.
- Chips:Small pieces missing from the eye ring, causing rough edges.
- Bends:Eyes that no longer sit straight, misguiding the line.
- Corrosion:Rust or wear on metal parts that weakens the eye.
When To Repair Or Replace
Deciding to repair or replace the rod eye depends on damage severity. Small cracks may be fixed, but large damage often means replacement is better.
| Damage Type | Repair Possible | Replace Recommended |
| Small Cracks | Yes | No |
| Large Cracks or Chips | No | Yes |
| Bent Eyes | Sometimes | Usually |
| Corrosion | No | Yes |
Removing The Damaged Eye
Fixing a fishing rod starts with removing the damaged eye. This part guides you through the process carefully. You need patience and the right tools.
Focus on loosening the wrap first. Then, detach the damaged eye from the rod. Follow the steps to avoid harming the rod.
Loosening The Wrap
The eye is held by thread wraps coated with epoxy. Loosen these wraps before removing the eye. Use gentle heat and careful tools to protect the rod.
- Use a heat gun or hair dryer to warm the wrap gently.
- Apply heat evenly around the wrap area.
- Let the epoxy soften for a few minutes.
- Use a sharp blade or hobby knife to cut the softened wrap carefully.
- Peel the thread wrap slowly without pulling hard.
Detaching The Eye
After loosening the wrap, the eye guide is ready to be removed. Handle it carefully to avoid damage to the rod blank.
| Tool | Purpose | Tip |
| Needle-nose pliers | Grip the eye firmly | Hold the frame gently to prevent bending |
| Small flat screwdriver | Lift the eye base if stuck | Use light pressure to avoid scratches |
| Rubbing alcohol | Clean residue after removal | Apply with a soft cloth |
Preparing For Installation
Fixing the eye on a fishing rod needs careful preparation. Proper steps make the repair last longer.
Start by getting the rod ready and choosing the right replacement eye. These steps help the installation go smoothly.
Cleaning The Rod
Clean the area around the broken eye before installing a new one. Dirt and old glue can stop the new eye from fitting well.
- Wipe the rod with a dry cloth to remove dust.
- Use rubbing alcohol on a cloth to clean sticky glue spots.
- Let the rod dry completely before moving on.
Selecting A Replacement Eye
Choosing the right eye is key. It must match the rod’s size and type for good fishing performance.
| Type of Rod | Eye Size Needed | Material |
| Light Spinning | Small (4-8 mm) | Stainless Steel |
| Medium Casting | Medium (8-12 mm) | Aluminum Oxide |
| Heavy Surf | Large (12-20 mm) | Ceramic |
Installing The New Eye
Replacing a damaged eye on a fishing rod is important for good casting. Installing the new eye carefully keeps the rod strong and balanced.
This guide will explain how to position the new eye and use wrapping techniques for a secure fit.
Positioning The Eye
Place the new eye exactly where the old one was. This keeps the line running straight along the rod.
Make sure the eye sits flat and lines up with the other eyes on the rod. Check the angle from different views.
- Remove old glue and clean the area well
- Set the new eye on the rod
- Align it with other eyes for a straight line
- Hold it steady before wrapping
Wrapping Techniques
Use strong thread to wrap the eye firmly to the rod. Tight wrapping stops the eye from moving or falling off.
Wrap the thread evenly around the foot of the eye. Cover the entire base with tight, close wraps for best hold.
- Start with a small anchor wrap on the rod
- Wrap around the eye foot tightly
- Keep wraps close without gaps
- Finish with a secure knot or whip finish
- Apply epoxy to seal and protect wraps
Credit: collegeofems.com
Sealing And Finishing
Fixing the eye on your fishing rod is important for its strength and durability. After the repair, sealing and finishing protect the rod from water and damage.
This guide covers how to apply epoxy and tips for drying the repaired eye properly.
Applying Epoxy
Use a good quality epoxy to seal the repaired eye. It keeps the parts together and stops water from getting inside.
- Mix the epoxy resin and hardener in equal parts.
- Use a small brush to apply a thin, even layer on the repaired area.
- Cover the wraps and the eye seat carefully.
- Remove any bubbles with the brush or a toothpick.
- Apply a second coat if needed after the first dries.
Drying Tips
| Condition | Advice |
| Temperature | Keep between 70°F and 80°F (21°C – 27°C) |
| Humidity | Low humidity is best to avoid cloudiness |
| Position | Lay rod flat or hang to prevent epoxy runs |
| Time | Let dry at least 24 hours before use |
Do not touch the epoxy while drying. Avoid moving the rod to keep the epoxy smooth and strong.
Testing The Repair
After fixing the eye on your fishing rod, testing the repair is important. This ensures the rod works well and lasts longer.
Two key areas to check are the alignment of the eye and the durability of the repair. Each part affects your fishing experience.
Checking Alignment
Look closely to see if the repaired eye lines up with the other guides on the rod. Proper alignment helps the fishing line move smoothly.
- Place the rod on a flat surface.
- Look along the length of the rod from the handle to the tip.
- Check that the repaired eye matches the line path of the other eyes.
- Adjust slightly if the eye is off-center or tilted.
- Make sure the line can pass through without catching or twisting.
Ensuring Durability
Test the strength of the repair to avoid problems while fishing. The eye should stay fixed under pressure and use.
| Test Type | What to Do | What to Check |
| Flex Test | Bend the rod gently near the repaired eye. | See if the eye stays in place without moving or cracking. |
| Line Test | Thread the fishing line through the eye and pull lightly. | Watch for any looseness or damage to the repair. |
| Water Test | Dip the repaired area in water and dry it. | Check that the repair does not weaken or peel when wet. |
Maintenance Tips
Proper care of your fishing rod’s eye ensures longer use and better performance. Small damages can cause big problems if ignored.
Regular maintenance keeps your gear ready and prevents costly repairs. Learn how to inspect and protect your rod’s eye.
Regular Inspection
Check the eye of the fishing rod after every trip. Look for cracks, bends, or corrosion that could weaken it.
- Run your finger gently around the eye ring to feel for rough spots.
- Use a magnifying glass to spot tiny cracks or rust.
- Test the eye’s firmness by lightly shaking the rod tip.
- Look for loose or missing wraps that hold the eye in place.
Preventing Future Damage
Protect the eye by following simple habits and using proper storage methods. This stops damage before it starts.
| Tip | Reason |
| Clean the eye after use | Removes salt and dirt |
| Store rods vertically | Prevents bending or warping |
| Use rod covers | Protects from scratches and impacts |
| Avoid dragging the rod | Prevents wear on the eye |

Credit: www.reddit.com
Frequently Asked Questions
How Do I Fix A Broken Eye On A Fishing Rod?
To fix a broken eye, first remove the damaged guide carefully. Clean the area, then use epoxy to attach a new guide. Align it properly and let the epoxy cure for 24 hours. This ensures durability and smooth line movement.
What Tools Are Needed To Repair A Fishing Rod Eye?
You need a replacement guide, epoxy resin, a razor blade, sandpaper, and a small brush. These tools help remove the old guide, prepare the rod, and securely attach the new eye for a lasting repair.
Can I Repair A Fishing Rod Eye At Home?
Yes, you can repair a fishing rod eye at home using simple tools and materials. Follow step-by-step instructions carefully. Patience and precision are key to restoring your rod’s functionality and extending its lifespan.
How Long Does It Take To Repair A Fishing Rod Eye?
Repairing a fishing rod eye typically takes 30 to 60 minutes. However, curing epoxy requires about 24 hours for a strong bond. Total time depends on drying conditions and repair complexity.
Conclusion
Repairing the eye on a fishing rod is straightforward. Gather your tools and materials. Follow step-by-step instructions carefully. Ensure each step is completed with precision. Patience is key to success. Practice makes you better over time. Your rod will work great again.
Enjoy fishing with a repaired rod. Share this guide with fellow anglers. They might find it helpful too. Happy fishing!