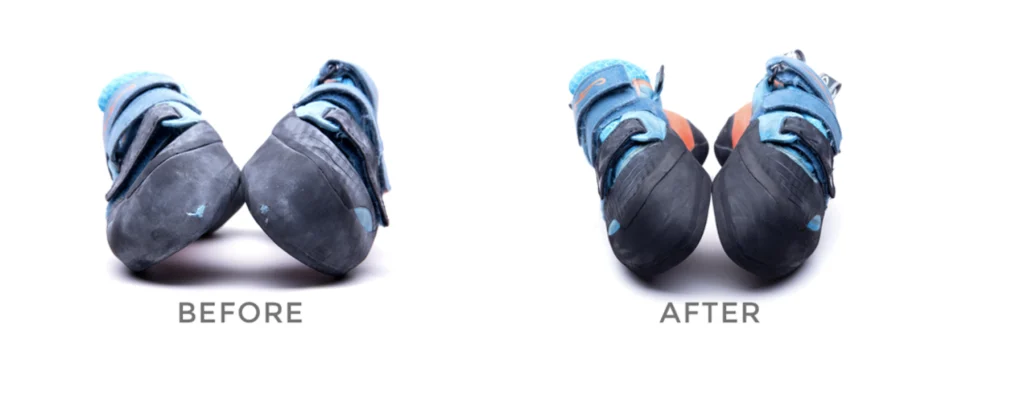
Your climbing shoes have carried you through countless climbs, but now the worn-out soles are holding you back. You might think it’s time to buy a new pair, but what if you could bring your favorite shoes back to life?
Learning how to resole climbing shoes can save you money and keep your trusted gear performing like new. In this guide, you’ll discover simple steps to extend the life of your shoes, so you can climb with confidence and comfort again.
Ready to give your shoes a second chance? Let’s dive in.
When To Resole Climbing Shoes
Climbing shoes wear out over time, especially on the sole. Resoling them keeps your grip strong and safe. Knowing when to resole saves money and keeps your shoes working well.
This guide explains the signs of wear and tear and how to time your resole correctly.
Signs Of Wear And Tear
Look for these signs to know if your climbing shoes need resoling:
- The rubber sole is worn thin or has holes.
- Edges of the sole start to peel away from the shoe.
- The shoe feels less sticky on holds.
- Excessive wear at the toe or heel areas.
- Visible cracks or splits in the sole rubber.
Timing Your Resole
Resoling at the right time keeps your shoes effective and prevents damage. Use this table to decide when to resole based on how often you climb and the shoe condition.
| Climbing Frequency | Signs to Check | Resole Timing |
| Once a week | Thin sole, less grip | Every 12-18 months |
| Several times a week | Holes, peeling edges | Every 6-12 months |
| Daily or intense use | Cracks, sole damage | Every 3-6 months |

Credit: www.theclimbingguy.com
Choosing The Right Sole Material
Resoling climbing shoes is important to maintain performance. The right sole material ensures good grip and durability.
Different types of rubber offer various benefits. Understanding them helps you choose the best for your needs.
Types Of Rubber For Climbing
Rubber types vary in stickiness, durability, and thickness. Selecting the right one improves climbing experience.
- Stealth Rubber: Offers great grip, perfect for bouldering.
- Vibram XS Grip2: Known for high performance on sport routes.
- Five Ten C4: Balances durability and stickiness well.
Matching Sole To Climbing Style
Climbing style influences the best sole choice. Different activities need different rubber properties.
Consider what type of climbing you do most. This helps in picking the right sole material.
- Indoor Climbing: Softer rubber for better grip.
- Trad Climbing: Durable rubber for rough surfaces.
- Sport Climbing: Balance between grip and durability.
Preparing Shoes For Resole
Before resoling climbing shoes, you need to prepare them carefully. Good preparation helps the new sole stick well.
This guide covers cleaning the shoes and removing old soles to get ready for resoling.
Cleaning The Shoes
Clean your climbing shoes to remove dirt and sweat. This makes the resole process easier and more effective.
- Use a soft brush to remove loose dirt from the surface.
- Wipe the inside and outside with a damp cloth.
- Let the shoes dry completely before starting work.
- Do not use harsh chemicals or soak the shoes in water.
Removing Old Soles
Old soles need to be removed carefully to avoid damaging the shoe. This step prepares the shoe for a clean new sole application.
| Tool | Purpose |
| Heat Gun | Softens glue under the sole |
| Utility Knife | Separates sole from shoe upper |
| Flat Screwdriver | Helps pry the sole off gently |
| Sandpaper | Removes leftover glue for a smooth surface |
Step-by-step Resole Process
Resoling climbing shoes lets you extend their life and keep good grip. It is a careful process that needs the right tools and steps.
This guide shows how to resole climbing shoes with clear steps to follow at home or in a workshop.
Cutting The New Sole
Start by removing the old sole carefully. Use a sharp knife to cut along the edge without damaging the shoe.
Place the old sole on the new rubber sheet and trace its shape. Cut the new sole with scissors or a utility knife.
Applying Adhesive
Choose a strong glue made for rubber and leather. Apply a thin, even layer on both the shoe sole and the new rubber sole.
- Use a brush or small spatula for spreading glue.
- Let the glue dry until it feels tacky, usually 5 to 10 minutes.
- Avoid thick layers to prevent lumps or poor bonding.
Attaching The Sole
Align the new sole with the shoe carefully. Press firmly to attach the sole without air bubbles or gaps.
| Tool | Use |
|---|---|
| Clamps | Hold the sole tightly in place while glue sets |
| Roller | Press the sole evenly for strong bonding |
| Weights | Apply steady pressure when clamps are not available |
Keep the shoe clamped or weighted for several hours. This helps the glue set fully and the sole bond firmly.
Shaping And Finishing
After the glue dries, trim any extra rubber around the sole edge. Use a sharp knife for clean cuts.
- Check the sole edge for smoothness.
- Use sandpaper to smooth rough spots gently.
- Test the shoe fit and comfort before use.
Diy Vs Professional Resole
Climbing shoes wear out over time, especially the soles. Resole helps extend their life. You can choose to resole them yourself or hire a professional. Both options have benefits and drawbacks.
This guide compares DIY and professional resoling. It covers the pros and cons of doing it yourself and when to seek expert help.
Pros And Cons Of Diy
Doing your own resole saves money but needs skills and tools. You control the timing and process. Yet, mistakes can damage shoes.
- Pros:
- Lower cost than professional service
- Quick turnaround if you have tools
- Learn new skills and understand your shoes better
- Can customize sole thickness and pattern
- Cons:
- Requires special glue and rubber
- Needs proper equipment like sanding tools
- Risk of poor adhesion or uneven soles
- Time-consuming for beginners
- May void shoe warranty
When To Seek Experts
Professional resolers have experience and tools. They offer reliable results and can handle complex repairs. Some situations call for expert help.
| Situation | Reason to Choose Professional |
| Expensive or favorite shoes | Ensure quality and avoid damage |
| Severe sole wear or damage | Specialized repair techniques needed |
| No access to tools or materials | Professionals have all supplies |
| Time constraints | Faster and guaranteed service |
| Want warranty or resale value | Professional resole maintains value |
Credit: www.uncarvedblock.com.au
Maintaining Shoes After Resole
Resoling climbing shoes can extend their life. Proper care after resoling keeps them performing well. Clean and store shoes right to maintain grip and comfort.
Ignoring maintenance may cause damage. Follow simple steps to keep your shoes in good shape after resoling.
Proper Cleaning Techniques
Clean your climbing shoes regularly to remove dirt and sweat. Use gentle methods to avoid harming the new sole or upper materials.
- Use a soft brush to remove dirt from the sole and fabric.
- Wipe the shoes with a damp cloth; avoid soaking them.
- Use mild soap if needed, but rinse thoroughly.
- Air dry shoes away from direct sunlight or heat sources.
- Do not machine wash or dry, as this damages the shoes.
Storage Tips For Longevity
Store your climbing shoes properly to keep their shape and performance. Good storage prevents odors and material breakdown.
| Storage Tip | Reason |
| Keep shoes in a cool, dry place | Prevents mold and material damage |
| Use shoe trees or stuff with newspaper | Maintains shape and absorbs moisture |
| Avoid sealed plastic bags | Allows shoes to breathe and dry |
| Store away from direct sunlight | Prevents fading and sole hardening |
Common Mistakes To Avoid
Resoling climbing shoes can save money and extend their life. Doing it wrong can damage the shoes. Avoid these common mistakes to get good results.
Using the wrong glue or placing the sole poorly can cause problems. Learn what to watch out for during resoling.
Improper Adhesive Use
Using the wrong adhesive can make your climbing shoes fail fast. Some glues do not hold well on rubber or leather.
Too much glue or not enough can cause weak bonds. The glue must be spread evenly and in the right amount.
- Do not use craft glue or wood glue.
- Use adhesive made for rubber or shoes.
- Apply glue thinly and evenly.
- Allow glue to become tacky before pressing parts together.
- Clamp shoes firmly during drying time.
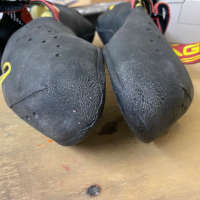
Incorrect Sole Placement
Placing the new sole wrong can affect shoe fit and performance. The sole must match the shoe’s shape perfectly.
A sole too small or too large can peel off quickly. Check the sole edges carefully before gluing it on.
- Cut the new sole to match the old one exactly.
- Align the sole carefully before gluing.
- Make sure the toe and heel areas fit well.
- Trim any extra sole material after gluing if needed.
- Avoid gaps between shoe and sole.

Credit: www.reddit.com
Frequently Asked Questions
How Often Should I Resole Climbing Shoes?
Resole climbing shoes when the rubber sole wears thin or peels. Typically, this is after 50-100 climbing sessions. Frequent climbers may need resoling more often. Regular checks help maintain grip and safety. Ignoring wear reduces performance and shoe lifespan.
Can I Resole Climbing Shoes At Home?
Yes, you can resole climbing shoes at home with proper tools. However, it requires skill and patience for good results. Many prefer professional resoling for durability and fit. Home resoling suits minor repairs or budget-conscious climbers.
What Materials Are Used For Climbing Shoe Resoling?
Climbing shoe resoling mainly uses sticky rubber soles like Vibram XS Edge. The rubber is durable and provides excellent grip. Glue and strong adhesive tape secure the sole. High-quality materials ensure performance and longevity.
How Much Does Professional Climbing Shoe Resoling Cost?
Professional resoling typically costs between $30 and $60. Prices vary by shoe type, sole material, and shop location. Some shops offer quick turnaround or warranty on resoling. Investing in professional resoling extends shoe life and climbing safety.
Conclusion
Resoling climbing shoes saves money and extends their life. You can keep climbing without buying new shoes often. Follow the steps carefully for best results. Use the right materials for a strong, lasting sole. Take your time and work with patience.
Your shoes will feel almost new again. Enjoy climbing with better grip and comfort. Small repairs make a big difference in performance. Try resoling to protect your favorite climbing shoes. Keep climbing safe, fun, and affordable.