
Ready to catch more fish on your next trip? Knowing how to rig up a fishing rod the right way can make all the difference between a frustrating day and a successful one.
Whether you’re new to fishing or looking to improve your skills, this guide will walk you through simple, step-by-step instructions to get your rod set up quickly and correctly. By the end, you’ll feel confident and prepared to cast like a pro.
Let’s dive in and make sure your next fishing experience is a great one!
Choosing The Right Rod And Reel
Picking the right fishing rod and reel helps you catch fish easier. It is important to know what type suits your fishing style.
This guide explains different rods and reels. It also shows how to match them for the best fishing experience.
Types Of Fishing Rods
Fishing rods come in many types. Each type works well for certain fish and fishing places.
Common types include spinning, baitcasting, and fly rods. Each has a special design for different fishing methods.
- Spinning rods:Easy to use, good for beginners and light lures.
- Baitcasting rods:Offer more control and power for bigger fish.
- Fly rods:Made for fly fishing with light lines and delicate casts.
Selecting The Best Reel
Reels hold the fishing line and help you catch fish. Choose a reel type that matches your rod and fishing style.
There are spinning, baitcasting, and spincast reels. Each works best with certain rods and fish sizes.
- Spinning reels:Good for light to medium fishing and easy to handle.
- Baitcasting reels:Provide more accuracy and power for bigger fish.
- Spincast reels:Simple design, great for beginners and kids.
Matching Rod And Reel
Matching your rod and reel ensures better balance and easier fishing. Use similar types for best results.
For example, pair a spinning rod with a spinning reel. This keeps your gear balanced and works smoothly.
- Spinning rod + spinning reel: Good for beginners and light fishing.
- Baitcasting rod + baitcasting reel: Best for control and heavy fishing.
- Fly rod + fly reel: Needed for fly fishing style.

Credit: mysterytacklebox.com
Essential Fishing Line Choices
Choosing the right fishing line is important for a good catch. Different lines have different strengths and uses.
This guide explains the main types of fishing lines and how to prepare your reel.
Monofilament Vs. Braided Line
Monofilament lines are made from a single nylon strand. They stretch more and are easier to handle. Braided lines have many fibers woven together. They are stronger and thinner but less stretchy.
- Monofilament: good for beginners, floats well, and is less visible underwater.
- Braided: better for heavy cover, lasts longer, and has less stretch.
- Choose based on the type of fish and water conditions.
Line Strength And Thickness
| Line Type | Strength (lbs) | Diameter (inches) |
| Monofilament | 6-20 | 0.012-0.030 |
| Braided | 10-50 | 0.008-0.020 |
Stronger lines hold bigger fish but are thicker. Thinner lines cast farther but can break easier.
How To Spool Your Reel
- Clean the reel and check for damage.
- Attach the line to the spool with a knot.
- Keep line tight and wind slowly to avoid twists.
- Fill the spool leaving some space at the top.
- Cut the line and secure it to the reel.
Proper spooling prevents tangles and helps your line last longer.
Attaching The Line To The Reel
Attaching the line to the reel is the first step in rigging your fishing rod. It helps you cast smoothly and catch fish better.
Using the right techniques ensures the line stays secure. This guide covers knot methods and how to stop the line from slipping.
Secure Knot Techniques
Tying a strong knot connects your line firmly to the reel spool. A weak knot can cause line breakage or loss of fish.
Loop the line around the spool.
Make a simple overhand knot.
Wrap the tag end around the standing line five times.
Pass the tag end through the loop near the spool.
Pull the knot tight and trim excess line.
Preventing Line Slippage
Line slippage causes frustration and lost catches. Prevent it by keeping tension and using the right knot.
| Tip | How It Helps |
|---|---|
| Keep line tight while tying | Keeps knot snug and secure |
| Use backing line on spool | Prevents thin line from slipping |
| Check knot regularly | Fixes looseness before fishing |
| Moisten knot before tightening | Reduces friction and damage |
Credit: greatdaysoutdoors.com
Tying Knots For Hooks And Lures
Tying strong knots is key to keeping your hook or lure secure. Good knots help prevent losing fish and gear. Here are three popular knots every angler should know.
Each knot fits different fishing situations. Practice these to find what works best for your setup.
Improved Clinch Knot
The Improved Clinch Knot is simple and strong. It works well for tying hooks or lures to the line. It holds tight and is easy to tie even in low light.
- Thread the line through the hook eye.
- Wrap the tag end around the standing line 5 to 7 times.
- Pass the tag end through the small loop near the eye.
- Then pass the tag end through the big loop formed.
- Moisten the knot and pull tight.
Palomar Knot
The Palomar Knot is very strong and easy to tie. It works great for braided or monofilament lines. It keeps the lure or hook secure with minimal line weakening.
| Action | Instructions |
|---|---|
| Double Line | Double 6 inches of line and pass through the hook eye. |
| Make Knot | Tie a loose overhand knot with the doubled line. |
| Pass Loop | Pass the loop over the hook or lure. |
| Tighten | Pull both ends slowly to tighten the knot. |
Loop Knot For Lures
The Loop Knot lets the lure move freely. It shows natural action in the water. Use it to give your lure a better swimming motion.
- Make an overhand knot in the line about 10 inches from the end.
- Pass the tag end through the lure eye.
- Pass the tag end through the overhand knot loop.
- Wrap the tag end around the standing line 4 to 5 times.
- Pass the tag end back through the overhand knot loop.
- Moisten and pull tight slowly.
Adding Weights And Bobbers
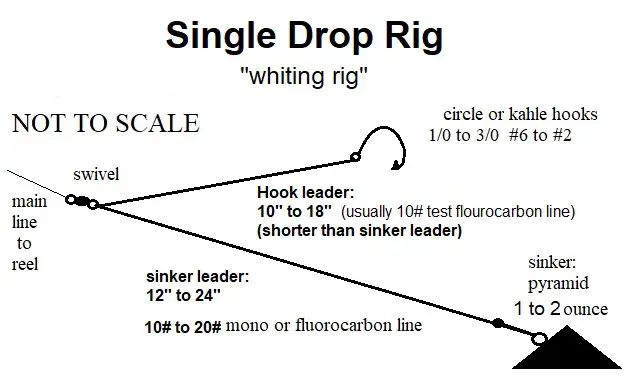
Rigging a fishing rod with weights and bobbers helps control the bait’s depth. This setup improves your chances of catching fish.
Weights make the bait sink faster, while bobbers keep it at a set depth. Both parts work together for better fishing.
Choosing The Right Sinkers
Sinkers add weight to your line, helping the bait reach the right depth. Pick the size based on water current and fish type.
Use smaller sinkers in calm water and larger ones in strong currents. Too much weight can scare fish away.
- Split shot sinkers: small and easy to add
- Egg sinkers: slide on the line for free movement
- Pyramid sinkers: good for sandy bottoms
- Bank sinkers: heavy and shaped for strong currents
Placing Bobbers For Depth Control
Bobbers hold your bait at the desired depth. Attach the bobber to the line above the hook to control where the bait floats.
Adjust the bobber’s position based on how deep the fish swim. Move it up for deeper water and down for shallow spots.
- Clip the bobber to the line securely
- Test the depth by lowering the bait in water
- Fine-tune the bobber’s position to match fish activity
- Watch the bobber for bites and movements
Selecting And Attaching Baits
Choosing the right bait is key to a good fishing trip. Baits attract fish and help catch them.
Knowing how to attach bait properly keeps it on the hook longer and makes fishing easier.
Live Vs. Artificial Baits
Live baits come from nature and move naturally in water. Artificial baits look like live ones but are made from plastic or rubber.
- Live Baits:worms, minnows, insects
- Artificial Baits:lures, soft plastics, spinners
Live baits attract fish by scent and motion. Artificial baits attract by color and shape.
Hooking Techniques
Hooking bait correctly helps fish bite and stay hooked. Different baits need different hooks.
| Type of Bait | Hooking Method | Tips |
| Worms | Thread worm onto hook from head to tail | Leave some worm wriggling free |
| Minnows | Hook through back or lips | Avoid piercing vital organs |
| Soft Plastic | Insert hook through head, then embed hook point | Keep bait straight on hook |
| Spinner Lures | Attach hook as designed | Check for sharpness regularly |
Testing Your Setup
After rigging your fishing rod, it is important to test your setup. This helps make sure everything works well before fishing.
Testing your setup can prevent problems and improve your fishing experience.
Line Tension Check
Check the tension of your fishing line by pulling it gently. The line should be tight but not too hard to pull.
Proper tension stops the line from tangling or breaking during fishing.
- Pull the line slowly from the reel
- Feel for smooth resistance
- Adjust if the line feels loose or too tight
Reel Drag Adjustment
The drag controls how much force the fish feels when pulling the line. Set the drag so it resists the fish but lets the line out smoothly.
Test the drag by pulling the line with your hand. Adjust the drag knob until you feel steady resistance without the line breaking.
- Turn drag knob clockwise to increase resistance
- Turn drag knob counterclockwise to reduce resistance
- Test by pulling line slowly after each adjustment
Casting Practice
Practice casting in an open area to check your setup’s performance. Watch how the line flows and the lure moves.
Good casting helps you place your lure where the fish are and avoids tangles or snags.
- Start with short casts to gain control
- Increase distance as you feel comfortable
- Adjust your grip and motion for smooth casts

Credit: mysterytacklebox.com
Maintenance Tips For Longevity
Keeping your fishing rod and reel in good shape helps them last longer. Regular care prevents damage and improves performance. Simple maintenance can save you money and hassle.
Learn how to clean and store your fishing gear properly. These tips protect your setup from wear and tear over time.
Cleaning Your Rod And Reel
Cleaning your rod and reel after each use removes dirt, salt, and grime. Saltwater fishing especially requires thorough rinsing to avoid corrosion. Use fresh water and soft cloths for best results.
- Rinse the rod and reel with fresh water gently.
- Use a soft brush or cloth to clean tight spots.
- Dry all parts fully before storage.
- Apply reel oil or grease to moving parts as recommended.
- Check guides and line for damage during cleaning.
Storing Your Setup Properly
Proper storage keeps your fishing rod and reel safe from damage. Avoid leaning rods against walls or leaving them in direct sunlight. Store them in a dry place to prevent rust and warping.
| Storage Tip | Reason |
| Use rod holders or racks | Prevents bending and warping |
| Keep reels covered | Keeps dust and dirt away |
| Store in a cool, dry place | Stops rust and mold growth |
| Loosen drag on reels | Protects internal parts |
Frequently Asked Questions
What Are The Basic Steps To Rig Up A Fishing Rod?
Start by attaching the reel to the rod. Next, thread the fishing line through the guides. Tie the hook or lure securely. Finally, add weights or bobbers if needed for your fishing style.
How Do I Choose The Right Fishing Line For Rigging?
Select line strength based on your target fish species. Lighter lines work for small fish; stronger lines suit bigger fish. Consider the water type—monofilament is versatile, fluorocarbon is less visible, and braided lines offer high strength.
What Knot Is Best For Rigging A Fishing Rod?
The improved clinch knot is reliable and easy to tie. It secures hooks and lures firmly. Practice tying it to ensure it doesn’t slip. This knot works well for most fishing setups.
How Do I Properly Attach A Hook To The Line?
Thread the line through the hook eye twice. Wrap the line around itself five to seven times. Pass the end through the loop near the eye. Pull tight and trim excess line to avoid tangles.
Conclusion
Rigging a fishing rod is simple with practice. Start with the basics. Choose the right rod and reel. Secure your line properly. Attach the right bait for your target fish. Remember to check the line for tangles. Always adjust your gear for better results.
Fishing is a relaxing and rewarding activity. Take your time to learn and enjoy. Practice makes perfect, so keep trying. Soon, you’ll rig your rod like a pro. Enjoy your time on the water. Happy fishing!