Setting up your fishing rod the right way can make all the difference between a frustrating day and a great catch. If you’ve ever felt confused or overwhelmed by the different parts and steps, you’re not alone.
This guide will walk you through how to rig up your fishing rod quickly and easily, so you can spend less time preparing and more time enjoying the water. By the end, you’ll feel confident and ready to reel in your next big fish.
Keep reading, because mastering this simple skill will change the way you fish forever.
Credit: greatdaysoutdoors.com
Choosing The Right Rod And Reel
Picking the right fishing rod and reel is key to a good fishing trip. The gear must fit the type of fish you want to catch and the water you will fish in.
Understanding rod and reel features helps you choose gear that feels right and works well for your needs.
Selecting The Rod Type
Rods come in many types. Each type suits different fishing styles and conditions. Choose a rod based on the fish size and where you will fish.
- Spinning rods are good for light lures and small fish.
- Baitcasting rods work well for heavier lures and bigger fish.
- Fly rods are best for fly fishing in rivers or streams.
- Surf rods help with casting far into the ocean.
Choosing The Right Reel
The reel controls the line and helps you catch fish. Match the reel to your rod and fishing style. Consider how much line capacity you need and the reel’s drag system.
| Reel Type | Best For | Line Capacity |
| Spinning Reel | Beginners, light to medium fishing | Low to medium |
| Baitcasting Reel | Experienced anglers, heavy lures | Medium to high |
| Fly Reel | Fly fishing in rivers | Low |
| Spin-cast Reel | Easy use, kids, beginners | Low |
Matching Rod And Reel
Make sure the rod and reel work well together. A light rod needs a light reel. A heavy rod needs a strong reel. This balance helps you fish without strain.
Here is a quick guide to match rod power and reel size:
- Light rod: Use a small spinning reel.
- Medium rod: Use a medium spinning or baitcasting reel.
- Heavy rod: Use a large baitcasting reel.

Credit: mysterytacklebox.com
Selecting The Appropriate Fishing Line
Choosing the right fishing line is important for a good fishing experience. The line must match your rod, reel, and fishing style.
The fishing line affects how far you can cast and how well you can catch fish. Different lines suit different situations.
Consider The Line Strength
Line strength is measured in pounds. It shows how much weight the line can hold before breaking.
Choose a line strength that matches the size of fish you want to catch and the rod’s power.
- Light lines (2-6 lbs) work for small fish and light rods
- Medium lines (8-15 lbs) suit most freshwater fishing
- Heavy lines (20+ lbs) are for big fish and strong rods
Pick The Right Line Material
There are three main types of fishing lines: monofilament, fluorocarbon, and braided.
Each type has its own strengths and weaknesses for different fishing conditions.
- Monofilament:Flexible and good for beginners, but stretches more
- Fluorocarbon:Less visible in water and sinks faster
- Braided:Very strong and thin, but more visible in water
Match The Line To Your Fishing Environment
Fishing in clear water needs a less visible line like fluorocarbon. In murky water, a strong braided line works well.
Saltwater fishing requires lines that resist damage from salt and sun.
- Clear water: fluorocarbon or light monofilament
- Muddy water: braided or heavier monofilament
- Saltwater: corrosion-resistant fluorocarbon or braided line
Check The Line Diameter
Line diameter affects how far you can cast and how strong the line is. Thinner lines cast farther but may break easier.
Match the diameter to the fish size and the rod’s specifications for best results.
| Line Type | Diameter Range (inches) | Use |
|---|---|---|
| Monofilament | 0.008 – 0.035 | General fishing, beginner friendly |
| Fluorocarbon | 0.009 – 0.025 | Clear water, less visible |
| Braided | 0.006 – 0.020 | Strong, thin, for heavy fishing |
Attaching The Reel To The Rod
Attaching the reel to the fishing rod is an important step. It keeps the reel secure during fishing.
This guide shows simple ways to attach your reel properly to the rod.
Select The Right Reel Seat
The reel seat is the part of the rod where the reel fits. It holds the reel tightly in place.
Make sure the reel seat matches the size of your reel foot. This ensures a strong fit.
Place The Reel Foot Into The Seat
Slide the reel foot into the reel seat carefully. The foot should fit snugly without forcing.
Check that the reel is aligned straight with the rod for better control.
Tighten The Reel Seat Rings
Most reels have seat rings that tighten to hold the reel foot. Turn these rings clockwise to secure the reel.
Do not overtighten. The reel should be firm but the rod must not get damaged.
Check The Reel Stability
Gently shake the reel to test if it is fixed well. It should not move or wiggle.
If the reel feels loose, tighten the seat rings more or reposition the reel foot.
Threading The Line Through Guides
Threading the fishing line through the rod guides is an important step. It helps the line move smoothly during casting and reeling.
Proper threading prevents tangles and improves control over your fishing rod.
Identify The Guides On Your Rod
Look along the rod to find small rings called guides. These run from the reel to the rod tip.
Each guide helps direct the fishing line. The largest guide is near the reel. The smallest is at the tip.
Start Threading At The Reel
Begin by pulling the line from the reel. Pass it through the first guide, the biggest one closest to the reel.
Hold the line tight to avoid slack. This makes threading easier and stops knots.
Thread Through Each Guide In Order
- Pass the line through each guide one by one.
- Move from the largest guide near the reel to the smallest at the tip.
- Make sure the line runs straight through each ring.
- Check for any twists or snags in the line.
- Pull the line gently to keep it tight and aligned.
Check Alignment And Tension
| Check Point | What to Look For |
|---|---|
| Guide Alignment | All guides should line up straight along the rod. |
| Line Tension | The line should be tight, not loose or drooping. |
| Line Condition | No twists or tangles inside the guides. |
Tying The Knot
Tying the right knot is key for a strong fishing rig. A good knot keeps your line secure and your catch safe.
This guide covers popular fishing knots and shows you how to tie them step by step.
Popular Fishing Knots
Many fishing knots serve different purposes. Choose the right one for your setup and fishing style.
- Improved Clinch Knot:Great for tying hooks and lures.
- Palo Verde Knot:Works well for lines with different thickness.
- Palomar Knot:Strong and simple for braided lines.
- Loop Knot:Allows bait to move freely.
- Blood Knot:Joins two lines together securely.
Step-by-step Knot Tying
Follow these steps to tie the Improved Clinch Knot, a common choice for many anglers.
- Thread the line through the hook eye.
- Wrap the tag end around the standing line five to seven times.
- Pass the tag end through the small loop near the eye.
- Then, pass it through the big loop you just created.
- Moisten the knot and pull the tag end and standing line tight.
- Trim the excess tag end close to the knot.
Practice tying this knot until you can do it smoothly and quickly.
| Knot | Use | Strength |
| Improved Clinch | Hooks, lures | Good |
| Palo Verde | Lines of different thickness | Strong |
| Palomar | Braided lines | Very strong |
| Loop Knot | Free bait movement | Moderate |
| Blood Knot | Joining lines | Strong |
Adding Weights And Bobbers
Adding weights and bobbers helps control your fishing line. They make it easier to cast and spot fish bites.
Choosing the right weights and bobbers depends on the fishing spot and fish type. Learn how to add them properly.
Selecting The Right Weights
Weights help your bait sink to the right depth. Pick small or large weights based on water conditions and fish behavior.
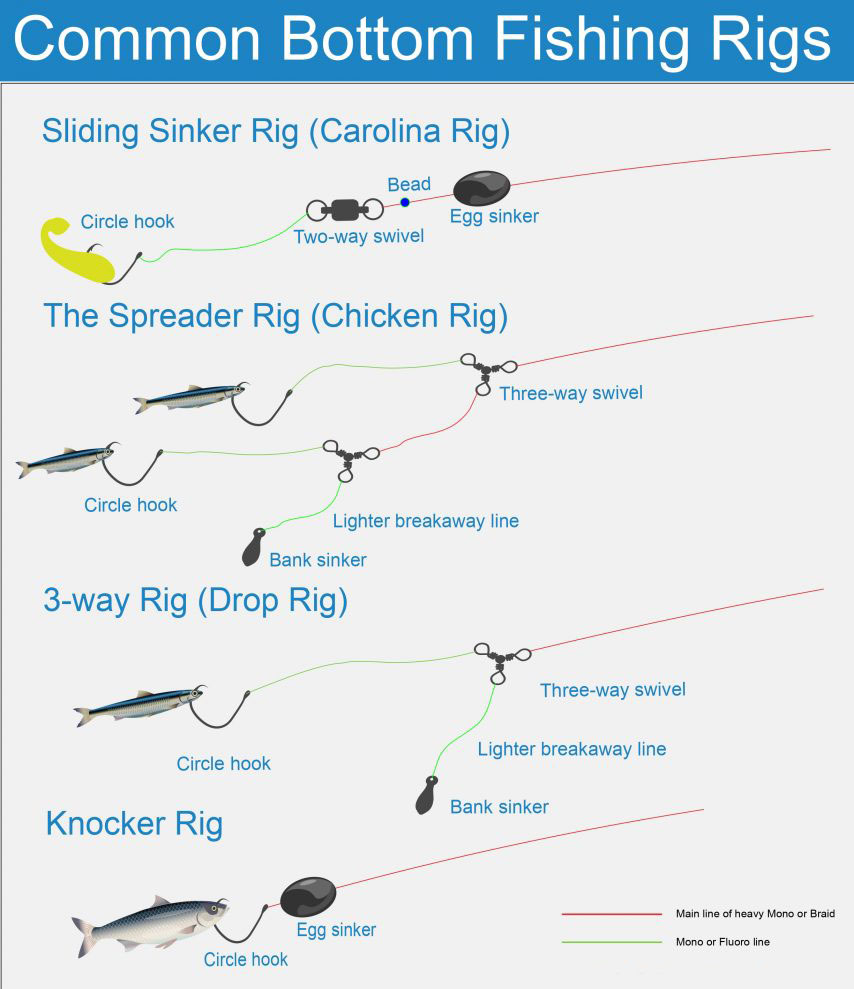
- Use split shot weights for light fishing and slow sinking.
- Use egg sinkers for deep water or strong currents.
- Choose heavier weights for windy days to improve casting.
- Use light weights in shallow water to avoid scaring fish.
Attaching Weights To Your Line
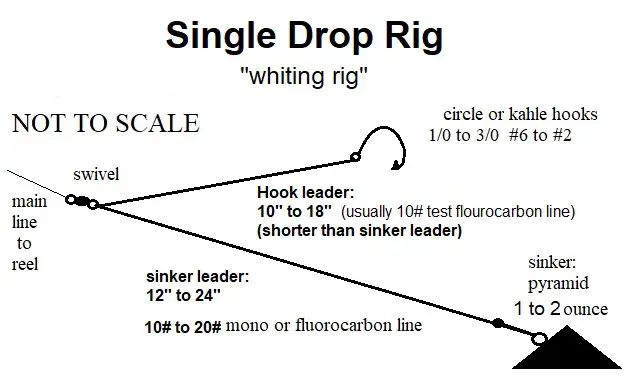
Pinch the split shot weight onto your fishing line about 12 inches above the hook. This lets the bait move naturally.
For egg sinkers, thread the line through the sinker hole. Tie a swivel below the sinker to prevent line twist.
Choosing And Using Bobbers
Bobbers keep your bait at the right depth and show when a fish bites. Pick a bobber size that matches your weight and bait.
| Bobber Type | Best Use | Size Range |
| Round Plastic | Calm water, light bait | Small to medium |
| Cigar Shaped | Strong currents, heavy bait | Medium to large |
| Slip Bobber | Variable depths, easy adjustment | Small to large |
Attaching Bobbers To Your Line
Clip the bobber onto your fishing line at the desired depth. Make sure it is secure but can slide if using a slip bobber.
Adjust the depth based on where fish are feeding. Keep your bait just above the bottom or near weeds.
Selecting And Attaching Lures Or Bait
Rigging a fishing rod starts with choosing the right lure or bait. The right choice helps catch more fish.
Attaching the lure or bait properly keeps it secure and looks natural in the water.
Types Of Lures And Baits
Lures and baits come in many types. Each type works best for different fish and water conditions.
- Soft Plastic Lures:Flexible and lifelike, good for many fish.
- Hard Baits:Made of plastic or wood, they mimic small fish or insects.
- Spinnerbaits:Use spinning blades to attract fish with flash and vibration.
- Live Bait:Worms, minnows, or insects that fish naturally eat.
- Cut Bait:Pieces of fish or meat to attract larger predators.
Proper Attachment Techniques
Attach lures or bait firmly to avoid losing them. Use the right knot for a strong hold.
Check your rig before fishing to ensure the lure moves naturally in water.
- Use an improved clinch knot for most hooks and lures.
- Thread live bait carefully to keep it alive longer.
- For soft plastics, insert the hook through the head and out the body.
- Tie spinnerbaits directly to the line for best action.
- Cut bait should be firmly hooked to avoid slipping off.
Final Adjustments And Testing
After assembling your fishing rod, it is important to make final adjustments. This ensures the rod works well and feels comfortable. Testing helps spot any problems before you start fishing.
Pay close attention to the guides, reel seat, and line tension. Small tweaks can improve casting and control. Let’s look at key areas for final checks.
Check The Line Guides
Make sure all line guides are aligned straight. Misaligned guides cause friction and may wear the line out quickly. Adjust the guides by gently bending the rod tip if needed.
Secure The Reel Properly
Tighten the reel seat so the reel does not move during use. Check for any looseness by trying to twist the reel gently. A stable reel improves casting accuracy and comfort.
Test Casting And Line Tension
Cast the line several times in a safe area. Feel the tension on the line and the rod’s response. Adjust the drag on the reel if the line pulls too easily or is too tight.
- Hold the rod firmly and cast forward.
- Watch the line flow through the guides smoothly.
- Check if the bait or lure lands where you aim.
- Adjust drag and line tension based on feel.
- Repeat casting until satisfied with performance.
Inspect The Knot Strength
Knots must be tight and neat to avoid slipping. Test each knot by pulling firmly on the line. Replace any knot that feels weak or uneven.
| Knot Type | Strength Test |
| Improved Clinch Knot | Pull line hard, knot should hold firm |
| Palomar Knot | Check for slippage under tension |
| Loop Knot | Ensure loop is secure and does not tighten |
Basic Maintenance Tips
Keeping your fishing rod in good shape helps it last longer. Regular care prevents damage and improves performance.
Simple maintenance steps keep your rod ready for every fishing trip. Learn how to clean, check, and store your rod properly.
Clean Your Rod After Use
Salt, dirt, and fish slime can harm your rod. Rinse it with fresh water after each trip. Use a soft cloth to wipe it down.
Check Guides And Reel Seat
Inspect the guides for cracks or rust. Make sure the reel seat is tight and free from dirt. Replace damaged parts to avoid line damage.
Store Rod Properly
- Keep your rod in a dry place away from sunlight
- Store it vertically or in a rod rack to avoid bending
- Remove the reel if storing for a long time
- Use rod covers to protect from dust and scratches
Lubricate Moving Parts
Apply light oil to the reel seat threads and guides. This prevents rust and keeps parts moving smoothly.
Inspect And Replace Line
| Maintenance Task | Frequency |
| Check line for frays or damage | Before each trip |
| Replace old fishing line | Every 3-6 months |
| Clean line guides | Monthly |

Credit: mysterytacklebox.com
Frequently Asked Questions
How Do I Choose The Right Fishing Rod For Rigging?
Select a rod based on your fishing style, target species, and water type. Match rod length, power, and action to your bait and fishing location for best results.
What Are The Essential Tools For Rigging A Fishing Rod?
You need fishing line, hooks, sinkers, swivels, and bobbers. Additionally, have scissors, pliers, and a rigging needle for precise setup and adjustments.
How Do I Tie A Strong Fishing Knot For Rigging?
Use knots like the improved clinch knot or Palomar knot. These knots secure the hook to the line and resist slipping during fishing.
When Should I Change My Fishing Line During Rigging?
Change your line if it shows frays, discoloration, or stiffness. Regular replacement ensures strength and prevents line breakage while fishing.
Conclusion
Rigging a fishing rod is simple with the right steps. Choose the right line and hook for your fishing style. Tie secure knots to keep your gear steady. Add weights or floats based on where you fish. Check your setup before casting to avoid problems.
Practice makes perfect, so don’t get discouraged. Enjoy the process and time spent outdoors. Fishing can be relaxing and rewarding. Keep learning and trying new techniques for better results. Ready to cast your line and catch some fish?