Your wood cutting board is more than just a kitchen tool—it’s an investment that can last for years if cared for properly. But how do you protect it from water damage, stains, and cracks?
The answer lies in sealing your wood cutting board the right way. You’ll discover simple, effective steps to seal your board, keeping it strong, beautiful, and safe for food prep. Keep reading, and you’ll learn how to extend the life of your cutting board with easy techniques you can do at home.
Choosing The Right Sealant
Sealing a wood cutting board protects it from water and stains. Picking the right sealant keeps your board safe and long-lasting. This guide covers common sealant types for wood cutting boards.
Each sealant has its own benefits and uses. Choose one that fits your needs and keeps your board food-safe.
Food-safe Oils
Food-safe oils soak into the wood and keep it from drying out. They are easy to apply and help keep your board in good shape.
- Mineral oil: A popular, odorless option that does not go rancid.
- Coconut oil: Natural and smells nice, but can spoil over time.
- Walnut oil: Penetrates well but may cause allergies.
Wax And Oil Blends
Wax and oil blends add extra protection on top of oils. The wax seals the surface and makes the board water-resistant.
| Type | Benefits | Considerations |
|---|---|---|
| Beeswax and mineral oil | Good water resistance and natural | Needs regular reapplication |
| Carnauba wax blends | Harder finish and better durability | More expensive than beeswax |
| Plant-based wax blends | Eco-friendly and safe | May wear out faster |
Commercial Sealers
Commercial sealers are made specifically for wood cutting boards. They often contain ingredients to stop germs and stains.
- Look for food-safe labels on the product.
- Check if the sealer is easy to apply and dries quickly.
- Choose sealers that do not leave a sticky surface.
- Follow the manufacturer’s instructions carefully.
Credit: www.slightlycrookedworkshop.com
Preparing The Cutting Board
Before sealing a wood cutting board, prepare it properly. This helps the sealant last longer and protect the wood well.
Good preparation includes cleaning, drying, and sanding the surface. These steps remove dirt and smooth the wood.
Cleaning And Drying
Start by washing the cutting board with warm water and mild soap. Use a sponge or cloth to remove all food residue.
After cleaning, dry the board completely. Leave it in a well-ventilated area or use a clean towel to dry it off.
- Use warm water and mild soap
- Scrub gently with a sponge or cloth
- Rinse thoroughly to remove soap
- Dry with a towel or air dry completely
Sanding The Surface
Check the surface for rough spots or stains. Sand these areas with fine-grit sandpaper to smooth the wood.
Sand evenly across the entire board. This opens the wood pores to absorb the sealant better.
- Use fine-grit sandpaper (around 220 grit)
- Sand all surfaces lightly and evenly
- Remove dust with a dry cloth after sanding
Applying The Sealant
Sealing a wood cutting board protects it from water and stains. It also keeps the wood strong and safe for food use.
Applying the sealant carefully helps the board last longer. Follow simple steps for best results.
First Coat Techniques
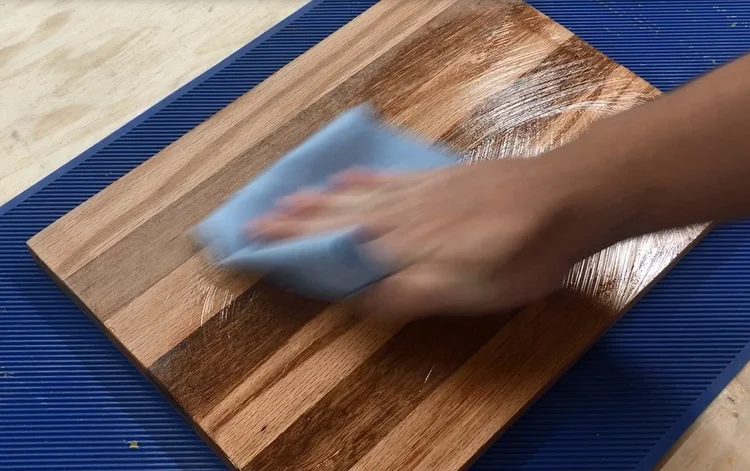
Start with a thin, even layer of sealant. Use a clean, soft cloth or brush to spread it well.
Cover the entire surface, including edges and sides. Avoid thick spots to prevent peeling.
Allowing Proper Absorption
Let the wood soak in the sealant for at least 20 minutes. This helps the wood absorb the oils deeply.
Wipe off any extra sealant with a clean cloth. Too much sealant can leave a sticky surface.
Multiple Coats For Durability
Apply 2 to 3 coats for better protection. Each coat adds more strength to the wood surface.
Wait about 4 hours between coats. This lets each layer dry and harden before adding the next.
- Apply thin layers for even coverage
- Let each coat dry fully
- Lightly sand between coats if needed
- Avoid rushing the process
Maintaining The Sealed Board
Keeping your wood cutting board sealed helps it last longer. Good care stops cracks and stains.
Learn simple ways to maintain the sealed surface and protect your board.
Regular Oiling Schedule
Oiling your cutting board keeps wood strong and water-resistant. Apply oil often to avoid dryness.
- Clean the board and dry it completely.
- Pour a small amount of food-safe mineral oil.
- Rub the oil evenly with a soft cloth.
- Let it soak for several hours or overnight.
- Wipe off any extra oil before use.
Avoiding Water Damage
Water can cause wood to swell and crack. Avoid soaking or washing the board in a dishwasher.
| Do | Don’t |
| Hand wash with warm soapy water | Soak in water for long periods |
| Dry immediately after washing | Leave wet or damp |
| Store in a dry place | Store near heat sources |
Repairing Minor Damage
Small scratches or cracks can be fixed to keep the board safe and smooth.
Try these steps to repair minor damage:
- Lightly sand the damaged area with fine-grit sandpaper.
- Clean off dust with a damp cloth and dry well.
- Apply a fresh coat of mineral oil or beeswax finish.
- Allow the board to absorb the oil before use.
Common Mistakes To Avoid
Sealing a wood cutting board protects it and extends its life. Many people make errors that damage their boards or reduce the seal’s effectiveness.
Knowing which mistakes to avoid helps keep your cutting board safe and in good condition for years.
Using Toxic Products
Some sealants contain chemicals that can harm your health. Avoid products with harmful ingredients like solvents or synthetic chemicals.
- Choose food-safe oils and waxes.
- Read labels carefully for toxic warnings.
- Never use varnish or paint on cutting surfaces.
- Use natural products like mineral oil or beeswax.
Skipping Surface Preparation
Sealing a dirty or rough board causes poor adhesion and uneven protection. Proper cleaning and sanding are key before sealing.
| Preparation Step | Reason to Do It |
| Clean with mild soap and water | Remove dirt and bacteria |
| Dry completely | Prevent moisture under seal |
| Sand smooth with fine grit | Help sealant stick better |
| Remove dust with cloth | Avoid bumps in finish |
Overusing Sealant
Applying too much sealant can cause sticky surfaces and uneven drying. Use only the needed amount in thin layers.
- Apply thin coats to avoid buildup.
- Allow each layer to dry fully before adding more.
- Wipe off excess oil or wax after application.
- Repeat sealing 2-3 times for best results.

Credit: www.amazon.com
Credit: enthrallinggumption.com
Frequently Asked Questions
How Often Should I Seal My Wood Cutting Board?
You should seal your wood cutting board every 3 to 4 weeks. Regular sealing helps protect the board from moisture and bacteria. It also extends the board’s lifespan. Use a food-safe mineral oil or beeswax for best results. Always ensure the board is clean and dry before sealing.
What Is The Best Oil For Sealing Wood Cutting Boards?
Food-grade mineral oil is the best option for sealing wood cutting boards. It’s odorless, colorless, and doesn’t go rancid. This oil penetrates the wood, providing protection from moisture. Alternatively, beeswax can also be used for sealing. Both options enhance the board’s durability and appearance.
Can I Use Olive Oil To Seal My Cutting Board?
It’s not recommended to use olive oil for sealing cutting boards. Olive oil can go rancid over time, causing unpleasant odors. Instead, opt for food-grade mineral oil or beeswax. These alternatives provide better protection and longevity. They are also free from any potential rancidity issues.
Why Is Sealing Wood Cutting Boards Important?
Sealing wood cutting boards protects them from moisture and bacteria. It helps prevent warping and cracking over time. A well-sealed board is easier to clean and maintain. Regular sealing ensures the board remains hygienic and durable. It also enhances the board’s appearance, keeping it looking new.
Conclusion
Sealing your wood cutting board keeps it safe and long-lasting. It stops water from soaking in and prevents cracks. Regular sealing also keeps the board looking fresh and clean. Use a food-safe oil or wax for the best results. Remember to clean the board well before sealing.
A little care goes a long way in protecting your board. Enjoy cooking with a smooth, well-kept cutting surface every day. Simple steps make a big difference for your kitchen tools.