Setting up your fly fishing line the right way can make all the difference between a frustrating day and an unforgettable fishing experience. If you want to cast smoothly, feel every nibble, and land more fish, then getting your line setup just right is key.
Don’t worry if you’re new or have struggled before—this guide will walk you through each step clearly and simply. By the end, you’ll have the confidence and know-how to get your gear ready fast and hit the water like a pro.
Ready to make your next fishing trip your best one yet? Let’s dive in.

Credit: jacksonholeflycompany.com
Choosing The Right Fly Line
Choosing the right fly line is key for a good fishing experience. The right line helps cast better and catch more fish.
This guide explains what types of fly lines exist and how to match them to your rod and reel. It also covers weight and length choices.
Types Of Fly Lines
Fly lines come in many types. Each type suits a different fishing style and water condition.
- Weight Forward: Most common, good for long casts.
- Double Taper: Better for roll casting and delicate presentations.
- Level: Uniform thickness, good for short casts and beginners.
- Sink Tip: The tip sinks, good for fishing deeper water.
- Full Sink: The whole line sinks, used in deep or fast water.
Matching Line To Rod And Reel
Your fly line must match your rod’s weight rating. This match helps you cast smoothly and control the line well.
| Rod Weight | Line Weight |
| 3 | 3 |
| 4 | 4 |
| 5 | 5 |
| 6 | 6 |
| 7 | 7 |
Also, check that your reel holds enough line for your fly line’s length and backing.
Weight And Length Considerations
Choose the line weight that matches your fishing target and location. Lighter lines suit small fish and calm waters. Heavier lines help with big fish and windy conditions.
- Weight affects casting distance and accuracy.
- Length affects how much line you can use for casting.
- Longer lines give longer casts but need more control.
- Shorter lines are easier to handle for beginners.
Credit: calflyfisher.com
Preparing The Fly Line
Setting up a fly fishing line starts with preparing the line correctly. Proper preparation helps the line last longer and perform well.
This guide covers cleaning, stretching, and attaching the backing to your fly line.
Cleaning And Inspecting The Line
Before using your fly line, clean off dirt and old oils. Dirt can damage the line or reduce its casting ability.
Check the line for cracks, cuts, or weak spots. Replace the line if you find damage to avoid breakage during fishing.
- Use warm water and mild soap to clean the line.
- Wipe the line with a soft cloth.
- Look closely for any damage along the whole line.
- Replace the line if it feels sticky or brittle.
Stretching The Line
New fly lines often have coils from packaging. Stretching the line removes these coils to help smooth casting.
Hold the line and pull gently but firmly until it straightens. Avoid pulling too hard to prevent damage.
- Pull the line slowly over several feet.
- Repeat stretching a few times if coils remain.
- Let the line rest straight before use.
Attaching The Backing
Backing adds extra line behind the fly line on your reel. It prevents line loss when a fish pulls hard.
Use a strong knot to tie the backing to the reel and the fly line. Make sure the knots are tight and secure.
- Attach backing to the reel spool first.
- Use an improved clinch knot to tie backing to fly line.
- Check knots for tightness before fishing.
- Wind backing evenly on the reel.
Attaching The Fly Line To The Reel
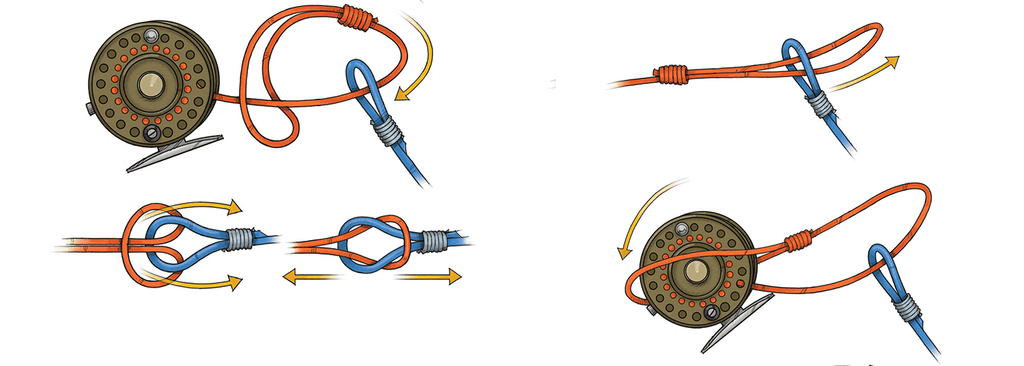
Attaching the fly line to your reel is an important step in setting up your fly fishing gear. A secure connection ensures smooth casting and prevents the line from slipping off.
In this guide, you will learn how to select the right knot, tie it correctly, and secure the line to your reel.
Selecting The Knot
Choosing the right knot is important for a strong and reliable connection. The knot should be easy to tie and hold well under tension.
The most common knots for attaching the fly line to the reel are the Arbor knot and the Improved Clinch knot. Both provide good strength and are simple to learn.
Step-by-step Knot Tying
Follow these steps to tie an Arbor knot, which is widely used for this connection:
- Wrap the fly line around the reel spool.
- Tie an overhand knot around the standing line.
- Make a second overhand knot on the tag end.
- Pull both knots tight against the spool.
- Trim the tag end close to the knot.
This knot grips the spool firmly and prevents slipping during fishing.
Securing The Connection
After tying the knot, check that it is tight and snug against the reel spool. Pull on the line gently to test the hold.
Make sure the tag end is trimmed neatly to avoid tangles. A secure connection will help you fish smoothly without line problems.

Credit: calflyfisher.com
Setting Up The Leader And Tippet
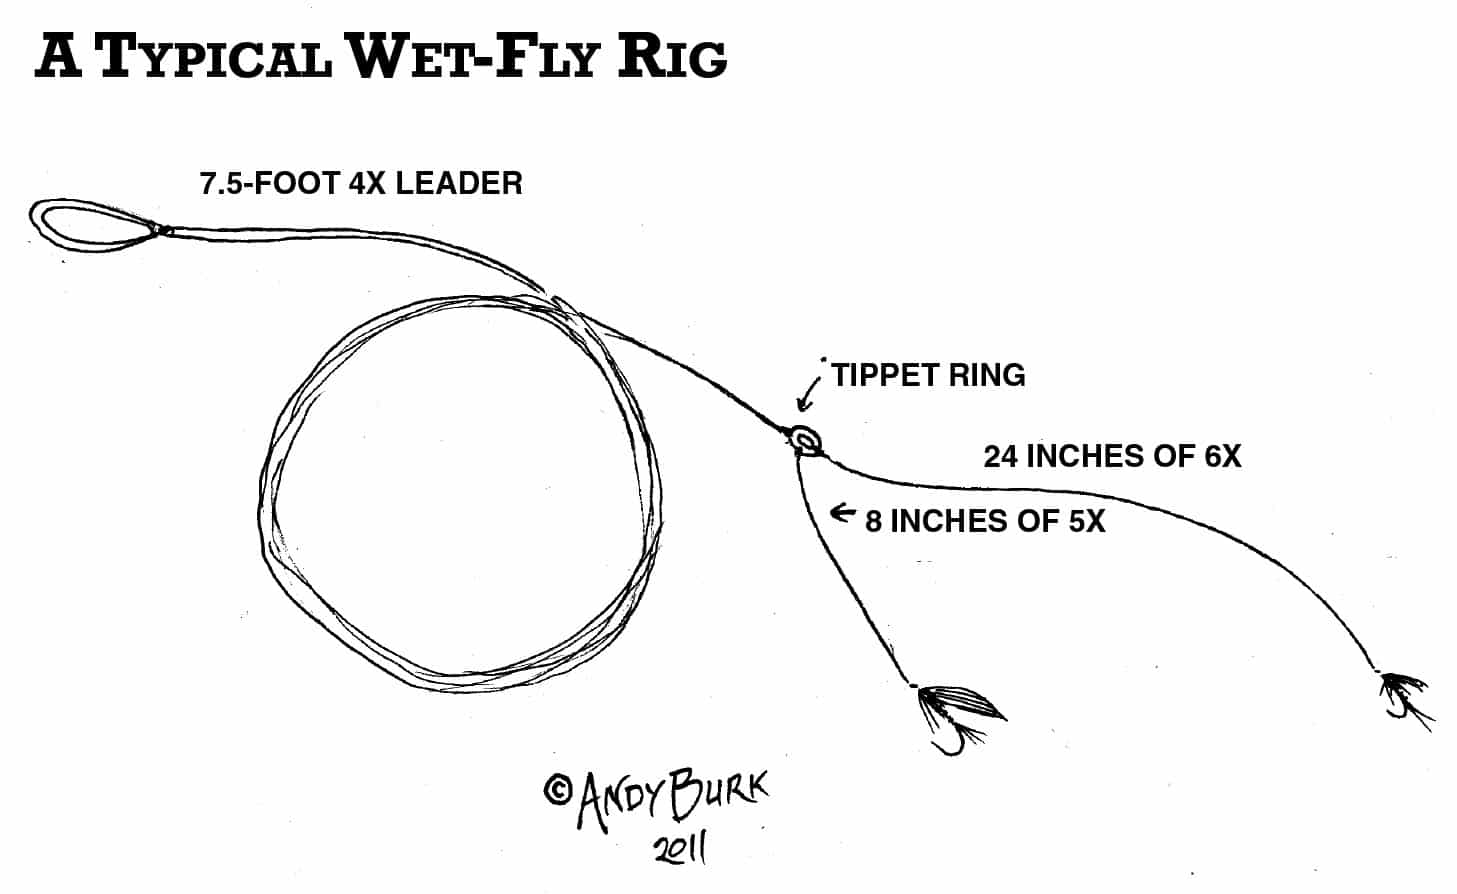
Setting up your leader and tippet is key for fly fishing. It helps your fly move naturally on the water.
This guide shows how to choose the right leader length, tie it to the fly line, and add the tippet.
Choosing The Leader Length
Pick a leader length based on the water and fishing style. Short leaders are good for close fishing.
Long leaders help when fish are far or the water is clear. Most leaders range from 7 to 12 feet.
- 7 to 9 feet for small streams and close casting
- 9 to 12 feet for larger rivers and clear water
- Choose thicker leaders for bigger flies and stronger fish
Tying Leader To Fly Line
Attach the leader to the fly line using a strong, simple knot. The most common knot is the nail knot.
The nail knot holds well and keeps a smooth connection. Use a nail knot tool or a small nail to help tie it.
- Slide the leader end over the fly line
- Wrap the leader around the fly line 5 to 7 times
- Pass the leader tip through the loop near the nail or tool
- Pull the wraps tight and trim the tag end
Adding The Tippet
The tippet is a thin line tied to the leader’s end. It connects the fly to the leader for better presentation.
Choose tippet size based on fly size and fish. Smaller tippets are less visible but weaker.
- Use a blood knot or surgeon’s knot to join leader and tippet
- Match tippet size to the fly and fish species
- Replace tippet when it gets worn or too short
Loading The Fly Line On The Reel
Loading the fly line onto the reel is an important step for fly fishing. It helps your casting and protects the line from damage.
Properly loading the line ensures smooth fishing and less hassle on the water. Follow simple steps for best results.
Spooling The Line Properly
Start by attaching the fly line to the reel spool securely. Use an arbor knot for a strong hold.
Wind the line evenly on the spool. Keep tension on the line as you spool to avoid loose coils.
- Attach the line with a secure knot
- Keep firm tension while winding
- Fill the spool evenly without overfilling
Avoiding Twists And Tangles
Twists and tangles make casting hard and can damage the line. Take care to keep the line straight.
Let the line come off the spool naturally when loading. Avoid flipping the spool or twisting the line.
- Keep the line straight while spooling
- Let the line feed from the spool smoothly
- Check for loops or twists often
Checking For Smooth Operation
Once the line is loaded, turn the reel handle. It should move smoothly without resistance.
Test casting a few times to feel if the line flows well. Fix any snags or rough spots before fishing.
- Turn the reel handle to check smoothness
- Cast a few times to test line flow
- Adjust if you feel twists or tight spots
Final Adjustments Before Casting
Before you start fly fishing, it is important to make final checks. These checks help ensure smooth casting and better control.
Pay attention to your line, drag system, and setup. Small adjustments can improve your fishing experience.
Checking Line Condition
Inspect your fly line carefully. Look for cracks, dirt, or any signs of wear. Clean the line if it looks dirty.
- Check the entire length of the line
- Look for spots where the coating may peel
- Remove any debris or dirt
- Replace the line if it is damaged
Testing The Drag System
Test the drag system on your reel to make sure it works well. The drag controls the tension on the line.
| Drag Setting | How to Test | What to Check |
| Low | Pull line gently | Line should pull smoothly without slipping |
| Medium | Pull line with more force | Drag should increase but still allow line to move |
| High | Pull line hard | Drag should resist line movement without jamming |
Preparing For The First Cast
Get ready to cast by setting your line properly and positioning yourself. Check your surroundings for safety.
Follow these tips before your first cast:
- Ensure the line is free from tangles
- Hold the rod at a comfortable height
- Face an open area without obstacles
- Practice a few short casts to feel the line
Frequently Asked Questions
How Do I Choose The Right Fly Fishing Line?
Selecting the right fly fishing line depends on your rod weight and fishing style. Match the line weight to your rod for balance. Consider line types like floating, sinking, or intermediate based on water conditions and target fish species.
What Is The Best Way To Attach The Fly Line To The Backing?
Use a nail knot or loop-to-loop connection to attach fly line to backing. This ensures a strong, smooth link. Proper attachment prevents line slippage and helps in casting and fighting fish effectively.
How Do I Properly Thread The Fly Line Through The Rod Guides?
Start threading the fly line through the tip-top guide first. Then, guide it through each subsequent rod guide toward the reel. Ensure the line passes smoothly without tangles to maintain casting performance and prevent damage.
When Should I Replace My Fly Fishing Line?
Replace your fly fishing line when it shows signs of wear, such as fraying, stiffness, or loss of coating. Typically, lines last 2-3 seasons, but frequent use or exposure to harsh conditions may shorten lifespan.
Conclusion
Setting up a fly fishing line can be simple and fun. Follow these steps to ensure a smooth fishing experience. Practice makes perfect, so don’t worry about mistakes. Enjoy each moment by the water. With time, you’ll get better at it.
Remember to check your line and gear regularly. This will help you catch more fish. Fly fishing brings peace and joy. Share this activity with friends and family. They will appreciate the adventure. Ready to cast your line? Enjoy the thrill of the catch.
Happy fishing!