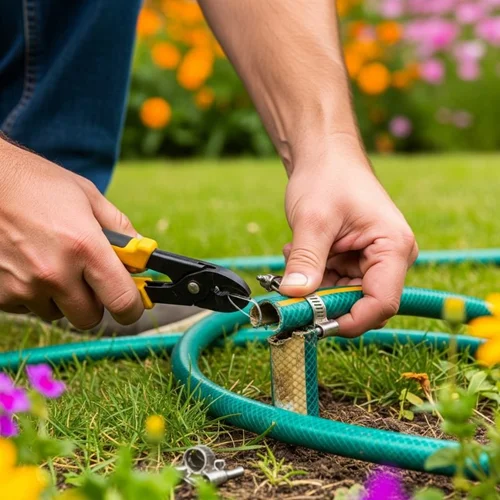
Is your garden hose too long and tangled, making watering a chore instead of a joy? You’re not alone.
A hose that’s the wrong length can waste water, cause frustration, and even damage your plants. But what if you could fix this in just a few simple steps? You’ll discover easy ways to shorten your garden hose quickly and safely.
Keep reading to learn how to save time, avoid mess, and make your gardening routine smoother than ever. Your perfect hose length is just around the corner!
Tools Needed
Shortening a garden hose is easy if you have the right tools. This guide covers the essential equipment and optional accessories for the job.
Using proper tools helps you make clean cuts and secure fittings. It also saves time and prevents leaks.
Essential Equipment
These tools are necessary to shorten your garden hose safely and correctly.
- Sharp Utility Knife– Use this to cut the hose cleanly without crushing it.
- Measuring Tape– Measure the length you want before cutting.
- Hose Cutter– A special tool made for cutting hoses straight.
- Hose Connectors– To attach fittings or join two hose ends.
- Screwdriver– Tighten hose clamps or connectors securely.
Optional Accessories
These accessories are not required but can make the job easier or improve hose function.
| Accessory | Purpose |
|---|---|
| Hose Clamps | Keep connectors tight and prevent leaks |
| Rubber Washers | Seal connections to stop water dripping |
| Protective Gloves | Protect hands while cutting and handling hose |
| Marker Pen | Mark cutting points clearly on the hose |

Credit: www.familyhandyman.com
Preparing The Hose
Shortening a garden hose helps make it easier to use and store. Preparing the hose correctly is important before cutting it.
This part focuses on measuring the right length and marking the place to cut.
Measuring The Desired Length
First, decide how long you want the hose to be after cutting. Use a tape measure to get an exact length.
Lay the hose straight on the ground or floor to measure it accurately. Avoid bends or kinks.
- Stretch the hose fully without stretching it too hard
- Measure from the end with the fitting to the new desired length
- Note the measurement clearly before marking
Marking The Cut Point
After measuring, mark the spot where you will cut the hose. Use a waterproof marker or tape to mark it clearly.
Check the mark twice to avoid cutting the wrong place. The mark should be straight across the hose.
- Make one clear line around the hose for a straight cut
- Use a bright color for the mark to see it easily
- Keep the hose steady while marking
Cutting The Hose
Shortening a garden hose can help make it more manageable. Proper cutting ensures the hose works efficiently without leaks.
Learn how to cut your garden hose with the right tools and techniques.
Choosing The Right Cutting Tool
Selecting the correct tool is crucial for a clean cut. You need the right equipment to avoid damaging the hose.
- Utility Knife: Best for thinner hoses.
- Hacksaw: Suitable for thicker hoses.
- Garden Shears: Great for precision cutting.
Making A Clean Cut
A clean cut ensures the hose will seal properly. Follow these steps for a smooth finish.
- Measure the desired length and mark it with a pen.
- Secure the hose to prevent movement.
- Use the chosen tool to cut straight across the mark.
- Inspect the cut end for smoothness; trim if necessary.
Credit: www.youtube.com
Attaching New Fittings
Shortening a garden hose often requires adding new fittings. These fittings connect the hose to water sources or other hoses. Proper attachment ensures no leaks and a secure fit.
Choosing the right fittings and securing them well is key for a working hose. This guide covers how to pick and attach fittings correctly.
Selecting Compatible Fittings
Pick fittings that match your hose’s diameter and type. Most garden hoses use standard sizes like 5/8 inch. Check your hose size before buying fittings.
Use fittings made from durable materials like brass or plastic. Brass fittings last longer and resist rust. Plastic fittings are lighter and cheaper but may wear out faster.
- Measure hose diameter accurately
- Choose fittings matching your hose size
- Pick durable materials for longer life
- Check if fittings include washers for sealing
Securing The Fittings Properly
Cut the hose end cleanly and square before attaching fittings. Remove any debris or old fittings. A clean cut helps a tight seal.
Push the fitting firmly into the hose end. Use a hose clamp or crimp ring to hold it tight. Tighten clamps securely to stop leaks but avoid over-tightening.
- Cut hose end evenly with a sharp knife
- Insert fitting fully into hose
- Place clamp over hose and fitting joint
- Tighten clamp with a screwdriver or tool
- Test for leaks before use
Testing For Leaks
Checking for leaks is important after shortening a garden hose. It ensures your hose works properly and saves water.
Leaks can happen at different points. Testing helps you find and fix them early.
Turning On The Water
Turn on the water slowly to avoid pressure shocks. Watch the hose carefully as water flows through it.
- Open the faucet fully to get steady water flow.
- Look for any wet spots along the hose length.
- Listen for hissing sounds that show small leaks.
- Check the cut end and new fittings for drips.
Inspecting Connection Points
Connections are common leak spots. Inspect each joint and fitting after water is on.
| Connection Area | What to Check | Fix Tips |
| Hose to faucet | Loose threads, cracks | Tighten or replace washer |
| Hose to nozzle | Drips, worn parts | Replace nozzle or use plumber’s tape |
| Cut end fitting | Seals and clamps | Secure clamps or reseal fitting |
Tips For Maintaining Hose Length
Keeping your garden hose at the right length helps you work efficiently. It also prevents damage and tangles.
Follow simple tips to make your hose last longer and stay easy to use.
Proper Storage
Store your hose properly to avoid kinks and cracks. Always drain water before storing it.
Keep the hose coiled loosely in a cool, shaded place. Avoid direct sunlight, which can weaken the material.
- Drain all water from the hose before storage
- Coil the hose in large loops to prevent bends
- Store it off the ground on a hose reel or hanger
- Avoid sharp bends and tight coils
- Keep the hose away from heat and sunlight
Regular Inspection
Check your garden hose often for damage and leaks. Early repairs keep it working well and at the right length.
Look for cracks, holes, and worn connectors. Fix small problems before they get bigger.
- Inspect the hose for cracks or splits
- Check connectors for rust or wear
- Replace washers to prevent leaks
- Cut off damaged ends to maintain length
- Test water flow to find hidden leaks

Credit: ucanr.edu
Frequently Asked Questions
How Do I Measure The Right Length To Shorten A Garden Hose?
Measure the exact length you need using a tape measure. Mark the spot carefully before cutting. This ensures you don’t cut too short or too long.
What Tools Are Needed To Shorten A Garden Hose?
You need a sharp utility knife or hose cutter, a hose connector, and a clamp. These tools help you cut cleanly and reconnect securely.
Can I Shorten A Garden Hose Without Damaging It?
Yes, by cutting straight and using proper connectors, you avoid leaks and damage. Ensure the hose ends are clean before reconnecting.
How Do I Reconnect A Garden Hose After Shortening?
Attach a hose connector to the cut end. Secure it tightly with a clamp to prevent leaks. Test with water before use.
Conclusion
Shortening a garden hose is simple and saves space. You only need a few tools and basic steps. Cut the hose carefully to avoid leaks later. Use hose connectors to join pieces securely. This small task helps your garden stay tidy.
Try this easy fix to make watering easier. Keep your hose neat and ready for use. Small changes can make a big difference outside. Now, you can enjoy a clutter-free garden area.