Tying a fishing line to a hook might seem simple, but doing it the right way can make all the difference in your fishing success. If your knot isn’t strong or secure, you risk losing the big catch you’ve been waiting for.
You want a knot that’s easy to tie, holds tight, and won’t slip when the fish pulls hard. In this guide, you’ll learn step-by-step how to tie your fishing line to a hook like a pro. Keep reading, and you’ll be ready to reel in more fish on your next trip.
Choosing The Right Fishing Line
Picking the right fishing line is important for a good catch. The line connects your rod to the hook and fish.
Different lines suit different fishing styles and fish types. Knowing the options helps you choose well.
Monofilament Vs. Braided Lines
Monofilament lines are made of one nylon strand. They stretch well and are easy to handle.
Braided lines have multiple fibers woven together. They are stronger and thinner than monofilament.
- Monofilament is good for beginners because it is flexible.
- Braided lines last longer and resist cuts better.
- Braided lines have less stretch, giving better sensitivity.
Line Strength And Thickness
Line strength shows how much weight the line can hold before breaking. It is measured in pounds.
Thicker lines are usually stronger but less invisible in water. Thinner lines cast farther and are less visible.
- Match line strength to the size of fish you want to catch.
- Use thinner lines for clear water and shy fish.
- Thicker lines work well in heavy cover or strong currents.
Best Line For Different Fish Types
Different fish need different lines for the best results. Use the right line to avoid losing fish.
| Fish Type | Recommended Line | Notes |
| Small Fish (e.g., Panfish) | Light Monofilament (2-6 lb) | Flexible and easy to cast |
| Medium Fish (e.g., Bass, Trout) | Medium Monofilament or Braided (8-15 lb) | Balance of strength and stretch |
| Large Fish (e.g., Catfish, Pike) | Strong Braided (20+ lb) | High strength and abrasion resistance |
Credit: www.beadinggem.com
Selecting The Proper Hook
Choosing the right hook is important for tying a fishing line. The hook must fit the type of fish and bait you plan to use.
A proper hook helps keep the bait secure and improves your chances of catching fish.
Hook Sizes And Styles
Hooks come in many sizes. Smaller hooks are for small fish. Larger hooks work for big fish. Styles include J-hooks, circle hooks, and treble hooks.
- J-hooks are common and easy to use
- Circle hooks reduce fish injury
- Treble hooks have three points for better grip
Matching Hooks To Bait
Match your hook size to the bait size. Large baits need big hooks. Small baits need small hooks to look natural.
Make sure the hook does not hide the bait. The bait should stay secure on the hook during casting.
Materials And Durability
Hooks are made from different metals like steel or stainless steel. Choose a hook that resists rust and lasts long.
Strong hooks hold well in fish mouths. Weak hooks may bend or break easily. Pick hooks that fit your fishing conditions.
Preparing The Line And Hook
Tying a fishing line to a hook is an essential skill for anglers. Proper preparation ensures a secure knot and increases your chances of a successful catch.
Before you start, gather your fishing line, hook, and a pair of scissors. Having everything ready makes the process smoother.
Trimming The Line
Trimming the line is important for a neat knot. Use sharp scissors to cut the line.
Ensure you leave enough length to tie the knot comfortably. A short line can make tying difficult.
- Cut the line cleanly with scissors
- Leave about six inches of line
Moistening The Knot Area
Moistening the knot area reduces friction. It helps the knot tighten properly.
Use your saliva or water to dampen the line. This simple step ensures a snug fit.
- Wet the line with saliva or water
- Ensure the entire knot area is moistened
Positioning The Hook
Proper hook positioning is crucial for an effective knot. Pass the line through the hook eye.
Make sure the hook is facing the right direction. This helps in catching fish successfully.
- Insert the line through the hook eye
- Check the hook’s orientation
Credit: n1outdoors.com
Tying The Improved Clinch Knot
The Improved Clinch Knot is a popular way to tie a fishing line to a hook. It is strong and easy to tie. Many anglers use it for all types of fishing.
This guide shows simple steps to tie the knot correctly. Follow each step carefully for the best results.
Step-by-step Instructions
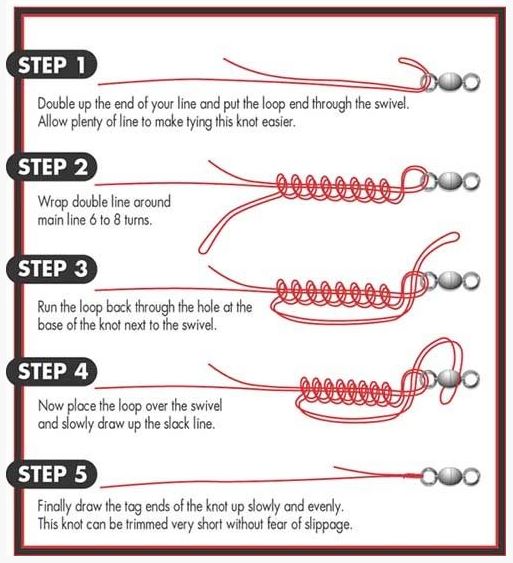
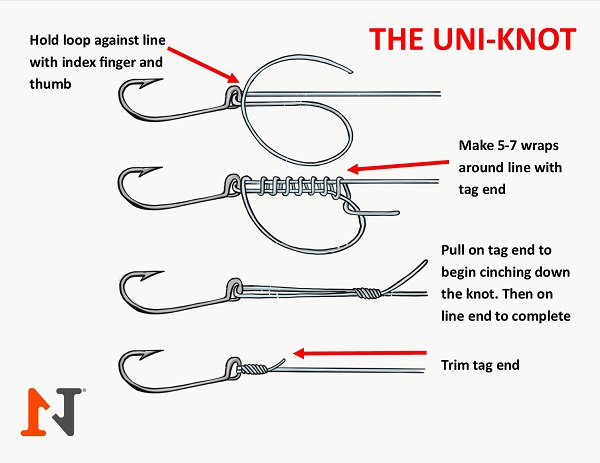
Thread the end of the fishing line through the eye of the hook.
Wrap the tag end around the standing line five to seven times.
Pass the tag end through the small loop next to the eye of the hook.
Then, pass the tag end through the big loop you just made.
Moisten the knot with water or saliva to reduce friction.
Pull the tag end and standing line slowly to tighten the knot.
Trim the excess tag end close to the knot.
Common Mistakes To Avoid
Not wrapping the line enough times. This weakens the knot.
Failing to moisten the knot before tightening can cause damage.
Pulling the line too fast, which can slip or weaken the knot.
Leaving the tag end too long, which can catch on weeds or debris.
Not tightening the knot evenly, causing it to slip under pressure.
Tying The Palomar Knot
The Palomar knot is a strong and simple way to tie a fishing line to a hook. It works well with most types of lines. This knot keeps the hook secure and holds up under pressure.
Learning this knot helps you fish with confidence. It is quick to tie and does not weaken your line much.
Step-by-step Instructions
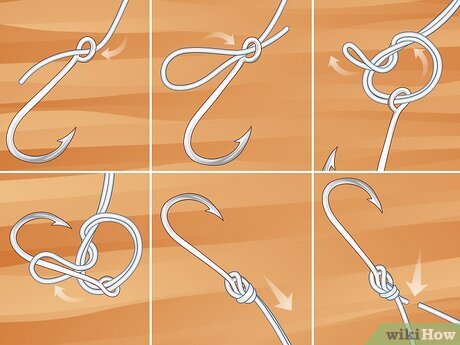
- Double about 6 inches of the line and pass it through the eye of the hook.
- Tie a loose overhand knot with the doubled line, leaving the hook hanging below.
- Pass the loop of the doubled line over the hook.
- Pull on both the standing line and tag end to tighten the knot down to the eye.
- Trim any excess tag end to finish.
Advantages Of The Palomar Knot
- Very strong and reliable under tension
- Works well with braided and monofilament lines
- Easy to tie quickly, even in low light
- Does not weaken the fishing line much
- Minimal slippage when tied correctly
| Feature | Benefit |
| Strength | Maintains 95-100% line strength |
| Simplicity | Easy to learn and remember |
| Versatility | Works with many line types |
| Speed | Ties quickly in any condition |

Credit: www.ohero.com
Testing Knot Strength
After tying a fishing line to a hook, it is important to test the knot strength. A strong knot keeps the hook secure during fishing. Testing helps avoid losing fish or gear.
Checking the knot ensures safety and confidence. It also shows if the knot is tied correctly or needs fixing.
Pull Test Techniques
One way to test knot strength is by doing a pull test. Hold the hook and pull the line hard. The knot should not slip or come undone.
Try pulling the line with steady pressure. If the knot stays tight, it is strong enough for fishing. Repeat the test a few times for confidence.
- Hold the hook firmly in one hand.
- Pull the line slowly with the other hand.
- Look for any slipping or loosening.
- Test several times before fishing.
When To Retie
Retie the knot if it slips or feels weak during the pull test. Also, retie if the line shows frays or damage near the knot.
Retie knots after catching a big fish. The strain can weaken the line. Regular checks help keep your setup safe.
- If the knot slips during a pull test
- If the fishing line frays near the knot
- After landing a large or strong fish
- Before starting a new fishing session
Tips For Knot Maintenance
Keeping your fishing knots strong is key to a good catch. Proper care helps avoid line breaks and lost fish.
Regular checks and quick fixes keep your knots reliable during every fishing trip.
Inspecting Knots Regularly
Check your knots before and during fishing. Look for signs of wear like fraying, loosening, or slipping.
- Run your fingers over the knot to feel for damage.
- Look for any discoloration or broken strands.
- Test the knot by pulling gently on the line.
- Replace knots that look weak or worn out.
Retying After Snags
Snags can weaken your knot even if it looks fine. Always retie your knot after a tough snag.
| Reason | Action |
| Line pulled tight on snag | Cut damaged section and retie knot |
| Knot slipped or loosened | Retie knot securely |
| Visible frays or damage | Replace entire section of line and knot |
Frequently Asked Questions
What Is The Best Knot To Tie A Fishing Line To A Hook?
The improved clinch knot is the most popular and reliable knot for attaching a fishing line to a hook. It provides strong holding power and is easy to tie, making it ideal for beginners and experienced anglers alike.
How Do I Prevent My Fishing Line From Slipping Off The Hook?
To prevent slipping, moisten the line before tightening the knot. Pull the knot firmly and trim excess line close to the knot. This ensures a secure grip and reduces the chance of the line slipping off during fishing.
Can I Use Any Fishing Line Type To Tie To A Hook?
Yes, you can tie most fishing line types, like monofilament, fluorocarbon, or braided lines, to a hook. However, knot strength varies with line type, so choose the right knot for your specific line to ensure durability.
How Tight Should I Tie The Fishing Line To The Hook?
Tie the knot tightly but avoid over-tightening, which can weaken the line. Pull firmly until the knot is snug against the hook eye. Proper tension ensures a secure connection without damaging the line.
Conclusion
Tying a fishing line to a hook is simple with practice. Use the right knot and pull it tight. Check the knot before casting to avoid losing fish. Small steps lead to better fishing results. Keep your line strong and secure.
Try different knots to see what works best. Enjoy your time fishing with confidence. Practice often, and your skills will grow. Fishing becomes more fun when your gear is ready. Keep tying and casting!