Are you tired of losing fish because your hook isn’t tied properly? Knowing how to tie a hook on your fishing line is one of the most important skills every angler needs.
When you master this simple technique, you’ll feel more confident and catch more fish. You’ll learn easy, step-by-step methods that anyone can follow. Get ready to improve your fishing game and never worry about your hook slipping again! Keep reading—you’re just moments away from becoming a pro at tying hooks.
Credit: www.beadinggem.com
Choosing The Right Fishing Line
Picking the right fishing line is key to tying a strong hook. Different lines suit different fishing needs.
Learn about monofilament, braided, and fluorocarbon lines to choose the best one for your fishing.
Monofilament
Monofilament line is made from a single strand of nylon. It is soft and stretches well, which helps absorb shocks.
This type of line is easy to tie knots on and works well for beginners. It floats on water and is good for topwater fishing.
- Affordable and widely available
- Good knot strength
- Stretches to prevent breaks
- Visible in water, so use colored lines if needed
Braided
Braided line is made by weaving many fibers together. It has very little stretch and is very strong.
This line is thin but strong, allowing longer casts. It is great for deep water and heavy cover fishing.
- High strength with small diameter
- Very sensitive to bites
- Does not stretch much
- Can be slippery, so use special knots
Fluorocarbon
Fluorocarbon line is made from a dense material that sinks in water. It is hard to see underwater.
This line is strong and resists abrasion. It works well in clear water and for fish that are shy.
- Almost invisible underwater
- Strong and abrasion resistant
- Less stretch than monofilament
- Can be stiffer and harder to tie

Credit: www.ohero.com
Selecting The Appropriate Hook
Choosing the right hook is key to successful fishing. The right hook fits your fishing style and target fish.
Knowing different hook types and sizes helps you pick the best one for your line and bait.
Types Of Hooks
Hooks come in many shapes. Each type suits certain fishing needs and bait types.
- J-Hooks: Classic style, good for most fish.
- Circle Hooks: Help catch fish without deep hooking.
- Treble Hooks: Three points, used for lures and big fish.
- Siwash Hooks: Single hook, often for artificial baits.
Size Considerations
Hook size matters for hook strength and fish size. Use the right size for your line and fish.
| Hook Size | Fish Type | Recommended Line Strength |
|---|---|---|
| Small (10-16) | Panfish, Trout | 2-6 lb |
| Medium (4-8) | Bass, Walleye | 6-12 lb |
| Large (1/0 – 4/0) | Catfish, Pike | 12-25 lb |
| Extra Large (5/0 and up) | Saltwater, Big Game | 25+ lb |
Essential Knot-tying Tools
Tying a hook on a fishing line needs the right tools. These tools help make strong, neat knots.
Using the correct tools saves time and makes fishing easier. Here are three key tools you need.
Needle Nose Pliers
Needle nose pliers have long, narrow jaws. They help hold small hooks tightly.
These pliers make pulling knots tight easier. They also help remove hooks from fish.
- Hold small hooks securely
- Tighten knots with control
- Remove hooks safely
Line Clippers
Line clippers cut fishing line cleanly and fast. They prevent frayed ends that weaken knots.
Good clippers are sharp and easy to use. They help trim excess line after tying knots.
- Cut line precisely
- Prevent frayed ends
- Trim excess line quickly
Knot Tying Tool
A knot tying tool helps make tight, neat knots. It guides the line and hook during tying.
This tool is useful for small hooks or thick lines. It makes knot tying less tricky.
- Assist in forming knots
- Hold line steady
- Work well with small hooks
Basic Knot Techniques
Tying a strong knot is important for fishing. It helps keep the hook attached to the line. There are many knots to learn. Two common knots are the Improved Clinch Knot and the Palomar Knot.
These knots are easy to tie and hold well. They work with most fishing lines and hooks. Learning these knots makes fishing more successful.
Improved Clinch Knot
The Improved Clinch Knot is popular for securing the hook. It is strong and simple to make. Many anglers use it for different fish sizes.
- Thread the line through the hook eye.
- Wrap the tag end around the main line five to seven times.
- Pass the tag end through the small loop near the hook eye.
- Then, pass the tag end through the large loop created.
- Moisten the knot and pull tight slowly.
- Trim the excess tag end.
Palomar Knot
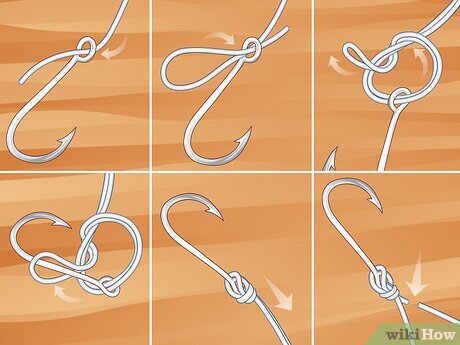
The Palomar Knot is known for its strength and ease. It works well with braided and monofilament lines. It keeps the hook in line during tough fights.
| Action | Description |
|---|---|
| Step 1 | Double the line and pass through the hook eye. |
| Step 2 | Tie a loose overhand knot with the doubled line. |
| Step 3 | Pass the hook through the loop of the overhand knot. |
| Step 4 | Pull the doubled line to tighten the knot. |
| Step 5 | Trim the tag end close to the knot. |
Advanced Knot Options
Fishing hooks must be tied securely to keep your catch safe. Advanced knots offer stronger holds than basic knots. These knots work well with different line types and conditions.
Below are two popular advanced knots. Each knot has unique steps and benefits for anglers seeking reliability and strength.
Snell Knot
The Snell Knot ties the hook to the line using the shank instead of the eye. This method gives more strength and keeps the hook straight for better hook sets.
- Pass the line through the hook eye and along the shank.
- Wrap the tag end tightly around the shank and main line.
- Make 5 to 7 wraps moving toward the hook eye.
- Thread the tag end back through the eye from the front.
- Pull the main line to tighten the wraps against the shank.
- Trim the tag end close to the knot.
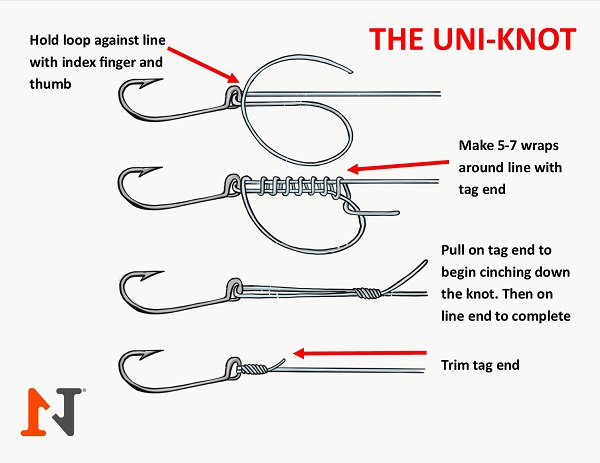
Uni Knot
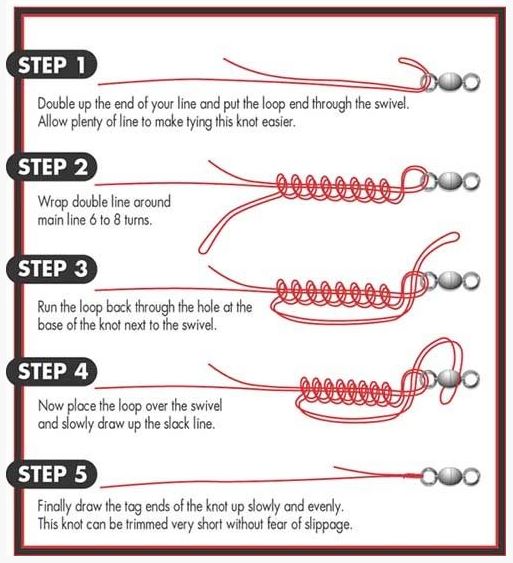
The Uni Knot works well for tying hooks, lures, and swivels. It is strong and easy to tie, even with slippery lines like fluorocarbon or braid.
| Step | Action |
| 1 | Pass the line through the hook eye and double back. |
| 2 | Make a loop by laying the tag end over the doubled line. |
| 3 | Wrap the tag end around both lines 6 times. |
| 4 | Pass the tag end through the loop created near the eye. |
| 5 | Moisten the knot and pull the main line to tighten. |
| 6 | Trim the tag end close to the knot. |
Step-by-step Knot Tying
Tying a hook to your fishing line is a basic skill every angler needs. A strong knot keeps the hook in place while fishing.
Follow these steps to tie a reliable knot that holds well and is easy to make.
Threading The Hook
Start by passing the end of the fishing line through the eye of the hook. Pull about 6 inches of line through to have enough for tying.
Make sure the line is not twisted or tangled before you start wrapping.
Wrapping The Line
Hold the hook and wrap the free end of the line around the main line five to seven times. Keep the wraps tight and close together.
- Wrap the line away from the hook eye
- Keep the wraps neat and even
- Use enough wraps for a secure knot
Securing The Knot
After wrapping, pass the line end through the loop near the hook eye. Pull both ends slowly to tighten the knot.
Wet the knot with water or saliva before pulling tight. This helps prevent the line from weakening.
- Check the knot for tightness
- Trim any excess line close to the knot
- Test the knot by pulling firmly
Testing Knot Strength
Knowing how to test the strength of your fishing knot is important for a successful catch. A strong knot keeps your hook secure and prevents losing fish.
There are simple ways to check if your knot is tied well and ready for fishing. Two common methods are the pull test and visual inspection.
Pull Test
The pull test helps you feel how strong your knot is. Gently pull on the line and hook to check if the knot holds tight. This test shows if the knot will slip or break under pressure.
- Hold the hook in one hand and the fishing line in the other.
- Pull slowly and steadily to apply pressure on the knot.
- Watch for any slipping or loosening of the knot.
- If the knot stays tight, it passes the pull test.
- If it slips or loosens, retie the knot and test again.
Visual Inspection
Look closely at the knot to check for any flaws. A well-tied knot looks neat and even. Visual inspection can catch problems before you test the knot physically.
| What to Check | Signs of a Good Knot |
| Tightness | Lines lie flat and snug without gaps |
| Symmetry | Knot looks balanced and tidy |
| No Fraying | Line is smooth and not damaged |
| Ends | Tag ends are trimmed close to the knot |
Credit: n1outdoors.com
Common Mistakes To Avoid
Tying a hook on a fishing line seems simple but many anglers make errors. These mistakes can cause the hook to slip or break off.
Knowing what to avoid helps you keep your hook secure and catch more fish. Two common mistakes are incorrect line tension and using the wrong knot type.
Incorrect Line Tension
Line tension means how tight you pull the fishing line when tying the knot. Too much or too little tension weakens the knot.
If the line is too loose, the knot may slip or come undone. If it is too tight, the line can fray or break.
- Keep steady, even tension while tightening the knot.
- Do not pull too hard or too softly.
- Practice to find the right feel for the line.
Using Wrong Knot Type
Different hooks and lines need different knots. Using the wrong knot makes your setup weak or hard to tie.
Some knots work better for braided lines. Others are best for monofilament or fluorocarbon lines.
- Use the improved clinch knot for most monofilament lines.
- Try the Palomar knot for braided lines.
- Match the knot to your line type and fishing style.
Tips For Knot Longevity
Tying a hook on your fishing line is only the first step. Keeping the knot strong over time is key to a good catch. Proper care helps your knots last longer and stay secure.
Small habits in storage and maintenance can make a big difference. This guide shares simple tips to protect your knots from damage and wear.
Proper Storage
Storing your fishing line and hooks correctly prevents knots from weakening. Avoid tight bends and pressure on the line, which can cause knots to slip or fray.
- Keep lines dry before storage to avoid weakening fibers
- Use a spool or line holder to prevent tangles and sharp bends
- Store fishing gear in a cool, dark place to reduce material degradation
- Separate lines with tied hooks from loose lines to avoid snagging
Regular Maintenance
Checking your knots regularly helps catch any damage early. Replace or retie knots if you see signs of wear.
| Maintenance Task | Why It Matters | How Often |
|---|---|---|
| Inspect knots for frays or slips | Prevents sudden line breaks | Before each fishing trip |
| Rinse line with fresh water | Removes dirt and salt that weaken line | After fishing in saltwater |
| Retie knots if unsure of strength | Ensures secure hook attachment | When knots look worn |
Frequently Asked Questions
How Do I Tie A Fishing Hook To The Line?
To tie a hook, thread the line through the eye, wrap it around 5-7 times, and pass the tag end through the loop. Pull tight and trim excess. This secure knot prevents slipping and is ideal for most fishing setups.
What Is The Best Knot For Fishing Hooks?
The improved clinch knot is the best choice for tying fishing hooks. It’s strong, reliable, and easy to tie. This knot holds well under tension and works great with various fishing lines, including monofilament and fluorocarbon.
Can I Tie A Hook Without Tools?
Yes, you can tie a hook without tools. Use your fingers to wrap the line and create loops. Practice makes perfect, and it’s helpful when fishing in remote locations without knot-tying tools or pliers.
How Tight Should I Pull The Fishing Knot?
Pull the knot tight enough to snug the wraps firmly. Avoid excessive force that may weaken the line. A properly tightened knot ensures the hook stays secure during casting and fighting fish.
Conclusion
Tying a hook on fishing line takes practice and patience. Start with simple knots and move to stronger ones. Always check your knot before casting. A secure knot helps catch more fish and avoids losing gear. Keep your line tight while tying to prevent slipping.
With time, your hands will work faster and better. Remember, fishing is about enjoying nature and learning new skills. Try different knots and find what works best for you. Stay calm, keep practicing, and have fun fishing!