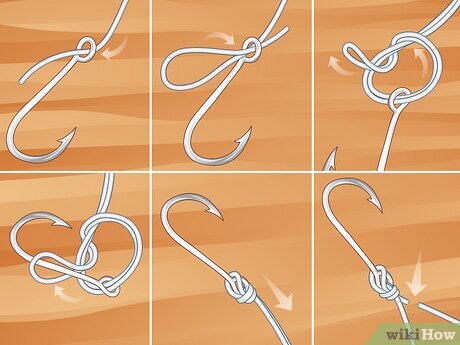
Tying a hook to your fishing line might seem simple, but doing it the right way can make all the difference between a great catch and a missed opportunity. If you want your fishing gear to hold strong and keep your bait secure, mastering this skill is a must.
You’ll learn easy, step-by-step methods to tie your hook quickly and securely. Keep reading, and you’ll be ready to fish with confidence every time you cast your line.
Choosing The Right Hook And Line
Picking the correct hook and line is key for successful fishing. The right match helps catch fish without losing them.
This guide covers types of hooks, how to select a line, and matching their strength for best results.
Types Of Fishing Hooks
Fishing hooks come in many shapes and sizes. Each type works best with certain fish and bait.
- J-Hooks: Classic shape, good for many fish types.
- Circle Hooks: Designed to hook fish in the corner of the mouth.
- Treble Hooks: Three points, used for lures and bigger fish.
- Siwash Hooks: Single hook, often used with artificial lures.
- Octopus Hooks: Short shank, ideal for live bait.
Selecting The Appropriate Line
Fishing lines differ by material, strength, and stretch. Choose a line that fits your fishing style and target fish.
| Line Type | Features | Best Use |
| Monofilament | Stretchy, good knot strength | Beginners, general fishing |
| Fluorocarbon | Low visibility, sinks fast | Clear water, wary fish |
| Braid | Strong, no stretch | Heavy cover, long casts |
Matching Hook And Line Strength
Match hook size and line strength to prevent breakage or lost fish. Stronger lines need bigger hooks.
- Small hooks pair with light lines for small fish.
- Medium hooks and lines suit most freshwater fish.
- Large hooks require heavy lines for big fish.
- Check line test ratings to match hook size.
Credit: www.beadinggem.com
Preparing Your Equipment
Tying a hook to a fishing line starts with good preparation. Getting your gear ready makes the knot stronger and easier to tie.
Organize your tools and follow simple steps to prepare the line and hook correctly. This helps avoid problems while fishing.
Trimming The Line
Cut the fishing line end cleanly before tying the hook. A neat cut helps the knot hold better and prevents slipping.
- Use sharp scissors or clippers
- Trim about 2 to 3 inches of the line end
- Remove any frayed or damaged parts
- Keep the cut straight and smooth
Moistening The Knot Area
Moisten the line before tightening the knot. This reduces friction and stops the line from weakening or breaking.
Use water or saliva to wet the knot area gently. Avoid too much moisture, which can make the knot slip.
Organizing Your Workspace
Keep your fishing area tidy. A clean space helps you focus and tie the hook faster without distractions.
| Item | Purpose | Tip |
| Fishing hook | Attach to line | Choose the right size for your catch |
| Line trimmer | Cut line ends | Keep blades sharp for clean cuts |
| Water container | Moisten knot area | Use a small cup or bottle cap |
| Flat surface | Organize tools | Clear space to avoid losing small items |
Step-by-step Knot Techniques
Tying a hook to a fishing line is an essential skill for anglers. A good knot keeps the hook secure while fishing.
Below are easy step-by-step instructions for three common knots. Each knot works well for different fishing needs.
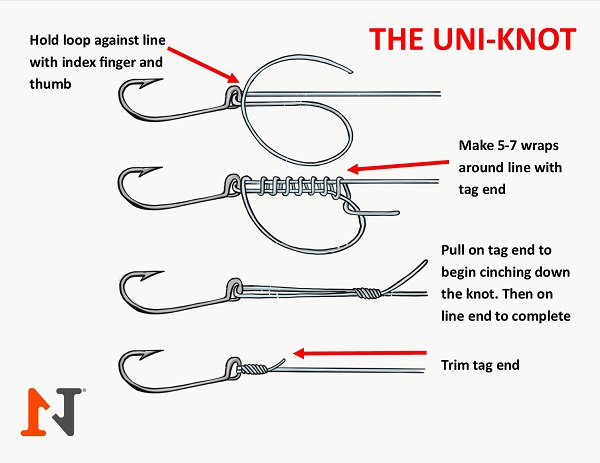
Improved Clinch Knot
The Improved Clinch Knot is strong and simple. It works well with most fishing lines and hooks.
Follow these steps to tie it:
- Thread the line through the hook eye.
- Wrap the tag end around the main line 5 times.
- Pass the tag end through the small loop near the eye.
- Then pass it through the big loop formed.
- Pull the tag end and main line to tighten the knot.
- Trim the excess tag end close to the knot.
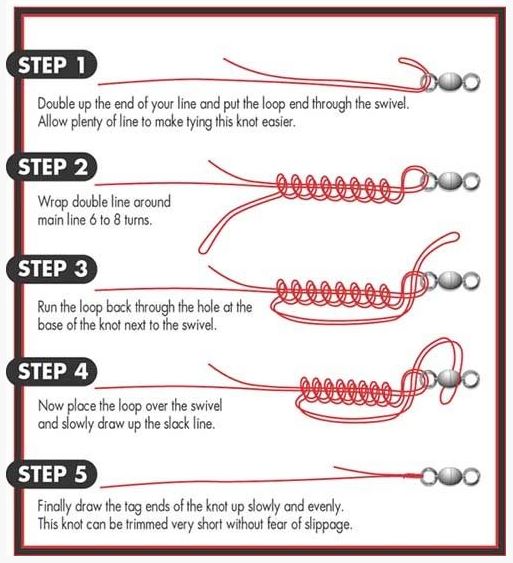
Palomar Knot
The Palomar Knot is very strong and easy to tie. It keeps the line from slipping on the hook.
Use these steps to tie a Palomar Knot:
- Double about 6 inches of line and pass it through the hook eye.
- Tie a loose overhand knot with the doubled line.
- Pass the hook through the loop of the overhand knot.
- Pull the doubled line slowly to tighten the knot around the hook eye.
- Trim the tag end close to the knot.
Loop Knot
The Loop Knot allows the hook to move freely. It is good for bait that needs natural movement.
Here is how to tie a Loop Knot:
- Make an overhand knot in the line, leaving a 6-inch tag end.
- Pass the tag end through the hook eye.
- Pass the tag end back through the overhand knot.
- Wrap the tag end around the standing line 4 times.
- Pass the tag end back through the overhand knot.
- Pull the tag end and standing line to tighten the knot.
- Trim the tag end close to the knot.

Credit: www.ohero.com
Tips For Stronger Knots
Tying a strong knot is key to successful fishing. It keeps your hook secure and stops the line from breaking.
Using the right techniques will help you tie knots that hold tight and last long on the water.
Avoiding Line Twists
Line twists can weaken your knot and cause tangles. To avoid twists, handle the line carefully during tying.
Keep the line straight and do not spin the hook while making the knot. This keeps the line from twisting.
- Hold the line steady without twisting
- Use a swivel if your lure spins a lot
- Check the line for twists before tying
Ensuring Tightness
A loose knot can slip and cause you to lose fish. Pull the knot tight slowly and evenly to secure it well.
Wet the line before pulling. This reduces friction and helps the knot tighten smoothly without damage.
- Wet the line with water or saliva
- Pull the knot slowly and firmly
- Keep tension on the tag end while tightening
Testing Knot Strength
After tying, test the knot by pulling hard on both ends. The knot should not slip or come undone.
If the knot slips, cut it off and retie. Testing ensures your knot will hold during fishing.
- Pull the main line and tag end firmly
- Look for any slipping or loosening
- Retie if the knot feels weak
Common Mistakes To Avoid
Tying a hook to a fishing line is easy but needs care. Small errors can cause lost fish and wasted time.
Below are common mistakes anglers make. Avoid these to keep your line strong and ready.
Using Damaged Line
Using a damaged line weakens the connection to the hook. Cuts, frays, or worn spots reduce line strength.
- Check the line for nicks or tears before tying.
- Do not tie knots on sections that look worn.
- Replace old or exposed line to avoid breaks.
Incorrect Knot Tying
Wrong knot tying leads to slipping or weak hold. Each knot has a proper way to tie and tighten.
| Mistake | Effect |
| Not wetting the line before tightening | Friction weakens the line |
| Skipping loops or wraps | Knot slips under pressure |
| Tying knot too close to the hook eye | Weak grip on the hook |
Skipping Knot Inspection
Not checking the knot after tying is risky. A loose or damaged knot can fail during fishing.
- Look for tightness and neat wraps.
- Make sure the knot does not slip when pulled hard.
- Retie the knot if it looks weak or uneven.
Maintaining Your Knots
Keeping your fishing knots strong is key for a good catch. Regular care helps avoid losing fish or gear. This guide covers how to maintain your knots well.
Simple checks and good habits can make your knots last longer. Follow these tips to keep your knots reliable every time you fish.
Regular Knot Checks
Check your knots before and after each fishing trip. Look for signs of wear like frayed lines or loose knots. Catch problems early to avoid breakage.
- Inspect the knot for tightness
- Look for any damage on the line near the knot
- Retie if the knot feels loose or damaged
- Make sure the hook is secure and does not slip
Retying After Use
Retie your hook knot after each use to keep it strong. Knots can weaken from water, fish pulls, and sun exposure. Fresh knots help prevent failures.
- Cut off the old knot carefully
- Use clean, dry line for tying
- Follow your preferred knot method
- Pull tight and test the knot firmly
Storage Recommendations
Store your fishing lines and hooks properly to protect knots. Poor storage can cause knots to weaken or lines to tangle. Keep gear dry and organized.
| Storage Tip | Why It Helps |
| Keep lines dry | Prevents line damage and knot weakening |
| Use line spools or holders | Stops tangling and maintains knot shape |
| Store in a cool place | Protects line from sun and heat damage |
| Check knots before storage | Ensures knots stay secure and ready |
Credit: n1outdoors.com
Frequently Asked Questions
How Do I Tie A Fishing Hook To A Line Securely?
To tie a fishing hook securely, use the improved clinch knot. Thread the line through the hook eye, wrap it five times, pass the end through the loop, and tighten. This knot is strong and reliable for most fishing situations.
What Is The Easiest Knot For Attaching A Hook?
The Palomar knot is the easiest for attaching a hook. It requires just a simple loop, passing the hook through, and tying a double knot. This knot is quick to tie and offers excellent strength for fishing lines.
Can I Use Any Fishing Line To Tie Hooks?
Yes, you can use most fishing lines like monofilament, fluorocarbon, or braided lines. Just ensure the knot you choose suits the line type. Different lines may need specific knots for optimal strength and durability.
How Often Should I Retie The Hook Knot?
You should retie your hook knot before each fishing trip or if the knot shows wear. Frequent reties prevent line breakage and ensure your hook stays secure. Always check knots for fraying or loosening.
Conclusion
Tying a hook to a fishing line is essential. It ensures a successful catch. Practice these steps regularly for confidence. A secure knot keeps your hook in place. Always check for tightness before casting. With patience, you’ll improve quickly. Fishing becomes more enjoyable and rewarding.
Remember, each knot tells a story. It connects you to nature’s rhythm. So, grab your gear and head to the water. Experience the joy of fishing firsthand. Happy fishing, and may you reel in the big one!