Knowing how to tie a hook to your fishing line is one of the most important skills every angler needs. If your knot slips or comes undone, you could lose your catch—and all the time you spent waiting.
But don’t worry, you’re about to learn simple, reliable methods that will keep your hook secure every time you cast. Whether you’re a beginner or want to improve your technique, this guide will give you clear, step-by-step instructions to boost your confidence and increase your chances of success on the water.
Keep reading, and soon tying a strong hook knot will become second nature.
Choosing The Right Hook And Line
Choosing the right hook and line is important for a good fishing experience. The right gear helps catch fish easily and keeps your tackle strong.
Different hooks and lines work better for certain fish and conditions. Knowing how to pick the right ones will improve your fishing success.
Types Of Fishing Hooks
Fishing hooks come in many shapes and sizes. Each type is good for different fish and bait styles.
- J-Hooks: Classic shape, good for live bait.
- Circle Hooks: Reduce fish injury, good for catch and release.
- Treble Hooks: Three points, often used with lures.
- Bait Hooks: Designed for holding bait securely.
- Double Hooks: Two points, used for special bait or rigs.
Selecting Suitable Fishing Line
Fishing lines vary by material and strength. Pick a line that matches your fishing style and target fish.
- Monofilament: Flexible and easy to handle, good for beginners.
- Fluorocarbon: Less visible in water, good for clear water fishing.
- Braid: Strong and thin, good for heavy cover and big fish.
Matching Hook Size To Line Strength
| Hook Size | Line Strength (Pounds) |
| Size 12 – 16 | 2 – 6 lbs |
| Size 8 – 10 | 6 – 12 lbs |
| Size 4 – 6 | 12 – 20 lbs |
| Size 1 – 2/0 | 20 – 30 lbs |
| Size 3/0 and larger | 30+ lbs |
Use a hook that fits your line strength. A small hook with a heavy line may break. A large hook with a weak line can pull free.
Essential Tools For Knot Tying
Tying a hook to fishing line needs some simple tools. These tools help make strong and neat knots.
Using the right tools makes knot tying easier and faster. It also helps avoid mistakes.
Needle Nose Pliers
Needle nose pliers are thin and pointed. They help grab small parts of the hook or line.
These pliers allow you to pull the line tight without hurting your fingers. They also help in bending or adjusting hooks.
- Grip the hook or line securely
- Pull knots tight with control
- Adjust small fishing parts easily
Scissors Or Line Clippers
Scissors or line clippers cut fishing line cleanly. Clean cuts stop knots from slipping or breaking.
Use sharp scissors or clippers designed for fishing lines. They work better on tough lines like braided or fluorocarbon.
- Cut excess line after tying knots
- Make smooth cuts for strong knots
- Keep blades sharp for best results
Optional Knot Tying Tools
Some anglers use extra tools to help tie knots. These tools are not required but can be useful.
Tools like knot tying jigs or loop makers help keep line steady. They make tying more consistent, especially for beginners.
- Knot tying jigs hold line tight and steady
- Loop makers help form perfect loops
- Hook threading tools guide line through small eyes
Preparing Your Line And Hook
Preparing your fishing line and hook is important for a strong and secure connection. This helps you catch fish without losing them.
Follow these simple steps to get your line and hook ready before tying.
Cutting The Line To Length
Cutting your fishing line to the right length makes tying easier and more effective. Use sharp scissors or a line cutter for a clean cut.
- Decide the length you need for your fishing setup.
- Hold the line firmly to avoid fraying.
- Cut the line straight across with sharp scissors.
- Check the cut end to ensure it is smooth and neat.
Moistening The Line
Moistening the line before tying helps reduce friction and prevents the line from weakening. Use clean water or saliva to wet the line.
Follow these tips for moistening your line:
- Dip the line end in water briefly.
- Avoid soaking the hook eye to prevent rust.
- Keep the line moist during the tying process.
Inspecting The Hook Eye
Check the hook eye carefully before tying. Make sure it is clean and free of damage to keep the line secure.
| Condition | What to Check | Action Needed |
| Clean | No dirt or rust inside the eye | Use as is |
| Dirty | Dirt or salt buildup | Clean with a soft cloth |
| Damaged | Cracks or sharp edges | Replace the hook |
Step-by-step Knot Tying Methods
Tying a hook to a fishing line is essential for every angler. Using the right knot keeps your hook secure and improves your catch rate.
This guide shows you how to tie four popular fishing knots. Each method has clear steps to help you learn fast.
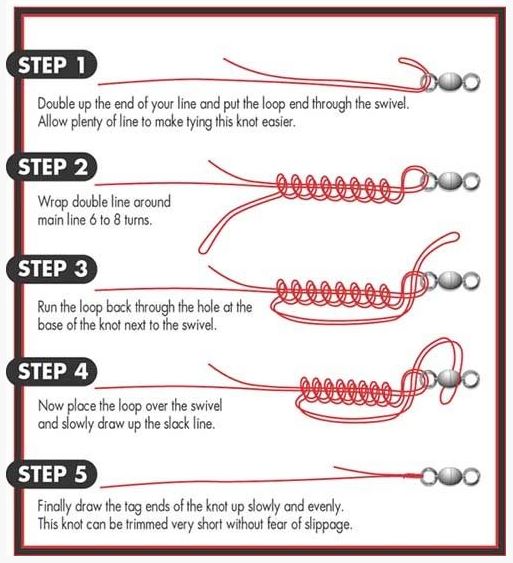
Improved Clinch Knot
The Improved Clinch Knot is strong and simple. It works well with monofilament and fluorocarbon lines.
- Pass the line through the hook eye.
- Wrap the tag end around the main line five to seven times.
- Thread the tag end through the small loop near the eye.
- Then pass the tag end through the big loop you just made.
- Wet the knot and pull the tag end and main line tight.
- Trim the excess tag end.
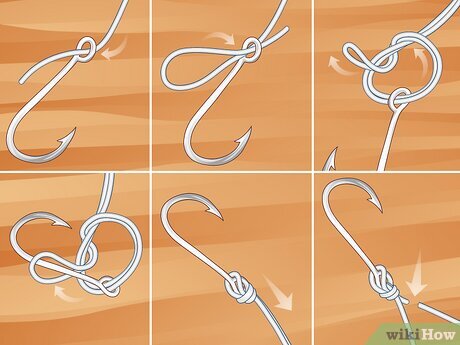
Palomar Knot
The Palomar Knot is very strong and easy to tie. It works well with braided and monofilament lines.
- Double about six inches of line and pass it through the hook eye.
- Tie a loose overhand knot with the doubled line.
- Pass the hook through the loop of the overhand knot.
- Pull the hook and line to tighten the knot.
- Trim the tag end close to the knot.
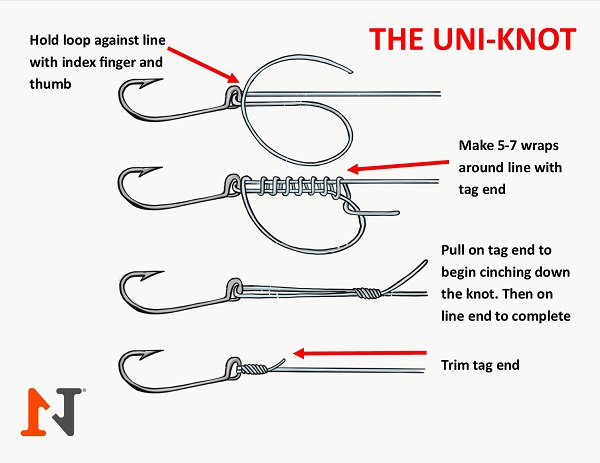
Uni Knot
The Uni Knot is versatile. It works well for attaching hooks, lures, and swivels.
- Pass the line through the hook eye and double back parallel.
- Make a loop by laying the tag end over the doubled line.
- Wrap the tag end around both lines five to seven times.
- Pull the tag end to tighten coils against the eye.
- Slide the knot down to the eye and pull the main line tight.
- Cut the tag end close to the knot.
Snell Knot
The Snell Knot keeps the hook in line with the leader. It works best with straight-shank hooks.
| Action | Description |
|---|---|
| Step 1 | Lay the line along the hook shank with the tag end pointing past the hook eye. |
| Step 2 | Wrap the tag end tightly around the hook shank and main line 6 to 8 times. |
| Step 3 | Pass the tag end through the loop near the hook eye. |
| Step 4 | Moisten the knot and pull both ends to tighten it against the hook eye. |
| Step 5 | Trim the tag end close to the wraps. |
Tips For Stronger Knots
Tying a hook to your fishing line is a basic skill every angler needs. Strong knots help keep your hook secure and catch more fish.
Using the right techniques makes your knots tighter and less likely to slip. Follow these tips for better results.
Avoiding Line Twist
Line twist weakens your knot and can cause tangles. Avoid twisting the line when tying your hook.
Hold the line steady and turn the hook instead of the line. This keeps the line straight and strong.
Applying Proper Tension
Pull the knot tight but gently. Too much force can damage the line or knot.
Use your fingers to feel the knot tighten. Stop pulling once it feels firm and secure.
Trimming Excess Line
Cut off the extra line close to the knot. Leaving long ends can cause tangles or snagging.
Use sharp scissors or nail clippers. Trim neatly without cutting too close to the knot.
Credit: www.beadinggem.com
Testing Your Knot Strength
Tying a hook to a fishing line is important for a strong catch. Testing your knot strength helps avoid losing fish.
Checking your knot ensures it holds well under pressure. This prevents your hook from slipping or breaking.
Pull Test Techniques
Pull tests show how strong your knot is. Use your hands to pull the line hard where the knot is tied.
Pull steadily, not fast, to see if the knot slips or breaks. Try pulling the hook and line in opposite directions.
- Hold the hook firmly with one hand.
- Pull the line slowly with the other hand.
- Check if the knot moves or loosens.
- Repeat several times to be sure.
Signs Of Weak Knots
Look for signs that your knot might fail. These signs help you know if the knot is safe to use.
- The knot slips when you pull the line.
- The line frays or looks worn near the knot.
- The knot looks uneven or twisted.
- The knot feels loose or soft.
Any of these signs mean your knot may break during fishing. It is best to fix or retie the knot.
When To Retie
Retie your hook knot after catching big fish. Heavy pulls can weaken knots without visible damage.
If you see any weak knot signs, retie before fishing again. Also, retie if the knot feels loose or moves during the pull test.
- After catching large or strong fish.
- If the line shows wear near the knot.
- When the knot slips during a pull test.
- If the knot feels loose or soft.
Common Knot Mistakes To Avoid
Tying a hook to a fishing line seems easy but mistakes can weaken the knot. These errors cause the knot to slip or break during fishing.
Knowing what to avoid helps you make strong, reliable knots. Here are some common knot mistakes to watch out for.
Incorrect Threading
Threading the line through the hook eye the wrong way reduces knot strength. The line must go through the hook eye cleanly without twists.
Twisted or uneven threading causes uneven tension. This can make the knot slip or weaken under pressure.
- Pass the line straight through the hook eye
- Avoid twisting the line as you thread it
- Keep the line aligned for neat wraps
Skipping Moistening
Many anglers skip moistening the line before tightening the knot. Dry knots create friction and can damage the fishing line.
Moistening the knot with water or saliva helps it tighten smoothly. This reduces heat and friction that weaken the line.
- Wet the line before pulling tight
- Use water or saliva for moistening
- Never tighten a dry knot hard
Over-tightening The Knot
Tightening the knot too hard can damage the fishing line. Excess force cuts fibers and weakens the knot’s hold.
Pull the knot firm but gentle. The right tension keeps the knot strong without harming the line.
- Apply steady, moderate pressure
- Stop tightening once the knot is snug
- Check the knot for damage before use
Credit: n1outdoors.com

Credit: www.ohero.com
Frequently Asked Questions
How Do I Tie A Hook To A Fishing Line?
To tie a hook, thread the line through the eye of the hook. Make a loop, wrap the tag end around the line 5-7 times, then pass it back through the loop. Pull tight and trim excess line. This creates a secure knot.
What Is The Strongest Knot For Fishing Hooks?
The Palomar knot is known as the strongest for fishing hooks. It is simple, strong, and reliable. It maintains high line strength and resists slipping, making it ideal for various fishing conditions.
Can I Tie A Hook Without Special Tools?
Yes, you can tie a hook without tools. Using just your hands, follow the knot steps carefully. Tools like pliers may help tighten knots, but they are not necessary for a secure hook attachment.
How Often Should I Retie My Fishing Hook?
Retie your hook if the knot shows wear or damage. Also, retie if you catch a big fish or after several uses. Regular retie ensures safety and prevents losing fish due to knot failure.
Conclusion
Tying a hook to a fishing line is essential. Practice makes it easier. Use the right knot for strength and reliability. Always check for tightness before casting. A secure hook increases fishing success. Even beginners can learn with patience. Following these steps ensures a good catch.
Keep your fishing gear ready and organized. Enjoy the process and stay patient. Fishing is both relaxing and rewarding. Happy fishing!