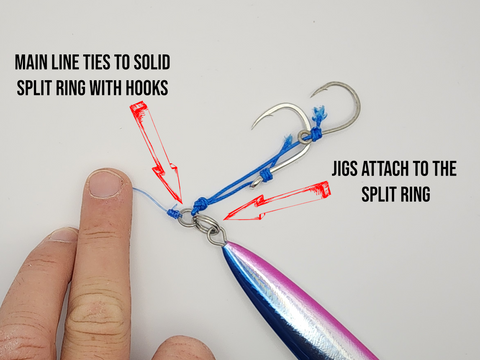
Are you tired of losing your jig right when the big catch bites? Knowing how to tie a jig on your fishing line the right way can make all the difference between a successful day on the water and coming home empty-handed.
In this guide, you’ll learn simple, step-by-step techniques that even beginners can master quickly. By the time you finish reading, you’ll have the confidence to tie strong, reliable knots that keep your jig secure—so you can focus on landing the fish you’ve been waiting for.
Ready to improve your fishing skills and catch more? Let’s get started.
Choosing The Right Jig
Selecting the right jig is important for successful fishing. The jig should match the fish you want to catch and the water conditions.
This guide explains types of jigs, matching jigs to fish species, and what materials to consider.
Types Of Jigs
There are many jig types. Each type works best in certain fishing situations and water depths.
- Round Head Jigs: Good for general use and deep water.
- Football Jigs: Work well on rocky bottoms and for bass.
- Tube Jigs: Ideal for mimicking small baitfish.
- Swim Jigs: Designed to move naturally in the water.
- Grass Jigs: Made to fish through weeds and vegetation.
Matching Jig To Fish Species
Different fish prefer different jigs. Match the jig size and color to the fish’s habits.
| Fish Species | Preferred Jig Type | Recommended Color |
| Bass | Football or Swim Jigs | Green, Brown |
| Walleye | Tube or Round Head Jigs | White, Yellow |
| Crappie | Small Round Head Jigs | Pink, Chartreuse |
| Trout | Lightweight Round Head | Silver, Blue |
| Perch | Grass or Tube Jigs | Orange, Red |
Material Considerations
Jigs come in different materials. Pick one that fits the water and fishing style.
- Lead:Heavy, sinks fast, good for deep fishing.
- Tungsten:Denser than lead, smaller size, sinks quickly.
- Plastic:Lightweight, floats or suspends well.

Credit: www.youtube.com
Selecting The Fishing Line
Choosing the right fishing line is key to tying a jig properly. The type and strength of line affect how well your jig moves and how strong your setup is.
Picking a fishing line that fits your fishing style helps catch more fish and makes your knot last longer.
Monofilament Vs. Fluorocarbon
Monofilament line is stretchy and easy to handle. It works well for beginners and is cheaper. Fluorocarbon is less visible underwater and sinks faster. It is good for clear water fishing.
Both lines have strengths. Choose monofilament if you want stretch and softness. Pick fluorocarbon for low visibility and abrasion resistance.
- Monofilament is flexible and floats
- Fluorocarbon is harder and sinks
- Fluorocarbon is less visible in water
- Monofilament is easier to knot
Line Strength And Diameter
Line strength matters for catching big fish. A stronger line holds more weight without breaking. The diameter affects how the line moves in water.
Thinner lines cast farther and are less visible. Thicker lines are more durable. Match your line strength to the fish you want to catch.
| Line Strength (lbs) | Recommended Use | Diameter (inches) |
|---|---|---|
| 6-10 | Small fish, light jigs | 0.010 – 0.014 |
| 12-20 | Medium fish, general use | 0.015 – 0.020 |
| 25+ | Large fish, heavy jigs | 0.021+ |
Line Condition Tips
Check your fishing line often. Look for frays, cuts, or weak spots. Old line breaks easily and can lose strength.
Replace your line if it shows damage. Store your line in a cool, dry place to keep it strong. Clean the line after fishing in saltwater.
- Inspect line before each trip
- Replace line after heavy use
- Keep line away from sunlight
- Wash salt off line after use
Preparing The Line And Jig
Tying a jig on your fishing line starts with good preparation. You need to get your line and jig ready before you tie the knot.
Preparing well helps the jig stay secure and work better when fishing. Let’s look at how to prepare the line and jig step by step.
Trimming And Inspecting The Line
Start by checking your fishing line for any damage. Look for frays, nicks, or weak spots that might break easily.
Trim the end of the line to remove old knots or rough edges. A clean end helps the knot hold better.
- Use sharp scissors or clippers to trim the line
- Cut about half an inch from the end
- Make sure the cut is straight and smooth
- Inspect the trimmed line for any signs of damage
Positioning The Jig
Hold the jig in one hand and the fishing line in the other. Position the jig so the line runs through the eye of the hook.
Place the jig close to your fingers to make tying easier. This helps you control the jig and line at the same time.
- Thread the line through the jig’s eye from front to back
- Keep about 6 inches of line beyond the eye for tying
- Hold the jig steady while you work on the knot

Credit: wholesalejigs.com.au
Step-by-step Knot Techniques
Tying a jig on your fishing line is important for a strong and reliable connection. Using the right knot keeps your jig secure during fishing. This guide shows simple steps for three common knots.
Each knot has its own use and strength. Follow these easy instructions to tie them correctly and improve your fishing experience.
Improved Clinch Knot
The Improved Clinch Knot is popular for tying jigs to monofilament lines. It is simple and holds well under pressure.
Make sure to wet the line before tightening to reduce friction and increase strength.
- Thread the line through the jig eye.
- Wrap the tag end around the standing line 5-7 times.
- Pass the tag end through the small loop near the eye.
- Then pass it through the big loop you just made.
- Wet the knot and pull both ends to tighten.
- Trim the excess tag end.
Palomar Knot
The Palomar Knot is strong and easy to tie. It works well with braided and monofilament lines. This knot keeps the jig secure and resists slipping.
Keep the loop loose enough to pass over the jig eye before tightening.
- Double about 6 inches of line and pass it through the jig eye.
- Tie a loose overhand knot with the doubled line.
- Pass the jig through the loop of the overhand knot.
- Pull both ends slowly to tighten the knot.
- Trim the tag end close to the knot.
Loop Knot For Jig Action
The Loop Knot allows the jig to move freely, giving it a natural action in the water. This knot is useful for jigs that need extra movement.
Make sure the loop is not too tight, so the jig can move without restriction.
- Make an overhand knot about 6 inches from the line end.
- Pass the line end through the jig eye.
- Thread the line end through the overhand knot loop.
- Wrap the tag end around the standing line 3-4 times.
- Pass the tag end back through the overhand knot loop.
- Wet the knot and pull the standing line to tighten.
- Adjust the loop size for jig movement.
- Trim the tag end close to the knot.
Tips For Secure Knot Tying
Tying a jig on your fishing line needs care. A strong knot keeps the jig from slipping off.
Using the right steps helps your knot hold tight and last longer in water.
Moistening The Knot
Before tightening, wet the knot with water or saliva. This reduces heat and friction.
Moistening stops the line from weakening or breaking while you pull the knot tight.
Tightening And Testing
Pull the knot slowly and firmly to tighten it. Avoid quick or jerky pulls.
After tightening, test the knot by pulling hard. Make sure it does not slip or come loose.
- Hold the jig and line firmly
- Pull with steady pressure
- Check for any movement in the knot
- Retie if the knot slips
Avoiding Common Mistakes
Do not skip moistening the knot. Dry knots can weaken or break easily.
Make sure the knot is tight and neat. Loose or messy knots often fail.
- Do not pull too fast or too hard
- Use the right knot for your line type
- Trim excess tag end close to the knot
- Practice tying knots regularly
Maintaining Your Tied Jig
Keeping your tied jig in good shape helps you catch more fish. Regular care stops problems before they start.
Simple checks and proper storage make your jigs last longer. Learn how to maintain your jig well.
Checking Knot Integrity
Look at your knot often to see if it stays tight. A loose knot can let your jig slip off during fishing.
Feel the knot with your fingers. If it feels weak or slides, it needs to be retied.
- Check knots before each fishing trip
- Pull gently to test tightness
- Retie knots that look worn or loose
Replacing Damaged Line
Fishing line can get weak from sun, water, or sharp edges. Replace it to avoid breakage.
Cut off old or frayed line. Tie a new piece to keep your jig secure.
- Check line for cuts or frays
- Replace line if damaged or old
- Use the right line strength for your jig
Storing Tied Jigs Properly
Store your tied jigs in a dry, cool place. Avoid direct sunlight to keep line from weakening.
Use a tackle box with separate compartments. This stops jigs from tangling or getting damaged.
- Keep jigs dry to prevent rust
- Use compartments to separate jigs
- Store away from heat and sunlight

Credit: www.youtube.com
Frequently Asked Questions
How Do You Tie A Jig To Fishing Line?
Start by threading the line through the jig eye. Make a loop, wrap the tag end around the line 5-7 times. Pass the tag end through the loop, then tighten. Trim excess line for a secure, strong knot.
What Is The Best Knot For Tying A Jig?
The Improved Clinch Knot is best for tying jigs. It is strong, easy, and reliable. This knot ensures your jig stays attached during casting and fish strikes, improving your fishing success.
How Tight Should The Knot Be When Tying A Jig?
The knot should be snug but not overly tight. Tighten it slowly to avoid line damage. A properly tightened knot secures the jig firmly and prevents slippage during fishing.
Can I Use Braided Line To Tie A Jig?
Yes, braided line works well for tying jigs. Use a Palomar knot with braided line for better grip. Braided lines offer high sensitivity and strength, enhancing jig performance.
Conclusion
Tying a jig on your fishing line is simple and useful. Practice the steps slowly to get better each time. A strong knot keeps your jig secure and helps catch fish. Use clean, dry hands for a tight, neat tie.
Remember, patience and practice bring good results. Try different knots to see what works best for you. Enjoy fishing with confidence and a well-tied jig. Ready to catch more fish? Keep practicing these easy steps often.