Have you ever struggled to tie a knot in fishing line for your craft projects? You’re not alone.
Getting the knot just right can make all the difference between a sturdy creation and a frustrating mess. In this guide, you’ll discover simple, step-by-step techniques that anyone can master quickly. Whether you’re making jewelry, decorations, or unique art pieces, knowing how to tie a strong knot in fishing line will take your crafts to the next level.
Keep reading, and you’ll never have to worry about your projects falling apart again.
Choosing The Right Fishing Line
Choosing the right fishing line is key for crafts that use knots. The line should be strong and easy to handle. Picking the right type helps your knot hold better and last longer.
Not all fishing lines are the same. Some work better for certain projects. Knowing the basics helps you select the best one for your craft.
Types Of Fishing Line
Fishing lines come in different materials. Each has its own strength and stretch. The main types are monofilament, fluorocarbon, and braided lines.
- Monofilament:Made from one strand of plastic. It is flexible and easy to knot. It stretches a bit, which can protect knots.
- Fluorocarbon:Less visible in water. It is stiffer and sinks faster. It is good for strong, tight knots.
- Braided:Made of many thin fibers woven together. It is very strong and thin. It has little stretch but can be slippery.
Factors To Consider
Choose a fishing line that fits your craft needs. Think about strength, thickness, and how easy it is to tie knots.
- Strength:Pick a line that holds well under pressure. Strong lines keep knots secure.
- Thickness:Thinner lines are easier to work with but may break easier.
- Flexibility:More flexible lines are simpler to knot tightly.
- Visibility:Clear or low-visibility lines look better in finished crafts.
- Durability:Some lines resist wear and last longer in projects.

Credit: thebearessentials.com
Basic Knot Tying Techniques
Tying knots in fishing line is useful for many crafts. It helps join lines or attach items securely.
Learning simple knots makes your craft projects stronger and easier to finish.
Overhand Knot
The overhand knot is the simplest and most common knot. It creates a basic loop at the line’s end.
This knot helps stop the line from slipping through holes or beads in your craft.
- Make a loop in the fishing line
- Pass the end through the loop
- Pull tight to secure the knot
Square Knot
The square knot joins two lines together. It is strong and lies flat, good for crafts.
This knot works well for tying ribbons or cords in your craft projects.
- Cross the right end over the left end
- Wrap it under and pull tight
- Cross the left end over the right end
- Wrap it under and pull tight again
Strong Knots For Crafts
Tying strong knots in fishing line is important for many craft projects. These knots hold well and keep your work secure.
Using the right knot makes your crafts last longer. Two popular strong knots are the Clinch Knot and the Palomar Knot.
Clinch Knot
The Clinch Knot is simple and strong. It works well for tying line to hooks or small rings in crafts.
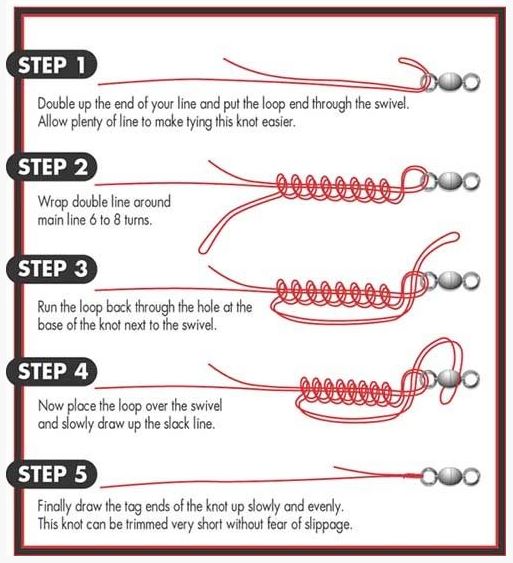
To tie it, pass the line through the eye, wrap it five times, then pass the end through the loop and pull tight.
- Pass line through hook eye
- Wrap line around itself 5 times
- Pass end through first loop
- Pull both ends to tighten
Palomar Knot
The Palomar Knot is very strong and easy to tie. It keeps the line from slipping, perfect for crafts needing durability.
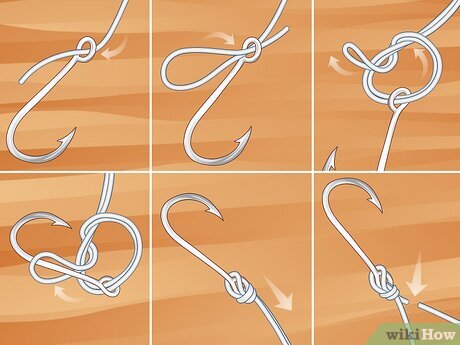
Fold the line in half, pass it through the hook eye, tie a loose overhand knot, and pull the loop over the hook. Then tighten.
- Fold line in half
- Pass loop through hook eye
- Tie loose overhand knot
- Pass loop over hook
- Pull to tighten knot
Credit: www.beadinggem.com
Decorative Knot Ideas
Tying knots in fishing line can add a creative touch to your crafts. Decorative knots are both useful and pretty.
These knots hold well and can be part of jewelry, decorations, or other handmade projects.
Figure Eight Knot
The Figure Eight Knot is easy to tie and looks like a small figure eight. It creates a neat loop that is strong and decorative.
- Make a loop in the line.
- Pass the end around the standing line.
- Thread the end back through the loop.
- Tighten the knot by pulling both ends.
This knot is great for hanging beads or charms in craft projects. It also stops the line from slipping through holes.
Bowline Knot
The Bowline Knot forms a fixed loop that does not slip. It is very useful for making loops for hanging or attaching decorations.
| Bowline Knot Steps | Description |
|---|---|
| Make a small loop | Leave a loop with the line, crossing the end over the main line |
| Pass the end through the loop | Bring the end up through the loop from the underside |
| Go around the line | Wrap the end around the standing line |
| Back through the loop | Thread the end back down through the original loop |
| Tighten | Pull the knot tight while holding the loop |
This knot keeps its shape well and is perfect for crafts that need a strong loop, like hanging ornaments or keychains.
Tools And Accessories
Tying a knot in fishing line for crafts needs some basic tools. These tools help make strong and neat knots. Using the right accessories can improve your work and make the process easier.
This guide covers essential tools and optional accessories you can use. Each item helps you handle the fishing line with care and precision.
Essential Tools
These tools are needed for most fishing line knot projects. They help you cut, hold, and tighten the line safely and accurately.
- Scissors or Line Clippers:Used to cut the fishing line cleanly without fraying.
- Needle-Nose Pliers:Helps pull and tighten knots in hard-to-reach places.
- Hook or Needle Tool:Useful for threading and pulling the line through tight loops.
- Ruler or Measuring Tape:Measures the length of the line for precise cuts.
Optional Accessories
These items are not necessary but can improve your knot-tying experience. They add convenience and help protect the line and your hands.
| Accessory | Purpose |
| Line Conditioner | Keeps the fishing line smooth and prevents tangling |
| Gloves | Protect your fingers from cuts and blisters while tying knots |
| Magnifying Glass | Makes it easier to see small knots and thin lines |
| Clamp or Line Holder | Holds the line steady while you work |
Tips For Practice
Tying knots in fishing line for crafts takes patience and practice. It helps to know common mistakes and how to improve your knot strength.
Try different knots and test them to see which hold best. Practice regularly to get comfortable with the process.
Common Mistakes
Many people tie knots too loosely or use the wrong type of knot for their line. This can cause the knot to slip or break easily.
- Not wetting the line before tightening the knot
- Tying knots with uneven loops or twists
- Pulling knots too fast or too hard
- Using knots that don’t fit the line thickness
- Failing to trim excess line close to the knot
Improving Knot Strength
Strong knots hold better and last longer. You can improve knot strength by following some simple tips.
| Tip | Why It Helps |
| Wet the line before tightening | Reduces friction and prevents damage |
| Tighten slowly and evenly | Ensures the knot sets properly |
| Choose the right knot for the line type | Matches strength and flexibility needs |
| Practice tying knots regularly | Builds muscle memory and speed |
| Trim excess line close to the knot | Prevents snagging and loosening |
Creative Craft Projects
Tying a knot in fishing line is useful for many craft projects. It helps hold pieces together tightly.
Fishing line is strong and clear, making it perfect for creative uses beyond fishing.
Jewelry Making
Fishing line works well for making necklaces and bracelets. It holds beads firmly without showing.
Knowing how to tie a strong knot keeps your jewelry from falling apart.
- Use a double knot for extra strength.
- Pull tight to secure beads in place.
- Trim excess line close to the knot.
Home Decor
Fishing line is great for hanging lightweight home decorations. It is nearly invisible on walls.
Tying neat knots helps keep decorations stable and prevents slipping or falling.
- Use a loop knot to hang items securely.
- Make sure knots are tight and trimmed.
- Test knots by gently pulling before hanging.

Credit: www.wikihow.com
Frequently Asked Questions
How Do I Tie A Strong Knot In Fishing Line?
To tie a strong knot, use the improved clinch knot. Pass the line through the eye, wrap five times, then thread back through the loop. Pull tight and trim excess. This knot is secure and ideal for crafts needing durability.
What Is The Best Knot For Fishing Line Crafts?
The improved clinch knot is best for fishing line crafts. It’s simple, reliable, and holds well under tension. It works with most line types and is easy to tie, ensuring your craft projects stay intact.
Can I Use Fishing Line Knots For Jewelry Making?
Yes, fishing line knots like the surgeon’s knot are great for jewelry. They provide strength and flexibility, ideal for beading and stringing delicate materials. This helps create durable and neat craft pieces.
How To Avoid Fishing Line Knot Slippage In Crafts?
Wet the line before tightening knots to reduce friction and slippage. Pull knots slowly and firmly until tight. Using the right knot type also helps prevent slipping in craft projects.
Conclusion
Tying a knot in fishing line for crafts is simple and useful. Practice a few times to get it right. Strong knots keep your projects neat and secure. Use the right knot for different materials. Small steps lead to better results.
Keep your line tight while tying. Crafting becomes more fun with good knot skills. Try these tips in your next craft project. Enjoy making beautiful things with strong knots.