Are you tired of losing fish because your fishing line slips off the hook? Knowing how to tie your fishing line to a hook the right way can make all the difference between a successful catch and a frustrating day on the water.
You’ll discover simple, step-by-step techniques that anyone can master quickly. By learning these easy knots, you’ll boost your confidence and increase your chances of landing the big one. Keep reading, and you’ll never worry about your line coming undone again.
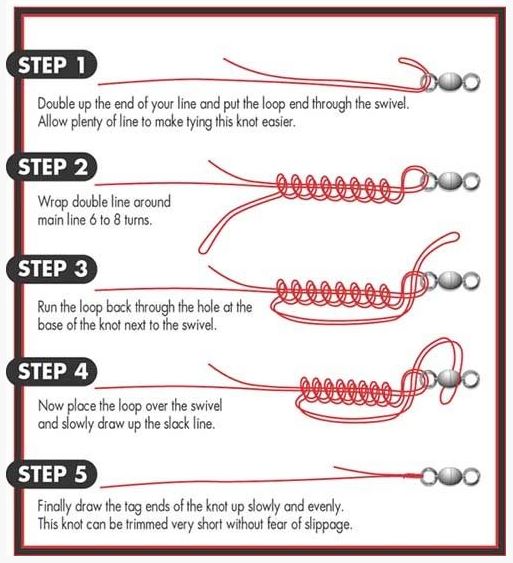
Credit: www.beadinggem.com
Choosing The Right Fishing Line
Choosing the right fishing line is important for a good fishing experience. The right line helps you catch fish easily and keeps your gear safe.
This guide explains different types of fishing lines and how to match the line to your hook size.
Types Of Fishing Lines
There are three main types of fishing lines: monofilament, fluorocarbon, and braided lines. Each type has its own strength and uses.
- Monofilament:Flexible and easy to handle. Good for beginners.
- Fluorocarbon:Almost invisible underwater. Best for clear water fishing.
- Braided:Very strong and thin. Great for heavy cover and big fish.
Matching Line To Hook Size
Using the right fishing line with your hook size helps prevent line breakage and improves catch rates.
| Hook Size | Recommended Line Strength |
| Small (size 10-14) | 2-6 lb test |
| Medium (size 4-8) | 6-12 lb test |
| Large (size 1/0 – 4/0) | 12-20 lb test |
| Extra Large (size 5/0+) | 20+ lb test |

Credit: www.ohero.com
Preparing The Hook And Line
Tying a fishing line to a hook is important for fishing. It ensures your bait stays secure. Follow these steps to prepare your hook and line properly.
Trimming The Line
Trimming the fishing line is a crucial step. It helps in avoiding tangles and ensures a tight knot.
Use sharp scissors to cut the line. Make sure to cut it cleanly.
- Hold the line steady
- Cut at a slight angle
- Leave enough line for tying
Checking The Hook Condition
Always check the hook before using it. A strong hook is key for successful fishing.
Inspect the hook for any rust or damage. Replace if necessary.
- Look for sharpness
- Check for any bends
- Ensure the hook eye is clear
Basic Knot Techniques
Tying fishing line to a hook is a key skill for any angler. Using the right knot keeps your hook secure and your catch safe. This guide covers three basic knots that are easy to learn and strong enough for most fishing needs.
Each knot has a simple method and works well with different types of fishing lines. Practice these to improve your fishing experience.
Improved Clinch Knot
The Improved Clinch Knot is popular for its strength and simplicity. It is great for attaching light to medium fishing lines to hooks or lures.
- Thread the line through the hook eye and wrap it around the standing line five to seven times.
- Pass the end of the line through the small loop near the hook eye.
- Then pass the tag end through the big loop created.
- Wet the knot with water or saliva and pull tight.
- Trim the excess line close to the knot.
Palomar Knot
The Palomar Knot is strong and easy to tie. It works well with braided and monofilament lines. This knot keeps the line from slipping off the hook.
- Double about six inches of line and pass it through the hook eye.
- Tie a loose overhand knot with the doubled line.
- Pass the hook through the loop of the overhand knot.
- Pull both the standing line and tag end slowly to tighten the knot.
- Trim the tag end close to the knot.
Uni Knot
The Uni Knot is versatile and simple. It works for tying line to hooks, lures, and swivels. It also holds well under pressure.
| Step | Action |
| 1 | Pass the line through the hook eye and double back parallel. |
| 2 | Make a loop by laying the tag end over the doubled line. |
| 3 | Wrap the tag end around both lines 5 times. |
| 4 | Pull the tag end to tighten the coils around the doubled line. |
| 5 | Slide the knot down to the hook eye and pull tight. |
| 6 | Trim the tag end. |
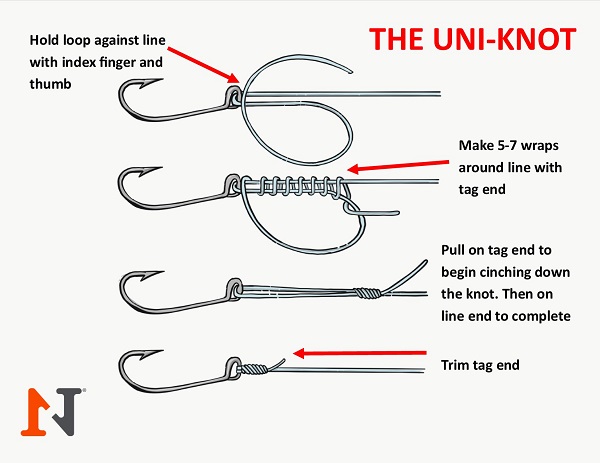
Credit: n1outdoors.com
Step-by-step Knot Tying
Tying a fishing line to a hook is a key skill for anglers. Good knots keep your gear strong and reliable.
Below are simple guides for three popular knots. Each method works well with different fishing lines and hooks.
Tying The Improved Clinch Knot
The Improved Clinch Knot is strong and easy to tie. It works best with monofilament lines.
- Thread the line through the hook eye.
- Wrap the tag end around the standing line 5 to 7 times.
- Pass the tag end through the small loop near the eye.
- Then pass it through the big loop you just made.
- Moisten the knot and pull it tight.
- Trim the excess tag end.
Tying The Palomar Knot
The Palomar Knot is very strong and works well with braided lines. It is simple and quick to tie.
- Double about 6 inches of line and pass it through the hook eye.
- Tie a loose overhand knot with the doubled line.
- Pass the hook through the loop of the overhand knot.
- Pull both tag ends to tighten the knot around the hook.
- Trim the tag ends close to the knot.
Tying The Uni Knot
The Uni Knot is versatile and works well with many line types. It offers good strength and is easy to adjust.
| Action | Description |
|---|---|
| 1. Pass Line | Pass the line through the hook eye and double back parallel. |
| 2. Form Loop | Make a loop by laying the tag end over the doubled line. |
| 3. Wrap Line | Wrap the tag end around the doubled line 5 times inside the loop. |
| 4. Tighten Knot | Moisten and pull the tag end to tighten the coils onto the doubled line. |
| 5. Slide Knot | Slide the knot down to the hook eye and pull the standing line tight. |
| 6. Trim Excess | Cut the tag end close to the knot. |
Testing Knot Strength
Tying a fishing line to a hook is only useful if the knot holds well. Testing the knot’s strength helps avoid losing fish.
Check knots before fishing. Strong knots keep your line secure and your catch safe.
Pull Test Method
The pull test method checks if your knot can handle pressure. Hold the hook and pull the line hard. The knot should not slip or break.
- Grab the hook firmly with one hand.
- Pull the line slowly with your other hand.
- Feel for any slipping or loosening of the knot.
- Keep pulling until you reach the line’s limit.
- If the knot holds tight, it is strong.
Signs Of Weak Knots
Look for these signs to spot weak knots. Weak knots may fail when you catch a fish.
| Sign | What It Means |
|---|---|
| Knot slips under pressure | The knot is not tight enough. |
| Line twists near the knot | Improper tying or wrong knot type. |
| Frayed or damaged line | The line is weak and may break easily. |
| Knot looks uneven or loose | It may fail when pulled hard. |
| Knot unties itself | Not tied correctly or needs more wraps. |
Tips For Stronger Knots
Tying fishing line to a hook needs care to keep the knot strong. A strong knot stops the line from slipping or breaking.
Use simple steps to make your knot last longer and hold better on every catch.
Moistening The Line
Wet the fishing line before tightening the knot. This helps reduce friction and heat.
Moistening stops the line from weakening or breaking during tightening.
- Use water or saliva to moisten the line
- Apply moisture just before pulling the knot tight
- Keep the line damp while finishing the knot
Avoiding Over-tightening
Tighten the knot enough to hold, but do not pull too hard. Over-tightening can weaken the line.
Pull the knot firmly, then stop to keep the line safe from damage.
- Pull smoothly and slowly when tightening
- Stop pulling once the knot feels secure
- Check the knot for tightness before fishing
Regular Knot Checks
Check your knots often while fishing. Knots can loosen or wear out over time.
Replace or retie knots if you see signs of damage or slipping.
- Look for frayed or worn spots near the knot
- Give knots a gentle tug before each cast
- Retie knots after catching a big fish
Common Knot Mistakes
Tying a fishing line to a hook needs care. Small mistakes can cause the knot to fail.
Knowing common errors helps you tie stronger knots and catch more fish.
Twisting The Line
Twisting happens when the line spins as you tie the knot. This weakens the line and knot strength.
Keep the line straight and avoid spinning it. This keeps the knot tight and strong.
Insufficient Wraps
Not wrapping the line enough times around the hook or itself makes the knot weak. The knot can slip or break easily.
Make sure to wrap the line at least five times for most knots. More wraps increase knot strength.
- Wrap 5 to 7 times for light lines
- Wrap 7 to 10 times for heavy lines
- Check the knot before fishing
Cutting Line Too Short
Cutting the tag end of the line too close to the knot causes it to slip. The knot can come undone easily.
Leave a small tag end about 1/8 inch (3 mm) to keep the knot secure. This helps prevent slipping.
Frequently Asked Questions
How Do I Tie A Fishing Line To A Hook Securely?
To tie a fishing line securely, use strong knots like the improved clinch knot. Wet the line before tightening to avoid friction damage. Make sure the knot is tight and trim excess line for a neat finish.
What Is The Best Knot For Fishing Hooks?
The improved clinch knot is the best for fishing hooks. It’s strong, easy to tie, and reliable. This knot holds well under pressure and works with most fishing lines and hook sizes.
Can I Use Any Fishing Line To Tie Hooks?
Yes, you can use different fishing lines like monofilament, fluorocarbon, or braided lines. However, knot-tying techniques may vary slightly. Always choose a knot suited for your line type for better strength and durability.
How Many Times Should I Wrap The Line Around The Hook?
Wrap the line around the hook 5 to 7 times for a secure hold. Too few wraps weaken the knot; too many may cause slipping. This range balances knot strength and ease of tying.
Conclusion
Tying a fishing line to a hook is simple with practice. Choose the right knot for your fishing style. Make sure the knot is tight and secure before you cast. A strong knot helps keep your catch safe. Keep practicing to improve your skill and confidence.
Soon, tying hooks will feel easy and natural. Enjoy your time fishing with better results!