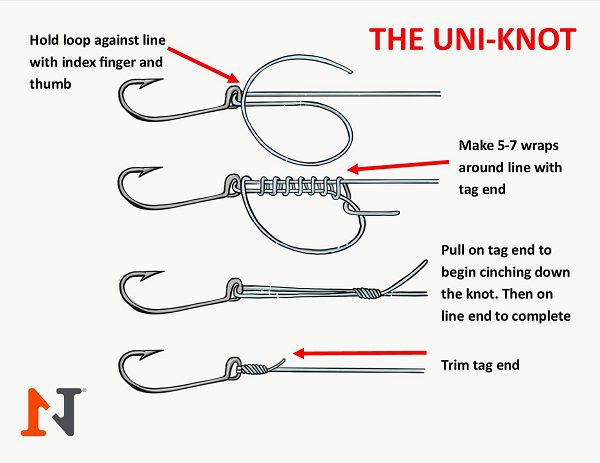
Tying your fishing line to a reel might seem simple, but doing it the right way can make all the difference when you’re out on the water. If your line isn’t secure, you risk losing your catch or wasting time fixing knots.
In this guide, you’ll learn easy, step-by-step methods to tie your fishing line quickly and confidently. By the end, you’ll be ready to cast with peace of mind, knowing your line won’t let you down. Keep reading to master this essential skill and improve every fishing trip.
Credit: www.epicflyrods.com
Choosing The Right Fishing Line
Choosing the right fishing line is important for a good fishing experience. It helps your reel work well and catches fish better.
Different fishing lines suit different fishing reels and types of fish. Knowing the right line makes tying it to the reel easier.
Types Of Fishing Lines
There are three main types of fishing lines: monofilament, fluorocarbon, and braided. Each has unique features.
Monofilament lines are flexible and easy to handle. Fluorocarbon lines are less visible underwater. Braided lines are very strong and thin.
- Monofilament:Good for beginners and general fishing.
- Fluorocarbon:Best for clear water and shy fish.
- Braided:Ideal for heavy cover and long casts.
Matching Line To Reel
Match your fishing line to the reel type for better performance. Each reel works best with certain lines.
Spinning reels use lighter lines like monofilament or fluorocarbon. Baitcasting reels handle heavier braided lines well.
- Spinning reel: Use light to medium lines, easy to cast.
- Baitcasting reel: Use strong braided lines for control.
- Spincast reel: Best with monofilament lines for smooth use.
Credit: monsterbass.com
Preparing The Reel
Before tying your fishing line to the reel, you need to prepare the reel properly. This helps the line stay secure and work well.
Preparing the reel includes cleaning, inspecting, and opening the spool. These steps make sure your reel is ready for the line.
Cleaning And Inspecting The Reel
Start by cleaning your reel to remove dirt and old fishing line. Use a soft cloth and some mild soap if needed.
Check the reel for any damage. Look for cracks, rust, or loose parts. Fix or replace parts if necessary to avoid problems while fishing.
- Wipe the reel with a damp cloth
- Remove debris from moving parts
- Inspect for cracks and rust
- Test the handle and drag system
Opening The Spool
Next, open the spool to prepare it for the new fishing line. Most reels have a knob or button to release the spool.
Remove the spool carefully and clean inside if needed. This clears any dirt that may affect the line’s smooth release.
- Turn the reel handle to unlock the spool
- Lift the spool off the reel body
- Clean inside the spool area gently
- Check the spool lip for damage
- Place the spool back securely
Attaching The Line
Attaching the fishing line to the reel is a key step before fishing. It helps the line stay secure and prevents slipping.
Using the right knot makes casting and reeling easier. Let’s look at how to choose and tie the best knot.
Selecting The Best Knot
Choose a knot that is strong and simple to tie. The knot must hold tight under pressure.
Common knots for attaching line to a reel include the Arbor knot and the Improved Clinch knot. Both work well with most fishing lines.
- Arbor knot: Good for beginners and quick tying
- Improved Clinch knot: Strong and reliable for most lines
- Palomar knot: Very strong but a bit harder to tie
Step-by-step Knot Tying
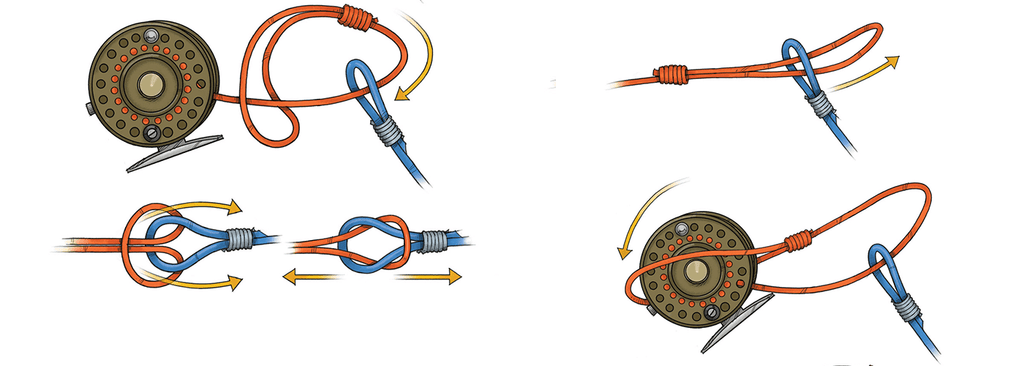
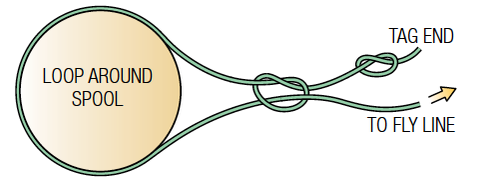
Start by wrapping the line around the spool of the reel. Leave some extra line to work with.
Follow these steps to tie the Arbor knot:
- Pass the line around the reel spool
- Tie an overhand knot around the main line
- Tie a second overhand knot at the tag end
- Pull both knots tight against the spool
- Trim the excess line
Tighten the knot firmly. Check the line to make sure it does not slip on the reel.
Securing The Line
Attaching your fishing line to the reel is an important task. A secure connection keeps your line from slipping during casting and retrieval.
Focus on tightening the knot well and trimming any extra line to avoid tangles and improve performance.
Tightening The Knot
After tying the knot, pull the line slowly but firmly. This action secures the knot and locks it in place on the reel spool.
- Hold the reel spool with one hand.
- Pull the tag end of the line with the other hand.
- Apply steady pressure until the knot tightens completely.
- Check that the knot sits flush against the reel spool.
- A loose knot can cause slipping, so tighten carefully.
Trimming Excess Line
Trim the extra line close to the knot. This prevents loose ends from catching or tangling during casting.
| Tool | Recommended Length to Trim |
|---|---|
| Line Clippers | About 1/8 inch (3 mm) |
| Scissors | About 1/8 inch (3 mm) |
| Knife | Use carefully, trim close but do not cut the knot |
Spooling The Line
Spooling the fishing line onto your reel is an important step before you start fishing. It helps to avoid problems like tangles and line damage.
Proper spooling keeps the line tight and ready for smooth casting. This guide focuses on keeping tension and preventing line twist.
Maintaining Tension
Keeping tension on the line while spooling helps the line wrap tightly around the reel spool. This prevents loose loops that cause tangles.
- Hold the line between your fingers as you spool it onto the reel.
- Ask a friend to hold the spool with slight pressure to keep the line tight.
- Keep the reel handle turning slowly and steadily.
- Check often to make sure the line is winding evenly on the spool.
Avoiding Line Twist
Line twist can cause knots and tangles, making fishing difficult. Preventing twist starts by placing the spool correctly and spooling the line the right way.
| Common Cause | How to Avoid |
| Line coming off the wrong side of the spool | Make sure the line comes off the spool in the same direction as the reel rotates |
| Reel spool spinning freely without tension | Apply light pressure on the spool during spooling |
| Using the wrong type of reel | Match your line type with the reel type for best results |
| Improper tying knot | Use strong knots like the Arbor knot to secure the line |
Testing The Setup
After tying your fishing line to the reel, you need to test the setup. This step ensures your line is secure and the reel works well. Testing helps avoid problems while fishing.
Check the knot strength and reel operation to confirm everything is ready. These simple tests save time and frustration later.
Checking Knot Strength
Pull the line firmly near the knot. The knot should not slip or loosen. A tight knot holds the line and prevents it from breaking.
If the knot slips, cut the line and tie it again. Use a knot recommended for your fishing type. Test until the knot feels very strong.
- Hold the line close to the knot.
- Pull with steady force.
- Look for any slipping or loosening.
- Retie if the knot moves.
Ensuring Smooth Reel Operation
Turn the reel handle slowly to check for smooth movement. The line should spool evenly without catching or jerking. Smooth reel action helps when casting and reeling in fish.
Listen for unusual sounds like grinding or clicking. These sounds may mean the reel needs cleaning or adjustment. Fix any issues before fishing to avoid problems on water.
- Turn the reel handle gently.
- Watch the line spool evenly.
- Listen for odd noises.
- Adjust or clean reel if needed.
Common Mistakes To Avoid
Tying fishing line to a reel needs care and attention. Small errors can cause problems when fishing.
This guide covers two common mistakes to avoid. Fix these to make your fishing better.
Loose Knots
Loose knots can slip or break easily. They reduce your chances of catching fish.
- Pull the knot tight after tying.
- Moisten the line before tightening to avoid friction heat.
- Use knots known for strength, like the improved clinch knot.
- Check the knot for security before fishing.
Overfilling The Spool
Overfilling the reel spool causes tangles and line damage. It makes casting harder.
| Problem | Effect |
| Line over the spool edge | Snags and tangles |
| Too much line | Line breaks under pressure |
| Uneven line winding | Line slip and poor casting |

Credit: www.wikihow.com
Frequently Asked Questions
How Do You Tie Fishing Line To A Reel Properly?
To tie fishing line to a reel, thread the line through the spool and tie a secure knot. The Arbor knot is commonly used. Tighten the knot firmly and trim excess line to prevent slippage and ensure smooth casting.
What Is The Best Knot For Fishing Line And Reel?
The Arbor knot is the best for attaching fishing line to a reel. It is simple, strong, and reliable. This knot prevents line slipping and keeps your line securely attached to the reel spool during casting and reeling.
Can I Use Any Fishing Line With My Reel?
Most reels work with monofilament, fluorocarbon, or braided lines. Check your reel’s specifications for line capacity and type. Using the correct line enhances casting performance and prevents damage to your reel.
How Much Fishing Line Should I Put On My Reel?
Fill the reel spool about 1/8 inch below the rim with line. Overfilling causes tangles, while underfilling reduces casting distance. Proper line capacity ensures smooth casting and retrieval.
Conclusion
Tying fishing line to a reel is simple with practice. Use the right knot to keep the line secure. Take your time to avoid tangles and slips. A strong connection helps your fishing go smoothly. Remember, patience and care make a big difference.
Try these steps next time you prepare your gear. Fishing becomes more fun when everything works well. Keep learning and enjoy every fishing trip ahead.