Tying your fishing line to the reel might seem simple, but doing it the right way can make all the difference in your fishing experience. If your line isn’t secured properly, you risk losing fish, wasting time, or even damaging your gear.
In this guide, you’ll learn a straightforward, step-by-step method to tie your line quickly and securely. Whether you’re a beginner or just need a refresher, mastering this skill will boost your confidence and help you focus on what really matters—catching fish.
Keep reading to discover the easy tricks that will make your next fishing trip smoother and more successful.

Credit: www.wikihow.com
Choosing The Right Fishing Line
Choosing the right fishing line is important for a good fishing experience. The line must suit your fishing style and the reel you use.
The right line helps you catch fish easily and keeps your gear working well. Learn about types of lines and how to match them to your reel.
Types Of Fishing Lines
There are three main types of fishing lines: monofilament, fluorocarbon, and braided. Each has special features for different fishing needs.
Monofilament is stretchy and easy to handle. Fluorocarbon is nearly invisible underwater. Braided lines are strong and thin.
- Monofilament:Best for beginners and general use.
- Fluorocarbon:Good for clear water and shy fish.
- Braided:Strong, good for heavy cover and big fish.
Matching Line To Reel
Match your fishing line to your reel type and size. This helps your reel work smoothly and avoid problems.
Spinning reels use lighter lines like monofilament or braided. Baitcasting reels handle heavier and stronger lines well.
| Reel Type | Recommended Line | Reason |
|---|---|---|
| Spinning Reel | Monofilament or Braided | Easy to cast and control |
| Baitcasting Reel | Fluorocarbon or Braided | Handles strong lines and heavy fish |
| Spincast Reel | Monofilament | Simple and smooth for beginners |
Credit: monsterbass.com
Preparing Your Reel
Before you tie your fishing line to the reel, you need to prepare your equipment. This ensures a smooth fishing experience without any tangles.
Two important steps are cleaning the spool and setting the drag correctly. These steps help in maintaining the reel’s functionality.
Cleaning The Spool
Keeping the spool clean is vital for reducing friction and ensuring smooth casting. Here’s how you can clean it effectively.
- Remove the spool from the reel.
- Use a soft cloth to wipe away any dust or dirt.
- Apply a small amount of reel oil to a cotton swab and clean the inner part.
- Reattach the spool securely.
Setting The Drag
The drag system controls how much resistance a fish feels when it pulls on the line. Proper drag setting prevents line breakage.
Adjust the drag knob by turning it clockwise to increase resistance or counterclockwise to decrease it. Test the drag by pulling on the line to ensure it is set to your preference.
Basic Knots For Fishing Line
Tying the fishing line to the reel is an important step before you start fishing. You need a strong knot to hold the line in place.
Here are three simple knots that work well to tie your fishing line to the reel. Each knot is easy to learn and reliable.
Improved Clinch Knot
The Improved Clinch Knot is a popular choice for many anglers. It holds the line tight and is easy to tie.
To tie it, pass the line through the reel’s eye. Wrap the tag end around the standing line five times. Then, thread the tag end through the loop near the eye. Pull the knot tight and trim the extra line.
- Pass line through reel eye
- Wrap tag end 5 times
- Thread tag end through loop
- Tighten knot and trim excess
Palomar Knot
The Palomar Knot is strong and simple. It works well with braided and monofilament lines.
Double about six inches of line and pass it through the reel eye. Tie a loose overhand knot with the doubled line. Pass the loop over the reel and pull both ends tight. Cut the tag end close to the knot.
- Double 6 inches of line
- Pass loop through reel eye
- Make loose overhand knot
- Pass loop over reel
- Tighten and trim tag end
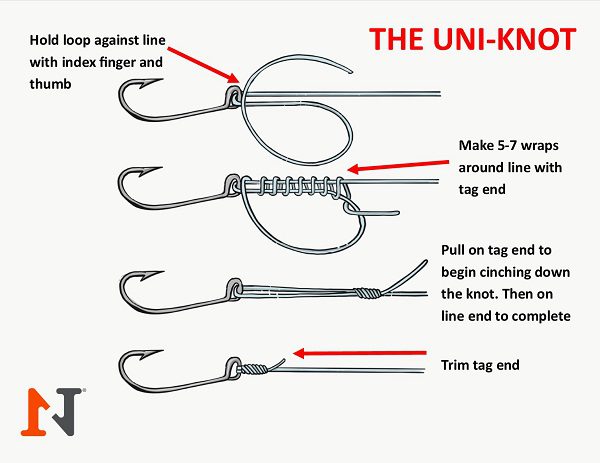
Uni Knot
The Uni Knot is easy to tie and very strong. It also works as a loop knot if needed.
Pass the line through the reel eye and double back. Make a loop along the doubled line. Wrap the tag end around the loop and standing line five times. Pull the tag end to tighten the coils. Slide the knot down and trim the tag end.
- Pass line through reel eye
- Double back and form loop
- Wrap tag end 5 times
- Tighten coils
- Slide knot down and trim
Step-by-step Tying Process
Attaching your fishing line to the reel is an important skill for every angler. A strong knot keeps the line secure and prevents it from slipping.
This guide explains how to tie the fishing line to the reel in a few clear steps. Follow each part carefully for the best results.
Threading The Line
First, pull the line from the spool and thread it through the reel’s guides. Make sure the line runs smoothly without tangles.
- Open the bail arm of the reel to allow the line to wrap freely.
- Pass the line through the rod guides starting from the tip to the reel.
- Thread the line through the spool’s center hole.
- Pull about 6 to 8 inches of line past the spool for tying.
Securing The Knot
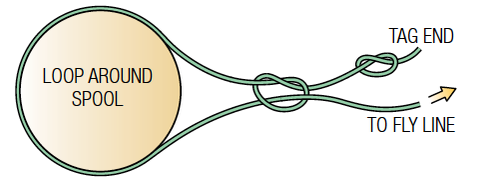
The knot holds the line firmly to the reel spool. Use a strong knot like the Arbor knot for best security and ease.
Here is how to tie the Arbor knot:
- Wrap the tag end of the line around the spool once.
- Tie an overhand knot with the tag end around the main line.
- Tie a second overhand knot at the tag end’s tip.
- Pull both knots tight and slide them against the spool.
Trimming Excess Line
Trim the extra line after securing the knot. This keeps the reel tidy and avoids loose ends that can tangle.
- Use sharp scissors or line clippers for a clean cut.
- Leave about 1/8 inch of tag end to avoid knot slipping.
- Check the knot again to ensure it is tight and secure.
Testing Knot Strength
After tying your fishing line to the reel, it is important to test the knot strength. This ensures the knot will hold during fishing and not break under pressure.
Testing the knot properly helps avoid lost fish and damaged gear. Use simple methods to check if the knot is secure and ready to use.
Pulling Techniques
To test the knot strength, pull the line firmly but steadily. Use your hands to apply pressure close to the knot. Avoid quick or jerky pulls that do not show true strength.
- Hold the reel firmly in one hand.
- Use the other hand to pull the line away from the reel slowly.
- Apply increasing pressure until you feel resistance.
- Watch how the knot behaves under the pull.
- Stop if the knot slips or the line breaks.
Signs Of Weakness
Look for signs that the knot is weak or may fail. These signs help you decide if you need to retie the knot before fishing.
| Sign | What It Means |
|---|---|
| Knot slips when pulled | The knot is not tight enough or tied incorrectly. |
| Line frays near the knot | The line is damaged and may break under stress. |
| Knot changes shape | The knot is unstable and may come undone. |
| Line breaks at the knot | The knot weakens the line or was tied poorly. |
Credit: www.epicflyrods.com
Tips For Maintaining Line And Knots
Keeping your fishing line and knots in good shape helps you catch more fish. Proper care prevents line breakage and knot slipping.
Regular checks and timely replacements make your fishing reel work smoothly. Learn simple ways to care for your line and knots.
Regular Inspection
Check your fishing line often for signs of wear or damage. Look for frays, nicks, and weak spots along the line.
- Run your fingers gently along the line to feel for rough areas.
- Look for discoloration or faded spots that show sun damage.
- Inspect knots to ensure they are tight and not slipping.
- Test the line’s strength by pulling gently before use.
Replacing Worn Lines
Replace your fishing line if you find damage during inspection. Worn lines can break easily and cause lost fish.
| Type of Damage | Action Needed |
| Frayed or Cut Line | Replace immediately |
| Discoloration or Sun Damage | Replace soon to avoid breakage |
| Knots Slipping | Retie knots or replace line |
| Line Feels Weak | Test and replace if needed |
Frequently Asked Questions
How Do I Start Tying Fishing Line To A Reel?
Begin by threading the line through the reel’s guide and spool. Tie a secure knot, like an Arbor knot, to attach the line firmly. Ensure the knot is tight and trim any excess line for a neat finish.
What Knot Is Best For Tying Line To A Reel?
The Arbor knot is ideal for attaching fishing line to a reel. It’s simple, strong, and reliable, preventing slippage. This knot works well with various line types and ensures your line stays securely fastened during fishing.
Can I Use Any Fishing Line With My Reel?
Most reels work well with monofilament, fluorocarbon, or braided lines. Check your reel’s specifications for recommended line types and weights. Using the correct line ensures better casting, durability, and prevents damage to your reel.
How Tight Should The Fishing Line Be On The Reel?
The line should be wound tightly but not overly stretched. Proper tension prevents tangles and ensures smooth casting and retrieval. Avoid wrapping the line too loosely to maintain control and reduce friction during fishing.
Conclusion
Tying your fishing line to the reel is simple and important. A strong knot keeps your line secure and helps catch fish. Practice the steps slowly to avoid mistakes. Use the right knot for your fishing style. Check your work before you start fishing.
This small skill saves time and frustration on the water. Keep trying, and it will become easy. Enjoy your fishing trips with confidence and good gear.