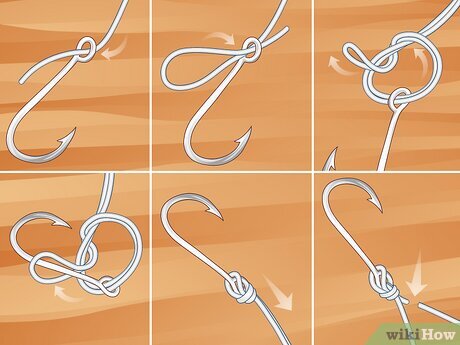
Are you tired of your fishing line twisting and tangling every time you cast? Learning how to tie a swivel to your fishing line is one of the simplest tricks that can make a huge difference in your fishing experience.
Not only does it keep your line from twisting, but it also helps you catch more fish with less hassle. In this guide, you’ll discover easy, step-by-step methods to tie a secure swivel knot that even beginners can master quickly.
Keep reading, and you’ll be ready to fish smarter and enjoy every moment on the water.

Credit: www.youtube.com
Choosing The Right Swivel
Choosing the right swivel is important for a strong and smooth fishing setup. The swivel helps prevent line twist and keeps your bait moving naturally.
Picking the right type and size of swivel can improve your fishing experience. It also protects your line from damage during casting and fighting fish.
Types Of Swivels
There are many swivel types. Each type works best in different fishing situations. Knowing them helps you pick the best one.
- Barrel Swivels:Simple and strong, good for general fishing.
- Ball Bearing Swivels:Smooth rotation, best for heavy loads and big fish.
- Snap Swivels:Quick to change lures or rigs, handy and fast.
- Coastlock Swivels:Secure snap and strong swivel, good for saltwater fishing.
Matching Swivel Size To Line
Choosing the right swivel size depends on your fishing line strength. A wrong size can cause line break or poor performance.
| Swivel Size | Line Test (lbs) | Use |
| Small (Size 10-14) | 2-8 | Light freshwater fishing |
| Medium (Size 6-8) | 10-20 | General freshwater fishing |
| Large (Size 2-4) | 25-40 | Heavy freshwater and light saltwater |
| Extra Large (Size 1/0 and up) | 50+ | Big game and saltwater fishing |

Credit: www.youtube.com
Preparing The Fishing Line
Getting ready to tie a swivel to your fishing line is important. This ensures a strong and secure connection. Proper preparation of the line can prevent tangles and improve casting.
Let’s go through the steps needed to prepare your fishing line before attaching a swivel. This will make your fishing experience smoother and more enjoyable.
Trimming And Straightening
Trimming and straightening the line is the first step. This helps to avoid knots and twists that weaken the line.
- Cut off any frayed or damaged ends of the line.
- Use a line straightener to remove any curls or kinks.
- Ensure the line is smooth and ready for tying.
Moistening The Line
Moistening the line is crucial before tying knots. This reduces friction and helps the knot to tighten properly.
To moisten the line, follow these steps:
- Wet your fingers with water or saliva.
- Gently run your fingers along the line’s end.
- Ensure the line is damp but not dripping wet.
Common Knots For Swivels
Tying a swivel to your fishing line keeps your rig strong and prevents line twists. Using the right knot makes your fishing setup more reliable.
This guide covers three common knots used to attach swivels: Improved Clinch Knot, Palomar Knot, and Uni Knot. Each knot has its own benefits and easy steps.
Improved Clinch Knot
The Improved Clinch Knot is popular for its strength and simplicity. It works well with monofilament lines and swivels with small eyelets.
- Thread the line through the swivel eye.
- Wrap the tag end around the main line five to seven times.
- Pass the tag end through the small loop near the swivel eye.
- Then pass the tag end through the big loop you just made.
- Moisten the knot and pull both ends tight.
Palomar Knot
The Palomar Knot is strong and simple to tie. It works well with braided and monofilament lines. This knot keeps the swivel from slipping off the line.
| Step | Action |
| 1 | Double about 6 inches of line and pass through swivel eye. |
| 2 | Tie a loose overhand knot with the doubled line. |
| 3 | Pass the swivel through the loop of the overhand knot. |
| 4 | Moisten the knot and pull both tag end and main line tight. |
Uni Knot
The Uni Knot is versatile and easy to learn. It holds well on different types of lines and swivels. You can adjust the number of wraps for line thickness.
How to tie a Uni Knot:
- Pass the line through the swivel eye and double back parallel to the main line.
- Make a loop by laying the tag end over the doubled line.
- Wrap the tag end around the doubled line and through the loop 5 to 7 times.
- Moisten the knot and pull the tag end to tighten the coils.
- Slide the knot down close to the swivel and pull the main line to secure.

Credit: www.youtube.com
Step-by-step Knot Tying
Tying a swivel to a fishing line is important for strong connections. Using the right knot helps keep your line from slipping.
This guide shows three common knots to tie a swivel. Each knot has easy steps to follow for a secure hold.
Tying The Improved Clinch Knot
The Improved Clinch Knot is popular for its strength and simplicity. It works well with most fishing lines.
- Thread the line through the swivel eye.
- Wrap the tag end around the standing line five to seven times.
- Pass the tag end through the small loop near the swivel eye.
- Then pass the tag end through the big loop you just created.
- Moisten the knot with water or saliva.
- Pull both ends to tighten the knot firmly.
- Trim the tag end close to the knot.
Tying The Palomar Knot
The Palomar Knot is strong and easy to tie. It keeps line strength high and is good for braided lines.
- Double about 6 inches of line and pass it through the swivel eye.
- Tie a loose overhand knot with the doubled line.
- Pass the swivel through the loop of the overhand knot.
- Moisten the knot with water or saliva.
- Pull both the standing line and tag end to tighten the knot.
- Trim the tag end close to the knot.
Tying The Uni Knot
The Uni Knot works well for many line types. It is easy to adjust and very reliable for fishing.
| Step | Action |
|---|---|
| 1 | Pass the line through the swivel eye and double back. |
| 2 | Make a loop by laying the tag end alongside the doubled line. |
| 3 | Wrap the tag end around both lines 5 times. |
| 4 | Pass the tag end through the loop near the swivel eye. |
| 5 | Moisten the knot and pull the tag end to tighten. |
| 6 | Slide the knot down to the swivel and pull the standing line to secure. |
| 7 | Trim the tag end close to the knot. |
Tips For Stronger Knots
Tying a swivel to your fishing line needs care. Strong knots keep your catch secure.
Use proper techniques to avoid knot failure. Small details make big differences.
Checking Knot Tightness
After tying, pull the knot firmly to check tightness. A loose knot can slip and fail.
Make sure the knot looks neat and snug against the swivel eye. Avoid gaps or twists.
Avoiding Line Damage
Do not pull the line too hard when tightening. Excess force can weaken or cut the line.
Wet the line before tightening the knot. This reduces friction and prevents damage.
- Wet the line before pulling tight
- Pull gently and evenly
- Check for frays or cuts after tying
Testing Knot Strength
Test the knot by pulling with steady pressure. It should hold firm without slipping.
If the knot slips or breaks, retie using a different knot or technique. Practice makes stronger knots.
- Pull line slowly to test holding power
- Retie if knot slips or loosens
- Practice tying knots often for skill
Common Mistakes To Avoid
Tying a swivel to your fishing line needs care and attention. Small errors can weaken the knot. This can cause lost fish or broken lines.
Learn about common mistakes to avoid. Fixing these will make your knots stronger and more reliable.
Insufficient Wraps
One common mistake is not making enough wraps around the swivel. Fewer wraps reduce knot strength. The knot can slip under pressure.
- Make at least five tight wraps around the swivel.
- Keep the wraps close together without gaps.
- Tighten the knot slowly to avoid loosening the wraps.
Not Moistening The Line
Dry knots create friction and heat. This damages the fishing line and weakens the knot. Always moisten the line before tightening.
| Effect | Cause | Solution |
| Line weakens | Friction from dry knot | Wet line with water or saliva |
| Knot slips | Line damage inside knot | Moisten before pulling tight |
| Knot breaks easily | Heat weakens line fibers | Always wet the line first |
Incorrect Knot Placement
Placing the knot in the wrong spot can cause problems. The knot should sit right next to the swivel eye. Too far away or on the line’s end weakens it.
- Ensure the knot is snug against the swivel eye.
- Do not leave gaps between the knot and swivel.
- Check the knot position before tightening fully.
Frequently Asked Questions
How Do You Tie A Swivel To Fishing Line?
To tie a swivel, thread the line through the swivel eye. Make a loop and wrap the tag end around the line 5-7 times. Pull the tag end through the loop, then tighten the knot securely. This ensures a strong, reliable connection.
What Is The Best Knot For Tying Swivel To Line?
The Improved Clinch Knot is the best for tying swivels. It is strong, simple, and reliable. This knot resists slipping and maintains line strength, making it ideal for various fishing conditions and swivel types.
Why Use A Swivel On A Fishing Line?
A swivel prevents line twisting, which weakens the line. It also allows lures and baits to spin freely. This reduces tangles and improves casting performance, making fishing more efficient and enjoyable.
Can I Tie A Swivel Without Special Tools?
Yes, you can tie a swivel by hand without tools. Just ensure the knot is tight and secure. Practice the knot a few times for consistency and confidence before fishing.
Conclusion
Tying a swivel to your fishing line is simple and useful. It helps prevent line twists and keeps your rig strong. Practice the knot a few times to get it right. Use clean, tight loops and pull the line firmly.
This small step can improve your fishing experience a lot. Keep your gear ready and enjoy your time by the water. Try this method next time you fish. It makes a difference.