
Are you tired of dealing with poor engine performance or erratic idling? You might be surprised to learn that the solution could be as simple as tuning your carburetor with a vacuum gauge.
This tool offers precision that your engine craves, ensuring smoother rides and optimal fuel efficiency. Imagine your engine purring like a content cat or roaring with the power you expect on the open road. In this guide, you’ll discover how to harness the power of a vacuum gauge to transform your vehicle’s performance.
Dive in and unlock the secrets to a perfectly tuned carburetor, making every drive an enjoyable experience.

Credit: www.vevor.ca
Tools Needed
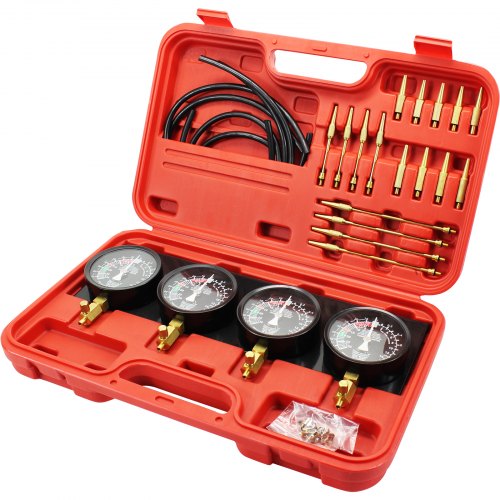
Tuning a carburetor with a vacuum gauge requires the right set of tools to get accurate readings and make precise adjustments. Without these tools, your efforts might lead to frustration rather than improved engine performance. Before you start, make sure you have everything ready so you can focus on fine-tuning without interruption.
Vacuum Gauge Types
Choosing the right vacuum gauge is crucial. There are mainly two types you can use: analog and digital.
- Analog vacuum gaugeshave a dial with a needle that shows vacuum levels. They are simple, reliable, and often preferred for their durability and quick readability.
- Digital vacuum gaugesprovide a numerical readout, which can be easier to interpret, especially if you want precise measurements down to small increments.
Think about how you’ll be using the gauge. Will you need to read it quickly while working under the hood? Or do you prefer detailed numbers to log and compare? Your choice will affect how smoothly your tuning session goes.
Additional Tools
A vacuum gauge alone won’t get the job done. You’ll need some extra tools to make adjustments and troubleshoot effectively.
- Screwdrivers:A flathead and Phillips screwdriver are essential to turn the carburetor screws without stripping them.
- Wrenches:An adjustable wrench or a set of small wrenches helps loosen or tighten vacuum lines and fittings.
- Rags or shop towels:Keep these handy to clean up spills or wipe off dirt for a clear view of components.
- Flashlight:Sometimes, the carburetor is tucked away in a dark spot. Good lighting makes a huge difference.
Do you have these tools organized and ready? It saves time and keeps frustration away during tuning. Preparing your workspace with these essentials can turn a daunting task into a manageable one.
Credit: www.vevor.ca
Prepare The Engine
Getting your engine ready is the first critical step before tuning a carburetor with a vacuum gauge. If the engine isn’t properly prepared, the readings you take won’t be accurate, leading to poor adjustments. Taking the time to warm it up and set the idle speed correctly can save you a lot of troubleshooting later.
Warm Up The Engine
Start your engine and let it run until it reaches its normal operating temperature. This usually takes about 5 to 10 minutes, depending on the engine and the outside temperature. A cold engine won’t give you accurate vacuum readings because the fuel mixture and idle speed will be off.
Pay attention to how smoothly the engine runs during this warm-up. If it’s rough or stalling, you might want to check for other issues before tuning. Have you noticed how the engine sound changes as it warms up? That’s a good sign it’s ready for the next step.
Once warmed up, adjust the idle speed to the manufacturer’s recommended RPM. You can usually find this information in your vehicle’s manual or on a sticker under the hood. Use the idle speed screw on the carburetor to make small adjustments.
Keep the vacuum gauge connected while adjusting. Aim for a steady vacuum reading that matches the engine’s ideal idle. This ensures the engine is running efficiently before you start fine-tuning the carburetor’s mixture screws.
Have you ever tried tuning without setting the idle speed first? It often leads to chasing false readings and frustration. Setting the right idle speed lays a solid foundation for accurate vacuum gauge tuning.
Connect The Vacuum Gauge
Connecting the vacuum gauge correctly is essential for tuning your carburetor accurately. This step ensures you get precise readings of the engine’s vacuum pressure. Proper connection helps identify how well your carburetor mixes fuel and air, affecting engine performance.
Locate The Vacuum Port
First, find the vacuum port on the carburetor or intake manifold. This port is usually a small, round nipple made of metal or rubber. It may have a cap or plug that needs removal before attaching the gauge.
Check your vehicle’s manual if you cannot spot the vacuum port. The port is often on or near the carburetor base or throttle body. It connects to vacuum hoses, so look for disconnected or unused hoses as clues.
Attach The Gauge Properly
Once the vacuum port is clear, connect the vacuum gauge hose firmly. Use a tight fit to avoid air leaks, which can cause wrong readings. A loose connection can lead to inaccurate tuning.
Secure the gauge hose with a clamp or zip tie if needed. Keep the gauge visible for easy reading while adjusting the carburetor. Avoid kinks or sharp bends in the hose to maintain steady vacuum flow.
Credit: www.vintage-mustang.com
Adjust Idle Mixture
Adjusting the idle mixture is a key step in tuning a carburetor with a vacuum gauge. It controls the air-fuel ratio at idle speed, affecting engine smoothness and fuel efficiency. Proper adjustment improves engine performance and prevents stalling.
The idle mixture screws regulate the amount of fuel entering the engine. Small changes can cause noticeable differences in vacuum readings. Fine-tuning these screws helps find the perfect balance for a steady idle.
Find The Idle Mixture Screws
Locate the idle mixture screws on the carburetor body. Usually, there are two screws, one for each barrel on a two-barrel carburetor. They are small, slotted screws near the base of the carburetor.
Use a flashlight to spot them clearly. Do not confuse them with the idle speed screw. The idle mixture screws adjust fuel, while the idle speed screw controls throttle plate position.
Increase And Decrease Vacuum Readings
Attach a vacuum gauge to a manifold vacuum source. Start the engine and let it warm up. Note the initial vacuum reading on the gauge.
- Turn an idle mixture screw slowly clockwise to lean the mixture. Watch the vacuum gauge for changes.
- Turn the screw counterclockwise to enrich the mixture. Look for a rise in vacuum reading.
- Adjust each screw in small steps to find the highest steady vacuum reading.
A higher vacuum reading means a better air-fuel mix. Avoid turning the screws too far. Over-lean or over-rich mixtures cause rough idle or engine stalls.
Set Idle Speed
Setting the idle speed is a key step when tuning a carburetor with a vacuum gauge. It controls how fast the engine runs while resting. Proper idle speed helps the engine run smoothly and saves fuel. It also prevents stalling during stops.
Use Idle Speed Screw
The idle speed screw adjusts the throttle plate’s position. Turning it changes how much air enters the engine at idle. Turn the screw slowly and watch the vacuum gauge. Aim for a steady vacuum reading. Too high or low idle speed affects engine performance.
- Turn clockwise to increase idle speed.
- Turn counterclockwise to decrease idle speed.
- Make small adjustments and wait for the engine to settle.
Maintain Stable Vacuum Level
Keep the vacuum level steady while adjusting idle speed. A stable vacuum shows the engine breathes well at idle. Watch the gauge for fluctuations. If vacuum drops or spikes, the engine may need further tuning. Check for air leaks or dirty parts that affect vacuum.
- Adjust the idle screw slowly and watch changes.
- Ensure the vacuum gauge needle stays steady.
- Repeat adjustments until vacuum is stable and idle speed feels smooth.
Fine-tune For Best Performance
Fine-tuning a carburetor with a vacuum gauge helps reach the best engine performance. This process ensures the engine runs smoothly and efficiently. Small changes can make a big difference in fuel economy and power. Patience is key for this delicate adjustment.
Check Engine Response
Start the engine and let it warm up. Observe how the engine responds to throttle changes. Listen for smooth idling and steady acceleration. Watch the vacuum gauge for steady needle movement. Any sudden drops or spikes show areas needing adjustment. Note the engine’s behavior during different speeds and loads.
Make Minor Adjustments
Turn the carburetor adjustment screws slowly. Use small movements, about a quarter turn at a time. Watch the vacuum gauge for rising or falling numbers. Aim for the highest steady vacuum reading. After each adjustment, test the engine response again. Repeat until the engine runs smooth and stable. Avoid over-adjusting; this can cause rough idling or stalling.
Troubleshooting Tips
Tuning a carburetor with a vacuum gauge can sometimes throw unexpected challenges your way. Knowing how to troubleshoot these issues saves time and frustration. Let’s look at some common problems you might face and how to spot them early.
Common Vacuum Gauge Issues
Your vacuum gauge is only as good as its condition and connection. Check the hose for cracks or leaks; even a tiny hole can cause false readings. If the gauge needle flickers wildly, it might mean a loose or dirty connection.
Sometimes the gauge itself can be faulty. If you suspect this, try swapping it with another one to see if the readings stabilize. Also, make sure the gauge is rated for your engine’s vacuum range; using the wrong type can confuse your adjustments.
Carburetor Problems To Watch For
Uneven vacuum readings often point to carburetor issues. A sticking throttle plate or a warped gasket can cause fluctuating numbers. Listen for hissing sounds—these might indicate air leaks around the carburetor base or intake manifold.
Dirty or clogged jets can also throw off your tuning. When the engine sputters or stalls at certain RPMs, check the jets first. Remember, a clean carburetor doesn’t just improve performance—it makes your vacuum gauge readings reliable.
Have you noticed your engine’s idle speed jumping unexpectedly? It could be a sign of a vacuum leak or a misadjusted idle mixture screw. Keep a close eye on these details as you tune, and your results will improve dramatically.
Maintenance After Tuning
After tuning your carburetor with a vacuum gauge, regular upkeep is vital. Proper maintenance helps keep your engine running smoothly and efficiently. It also prevents future tuning issues and costly repairs. Focus on checking the vacuum gauge often and keeping the carburetor clean. These simple steps extend the life of your carburetor and improve performance.
Regular Vacuum Gauge Checks
Check the vacuum gauge regularly to monitor engine health. A steady reading means the carburetor is working well. Sudden drops or fluctuations signal problems. These could include air leaks, clogged jets, or worn parts. Use the gauge readings to spot issues early. Make adjustments or repairs before they worsen. Keep a log of your vacuum readings for reference.
Keep Carburetor Clean
Clean the carburetor often to avoid dirt buildup. Dust and grime block fuel and air passages. This causes rough idling, poor acceleration, and higher fuel use. Use carburetor cleaner sprays and soft brushes for cleaning. Remove the air filter and check it too. Replace old filters to prevent dirt from entering. A clean carburetor ensures better fuel mixing and engine power.
Frequently Asked Questions
What Is A Vacuum Gauge In Carburetor Tuning?
A vacuum gauge measures engine vacuum pressure. It helps diagnose carburetor and engine performance. This tool aids precise carburetor adjustments for optimal fuel-air mixture.
How Do You Connect A Vacuum Gauge To Carburetor?
Connect the vacuum gauge to a manifold vacuum port or carburetor base. Use a vacuum hose to ensure a secure, leak-free connection for accurate readings.
Why Is Vacuum Gauge Tuning Important For Carburetors?
Vacuum gauge tuning ensures correct fuel-air mixture, improving engine efficiency. It prevents rough idling, stalling, and poor fuel economy by optimizing carburetor settings.
How Do You Interpret Vacuum Gauge Readings?
Stable vacuum readings around 17-22 inches Hg indicate good tuning. Fluctuations or low vacuum suggest leaks, incorrect timing, or carburetor issues needing adjustment.
Conclusion
Tuning a carburetor with a vacuum gauge helps your engine run smoothly. It gives you clear readings to adjust the fuel mixture right. This process saves fuel and improves engine life. Regular checks keep your vehicle in good shape. Take your time and follow each step carefully.
Small adjustments make a big difference in performance. Now, you can keep your engine healthy and efficient. Give it a try and notice the change yourself.