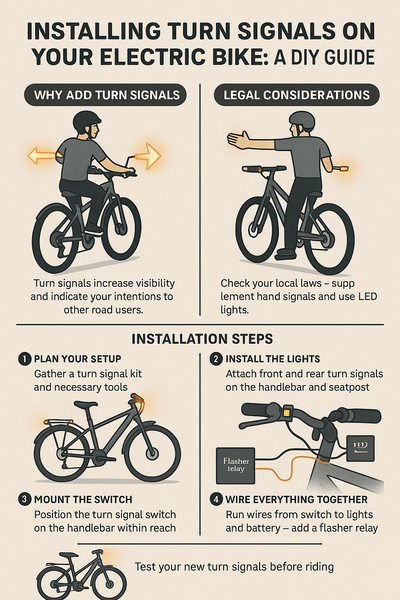
Are you ready to ride safely and be seen on the road? Knowing how to turn on your bike lights is one of the simplest yet most important steps you can take before every ride.
Whether you’re cycling at night, in fog, or during early morning hours, your bike lights keep you visible and protect you from accidents. In this guide, you’ll learn exactly how to switch on different types of bike lights quickly and easily.
Keep reading to make sure your next ride is bright, safe, and worry-free.

Credit: www.youtube.com
Choosing The Right Bike Lights
Bike lights help you see and be seen while riding. Picking the right lights keeps you safe on the road.
Focus on the light type, brightness, and battery life. These factors affect how well your lights work.
Types Of Bike Lights
There are front and rear bike lights. Front lights help you see ahead. Rear lights make you visible to others.
- Headlights: Bright and wide beam for front view
- Taillights: Red lights for back visibility
- Helmet lights: Extra light on your helmet
- Wheel lights: Decorative and increase side visibility
Brightness And Beam Patterns
Brightness is measured in lumens. Higher lumens mean brighter light. Choose brightness based on your riding area.
| Brightness (Lumens) | Best Use | Beam Pattern |
| Under 100 | City riding with street lights | Wide and soft |
| 100-300 | Suburban roads and parks | Focused and medium range |
| 300+ | Dark trails and rural roads | Strong and long range |
Battery Options
Bike lights use different batteries. Pick one that suits your ride length and charging habits.
- Rechargeable batteries: Use USB to charge, cost-effective
- Disposable batteries: Easy to replace, no charging needed
- Hub-powered lights: Use your bike’s wheel motion to generate power

Credit: www.amazon.ca
Installing Bike Lights
Bike lights help you see and be seen while riding at night or in low light. Installing them correctly keeps you safe on the road.
This guide shows how to mount front and rear lights and keep them steady during rides.
Mounting Front Lights
Front lights usually attach to the handlebar or the front fork of your bike. Choose a spot that faces forward and is easy to reach.
- Clean the mounting area to remove dirt and grease.
- Use the rubber strap or bracket that comes with the light.
- Wrap the strap tightly around the handlebar or fork.
- Make sure the light points straight ahead and does not wobble.
- Test the light before your ride to check its brightness and angle.
Mounting Rear Lights
Rear lights often mount on the seat post or rear rack. Pick a spot visible to traffic behind you.
| Mount Location | Advantages | Notes |
| Seat Post | High visibility | Easy to reach |
| Rear Rack | Stable position | May need extra bracket |
| Helmet | Follows head movement | Lower battery life |
Securing Lights For Stability
Lights that move or fall off can be dangerous. Use these tips to keep them stable.
- Tighten all straps and screws firmly but avoid over-tightening.
- Use extra rubber bands or zip ties if the mount feels loose.
- Check light mounts before every ride for wear and tear.
- Choose mounts with anti-slip pads or grips for better hold.
Turning On Different Bike Lights
Bike lights help you see and be seen while riding. Different lights have various ways to turn them on. Knowing how to switch on your bike lights is important for safe riding.
This guide explains how to turn on bike lights using manual switches, automatic sensors, and remote controls. Each type works differently and fits different needs.
Manual Switches
Many bike lights have manual switches. These switches let you control the light by pressing a button or flipping a switch. Manual switches are simple and reliable.
- Locate the switch on the light or battery pack.
- Press or flip the switch once to turn the light on.
- Press or flip again to turn the light off.
- Some switches have multiple modes like steady or flashing.
- Cycle through modes by pressing the switch repeatedly.
Automatic Sensors
Automatic sensors turn bike lights on and off without touching a switch. These sensors detect light levels or movement. They offer hands-free control for convenience.
| Sensor Type | How It Works | Common Use |
| Light Sensor | Detects darkness to switch on light | Night riding |
| Motion Sensor | Turns on light when bike moves | Short stops |
| Combination | Uses light and motion sensors | Automatic and efficient use |
Remote Controls
Remote controls let you turn bike lights on from a distance. They use wireless signals to operate the lights. This is useful for lights mounted in hard-to-reach places.
To use a remote control:
- Pair the remote with your bike light according to the manual.
- Press the remote button to turn the light on or off.
- Use the remote to switch between light modes if available.

Credit: www.ravemen.com
Adjusting Light Settings
Bike lights help you see and be seen at night or in low light. Adjusting their settings is important for safety. This guide covers brightness levels, flashing modes, and beam angles.
Each setting can change how your light works. Learn how to adjust them for your ride and environment.
Brightness Levels
Brightness controls how much light your bike light gives off. Higher brightness helps you see farther but uses more battery power.
- Low brightness saves battery and works in well-lit areas.
- Medium brightness is good for city streets and paths.
- High brightness is best for dark roads and trails.
Flashing Modes
Flashing modes make your light blink in different patterns. This helps other drivers notice you more easily.
| Mode | Description | Best Use |
| Steady | Constant light | Clear visibility |
| Slow Flash | Light blinks slowly | Daytime riding |
| Fast Flash | Light blinks quickly | Busy roads |
| Pulse | Light pulses softly | Mixed conditions |
Beam Angles
Beam angle changes where the light shines. It affects how much area you can see and how bright the light looks.
Adjust your bike light’s angle by:
- Loosening the mount clamp.
- Tilting the light up or down to the desired angle.
- Tightening the clamp to keep it steady.
Maintaining Bike Lights
Bike lights need regular care to work well. Proper maintenance keeps you safe on the road.
Check your lights often. Fix any issues quickly to avoid problems during rides.
Replacing Batteries
Weak batteries cause dim lights. Change them to keep your lights bright and reliable.
- Turn off the light before opening the battery compartment.
- Remove old batteries carefully.
- Insert new batteries matching the correct size and polarity.
- Close the compartment securely to keep out moisture.
- Test the light to ensure it works well after replacement.
Cleaning Lenses
Clean lenses let light shine clearly. Dirt and grime reduce brightness and visibility.
| Cleaning Step | Details |
| Remove Dust | Use a soft brush or cloth to wipe dust off the lens. |
| Wash Gently | Use mild soap and water for sticky dirt. Avoid harsh chemicals. |
| Dry Properly | Pat dry with a clean cloth to prevent water spots. |
Checking For Damage
Inspect lights for cracks, loose parts, or corrosion. Damage can stop lights from working.
- Look for cracks in the lens or casing.
- Check if the light fits tightly on the bike.
- Examine wires and connections for rust or breaks.
- Replace or repair damaged parts promptly.
Tips For Safe Night Riding
Riding a bike at night needs extra care. Good lighting and visibility keep you safe. Follow simple tips to stay seen and avoid accidents.
Using the right equipment and checking it often makes night rides safer. Learn how to use reflective gear, position your lights, and check them regularly.
Using Reflective Gear
Reflective gear helps drivers and others see you in low light. Choose items that reflect light well and cover parts of your body that move.
- Wear reflective vests or jackets.
- Use reflective tape on your helmet and bike frame.
- Attach reflectors to your shoes or ankle bands.
- Choose bright, light-colored clothing to increase visibility.
Positioning Lights Correctly
Place your bike lights where they are most effective. Front lights should shine forward to light your path. Rear lights warn others you are there.
| Light Type | Position | Purpose |
| Front White Light | Handlebar or Helmet | Illuminate road ahead |
| Rear Red Light | Seat post or back of helmet | Alert drivers behind you |
| Wheel or Pedal Lights | Spokes or pedals | Increase side visibility |
Regular Light Checks
Check your bike lights before every ride. Make sure batteries are charged and bulbs work. Clean lenses for clear light output.
- Turn on the front and rear lights.
- Look for dim or flickering lights.
- Replace batteries or bulbs as needed.
- Clean the light covers to remove dirt and grime.
- Test the lights on a dark street to confirm visibility.
Frequently Asked Questions
How Do I Turn On Bike Lights Manually?
Locate the power button or switch on your bike light. Press or slide it to the “on” position. Some models may require holding the button for a second.
Can Bike Lights Turn On Automatically?
Yes, some bike lights feature automatic sensors. They turn on in low-light conditions or at night for safety. Check your model’s specifications.
What Powers Bike Lights?
Bike lights are powered by batteries, rechargeable batteries, or a dynamo system. Rechargeable options are eco-friendly and cost-effective.
How To Check If Bike Lights Are Working?
Switch on the lights and ensure they emit bright, steady light. Replace batteries or recharge if the light is dim or flickering.
Conclusion
Turning on bike lights is simple yet crucial for safety. Ensure your lights work before every ride. Check batteries and connections regularly. Riding at night or in low light demands visibility. Bright lights help others see you. Practice switching them on and off.
It becomes second nature. Safety should never be compromised. Remember, good lighting prevents accidents. Stay visible. Stay safe. Enjoy your rides with confidence. Happy cycling!