If you want to turn your kitchen scraps and yard waste into rich, healthy soil, a tumbler compost bin is one of the easiest tools you can use. But maybe you’re not sure where to start or how to get the best results.
Don’t worry—this guide will show you exactly how to use a tumbler compost bin step-by-step. By the time you finish reading, you’ll know how to speed up composting, avoid common mistakes, and create nutrient-packed compost that will make your garden thrive.
Ready to transform your waste into garden gold? Let’s dive in.

Credit: www.amazon.com
Choosing The Right Tumbler Bin
Picking the right tumbler compost bin helps you compost easily at home. It saves space and speeds up composting.
Consider key features like materials, size, and ventilation. These affect how well your bin works.
Materials And Size
Tumbler bins come in plastic or metal. Plastic bins are lightweight and resist rust. Metal bins are strong but can get hot.
Choose a size that fits your space and waste amount. Small bins hold about 20 gallons. Large bins can hold 50 gallons or more.
- Plastic bins are easy to move
- Metal bins last longer outdoors
- Small bins suit small families
- Large bins work for big families or gardens
Ventilation Features
Good airflow helps compost break down faster. Look for bins with vents or holes for air circulation.
Some bins have adjustable vents. This lets you control the airflow depending on moisture and temperature.
- Vents prevent bad smells
- Airflow keeps materials dry
- Adjustable vents improve control
Ease Of Use
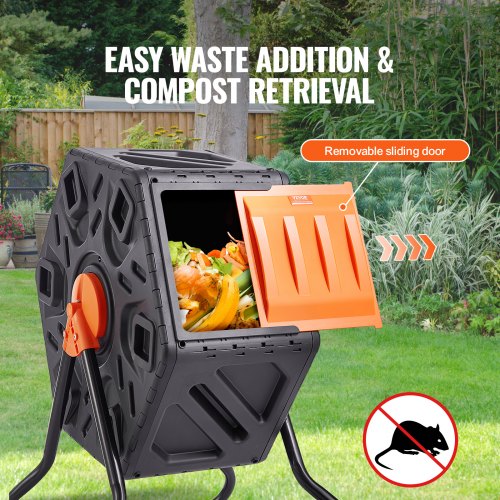
Choose a bin that is easy to turn and empty. A smooth rotating drum saves effort. Large handles help grip the bin.
Look for bins with a secure lid to keep pests out. Check if the bin is easy to clean and maintain.
- Easy rotation speeds up composting
- Secure lids stop animals
- Simple design means less cleaning
Setting Up Your Tumbler
A tumbler compost bin makes composting easy. It speeds up the process and keeps pests away. Let’s explore how to set it up.
Follow these simple steps to ensure your compost bin is ready for use. Proper setup will help you create rich compost for your garden.
Location Tips
Choose a spot that is convenient for you. The bin should be easy to access.
Make sure it gets enough sunlight to help with the composting process. Avoid placing it too close to your house.
- Choose a level surface for stability
- Avoid areas prone to flooding
- Keep away from direct wind
Assembly Instructions
Read the instructions included with your tumbler bin. Most bins come with all the necessary parts.
Assemble the frame first, then attach the drum. Ensure all parts are securely fastened.
- Use the provided tools for assembly
- Check for missing parts before starting
- Tighten all bolts for safety
Initial Preparation
Start by adding a mix of green and brown materials. Green materials include kitchen scraps and grass clippings.
Brown materials include dried leaves and small twigs. Balance is key for effective composting.
- Cut large items into smaller pieces
- Moisten materials if they are too dry
- Turn the tumbler every few days
What To Compost
Using a tumbler compost bin is simple and keeps your yard waste tidy. You add the right materials to help break down waste quickly.
Choosing what to compost is important. Some items help the process, while others can cause problems.
Green Materials
Green materials are rich in nitrogen. They help heat up the compost and speed up decomposition.
- Fruit and vegetable scraps
- Fresh grass clippings
- Coffee grounds and filters
- Tea bags (without staples)
- Green leaves
- Plant trimmings
Brown Materials
Brown materials add carbon to your compost. They help balance moisture and air flow.
| Brown Material | Notes |
|---|---|
| Dry leaves | Shred if possible |
| Straw or hay | Good for aeration |
| Cardboard pieces | Remove tape and labels |
| Paper towels and napkins | Only if not greasy |
| Wood chips | Use small amounts |
Materials To Avoid
Some items can harm your compost or attract pests. Avoid adding these to your tumbler bin.
- Meat, fish, and bones
- Dairy products like cheese and milk
- Oils and greasy foods
- Pet waste from cats or dogs
- Diseased plants or weeds with seeds
- Plastic, metal, or glass

Credit: www.amazon.com
Filling The Bin
Filling a tumbler compost bin correctly helps speed up the composting process. Using the right materials and methods ensures good breakdown and reduces odor.
Start with understanding how to layer materials, maintain proper ratios, and keep moisture balanced.
Layering Techniques
Layering different types of waste helps air flow and speeds decomposition. Alternate between green and brown materials in the bin.
- Place dry brown materials like leaves or straw at the bottom.
- Add a layer of green materials such as kitchen scraps or grass clippings.
- Repeat layers until the bin is full, finishing with a brown layer.
- Break up large pieces to increase surface area.
Ideal Ratios
| Material Type | Description | Ratio by Volume |
|---|---|---|
| Brown | Dry, carbon-rich materials | 2 parts |
| Green | Moist, nitrogen-rich materials | 1 part |
Keep the carbon-to-nitrogen ratio balanced for healthy compost. Too much green can cause smell. Too much brown slows breakdown.
Adding Water
Moisture helps microbes break down materials. The compost should feel like a damp sponge, not soaking wet or dry.
- Check moisture by squeezing a handful of compost.
- Add water if it feels dry or dusty.
- Turn the bin to mix water evenly.
- Avoid overwatering to prevent bad odors and soggy compost.
Turning The Compost
Turning compost in a tumbler helps speed up the breakdown of materials. It mixes air and moisture evenly inside the bin.
This process helps the microbes work better and makes rich compost faster.
Frequency And Method
Turn your tumbler compost every 2 to 4 days. This keeps the pile active and well-aerated.
Use the handle or the bin’s turning mechanism to rotate it completely. Make sure to move all parts of the compost inside.
- Turn more often if the compost is dry
- Turn less if it feels wet or soggy
- Rotate the bin at least one full turn each time
Signs Compost Is Ready For Turning
Check the compost before turning. It should look dark and crumbly but still have some large pieces.
You may notice a warm smell or heat inside the tumbler. This means microbes are active and breaking down material.
- Warm temperature inside the bin
- Earthy, not rotten smell
- Mix of small and large pieces
- No standing water or dryness
Benefits Of Tumbling
Tumbling compost mixes materials quickly and adds air needed for microbes. It keeps the pile healthy.
It also helps compost break down faster and reduces bad smells. You get ready compost in a shorter time.
- Improves airflow to speed decomposition
- Makes composting easier and less smelly
- Speeds up compost ready time
- Helps keep moisture levels balanced
Credit: www.vevor.com
Troubleshooting Common Issues
Using a tumbler compost bin is simple, but sometimes problems happen. These issues can slow down composting or cause bad smells. Fixing common problems helps keep your compost healthy and ready to use.
Below, we cover three main problems and how to solve them. Follow these tips to improve your tumbler compost bin’s performance.
Odor Problems
Bad smells often mean the compost is too wet or has poor airflow. Rotten or sour odors show that the compost is not balanced correctly.
- Turn the tumbler more often to add air.
- Add dry materials like shredded paper or dry leaves.
- Do not add meat, dairy, or oily foods that cause smell.
- Check if the bin has drainage holes to remove excess water.
Pests And Insects
Pests such as flies, rodents, or ants can invade your compost. They come looking for food or shelter.
| Common Pest | Cause | Solution |
|---|---|---|
| Flies | Food scraps left uncovered | Cover scraps with brown materials and close lid tightly |
| Rodents | Meat or oily foods in compost | Remove these foods and seal holes in the bin |
| Ants | Compost too dry | Moisten compost and turn it to add air |
Slow Decomposition
When compost breaks down slowly, it may lack enough heat, moisture, or nutrients.
- Make sure you mix green (nitrogen) and brown (carbon) materials well.
- Keep compost moist, like a wrung-out sponge.
- Turn the tumbler regularly to add oxygen.
- Chop large pieces into smaller bits to help them break down faster.
Harvesting Finished Compost
Using a tumbler compost bin makes composting easy and quick. After some weeks, the compost will be ready to harvest. Knowing when and how to take out the compost helps your garden grow well.
This guide explains how to identify ready compost, remove it safely, and use it in your garden.
Identifying Ready Compost
Finished compost looks dark and crumbly. It smells earthy, not rotten or sour. You will not see food scraps or large pieces in it.
The compost should be cool to touch. Warm or hot compost means it is still breaking down.
- Dark brown or black color
- Crumbly texture like soil
- Earthy smell
- No visible food or large bits
- Cool temperature
Removing Compost
Open the tumbler bin door carefully. Use a small shovel or gloved hands to scoop out the compost. Avoid mixing unfinished compost with the finished part.
Place the removed compost in a container or wheelbarrow. You can sift it to remove any large pieces before use.
- Open the bin door fully
- Use shovel or gloves to remove compost
- Keep unfinished compost separate
- Sift compost if needed
- Store compost in a dry place if not used immediately
Using Compost In Your Garden
Mix compost into garden soil to improve nutrients. Use it for flower beds, vegetable patches, or potted plants. Compost helps plants grow strong and healthy.
Spread a layer of compost around plants to keep moisture in the soil. Avoid using too much compost at once.
- Mix compost with garden soil
- Apply around flowers, vegetables, and pots
- Use as a mulch to retain moisture
- Do not overuse; a thin layer is enough
Frequently Asked Questions
What Materials Can I Compost In A Tumbler Bin?
You can compost fruit scraps, vegetable peels, coffee grounds, eggshells, and yard waste. Avoid meat, dairy, and oily foods to prevent odor and pests. Use a balanced mix of greens and browns for effective composting.
How Often Should I Turn A Tumbler Compost Bin?
Turn the tumbler compost bin every 2 to 3 days. Regular turning aerates the compost, speeds up decomposition, and prevents bad odors. Consistent rotation keeps moisture and heat evenly distributed for faster results.
How Long Does Compost Take In A Tumbler Bin?
Compost in a tumbler bin typically takes 4 to 6 weeks. Proper moisture, aeration, and balanced materials speed up the process. Hot composting in a tumbler produces nutrient-rich soil faster than traditional methods.
Can I Compost In Winter Using A Tumbler Bin?
Yes, you can compost in winter with a tumbler bin. The enclosed design retains heat, allowing decomposition to continue. Turning regularly and adding fresh materials helps maintain activity even in cold weather.
Conclusion
Using a tumbler compost bin makes composting simple and neat. Turn the bin regularly to help materials break down faster. Keep a good mix of green and brown waste for best results. Avoid adding meat or dairy to prevent pests.
Check moisture levels often; compost should feel like a damp sponge. With patience, you will have rich soil for your garden. This tool saves time and reduces kitchen waste. Start small, learn each step, and enjoy healthier plants. Composting can be easy and rewarding with the right habits.