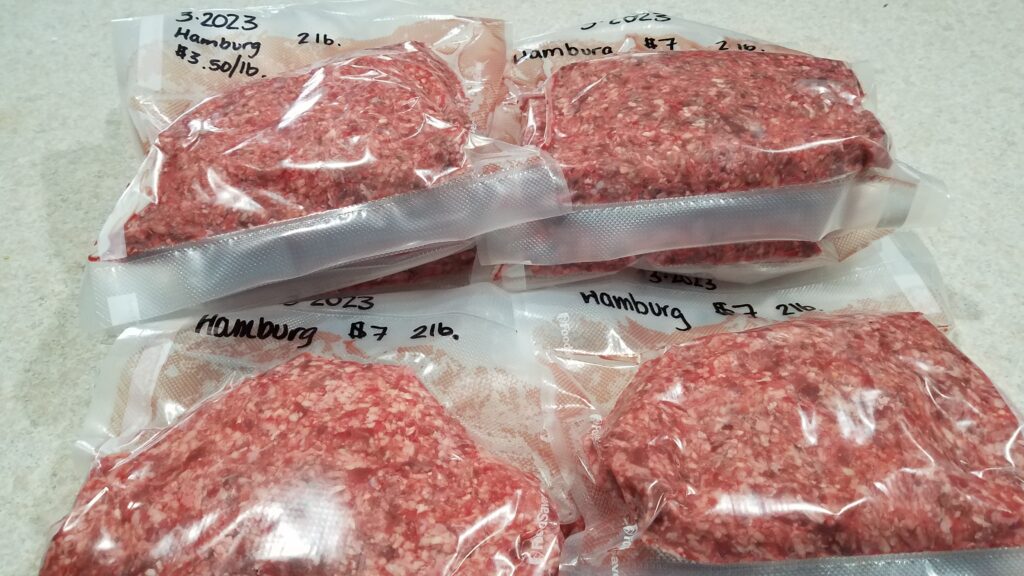
Are you tired of your meat going bad before you get a chance to use it? Imagine opening your freezer to find perfectly fresh cuts waiting for you, no freezer burn in sight.
Vacuum sealing meat is your key to longer-lasting freshness and flavor. Not only does it save you money by reducing waste, but it also locks in the taste, ensuring every bite is as satisfying as the first. You’re about to discover how easy it is to vacuum seal meat right at home.
Keep reading to learn the simple steps that can transform your meal prep and make your kitchen more efficient than ever.
Benefits Of Vacuum Sealing Meat
Vacuum sealing meat offers several benefits that can change how you store and enjoy your food. It helps maintain quality, saves money, and reduces waste. Understanding these advantages will make you think twice about how you package your meat.
Extending Shelf Life
Vacuum sealing removes air, which slows down the growth of bacteria and mold. This means your meat lasts much longer in the fridge or freezer compared to traditional storage.
I once kept steaks fresh for over two weeks without any spoilage, simply because they were vacuum sealed. Imagine the convenience of buying in bulk and not rushing to cook everything immediately.
Preserving Flavor And Texture
Sealing meat tightly locks in its natural juices and flavors. This prevents it from drying out and losing its original texture during storage.
You’ll notice a big difference when cooking vacuum-sealed meat. It tastes fresher and feels more tender, almost like it was just bought. Have you ever been disappointed by freezer-stored meat that turns out dry or bland? Vacuum sealing can prevent that.
Preventing Freezer Burn
Freezer burn happens when air reaches the surface of the meat, causing it to dry and develop tough, gray patches. Vacuum sealing cuts off air exposure completely, protecting your meat from this damage.
Freezer burn can ruin a meal and lead to food waste. By vacuum sealing, you keep your meat safe and maintain its quality, saving you money and frustration in the long run.
Choosing The Right Vacuum Sealer
Choosing the right vacuum sealer is essential for preserving meat effectively. A good sealer protects the meat from air and moisture, keeping it fresh longer. Picking a model that fits your needs saves time and money.
Types Of Vacuum Sealers
- External Sealers:These are affordable and easy to use. They work well for home use and small amounts of meat.
- Chamber Sealers:Ideal for larger quantities. They seal both bag and air inside the chamber, perfect for wet or marinated meat.
- Handheld Sealers:Compact and portable. Best for quick sealing of small portions or snacks.
Key Features To Look For
- Sealing Strength:Ensure it creates a strong, airtight seal to prevent freezer burn.
- Bag Compatibility:Check if it works with standard vacuum bags or only specific brands.
- Moisture Control:Look for settings that handle wet or dry foods differently.
- Ease of Use:Simple controls and clear instructions help avoid mistakes.
- Size and Storage:Consider how much space it takes in your kitchen.
Budget Considerations
- Set a budget before shopping to narrow down choices quickly.
- Basic models cost less but may lack advanced features.
- Mid-range sealers offer better durability and settings.
- High-end models provide professional results with extra functions.
- Think about how often you will use it to decide what fits best.
Preparing Meat For Sealing
Preparing meat correctly before vacuum sealing helps keep it fresh and tasty. Proper preparation reduces air exposure and prevents freezer burn. Follow these simple steps to get your meat ready for sealing.
Selecting Quality Cuts
Choose fresh meat with a good color and firm texture. Avoid cuts with discoloration or unpleasant smells. Freshness affects how long the meat will last once sealed. High-quality cuts seal better and taste better after storage.
Trimming And Portioning
Trim excess fat, silver skin, and any tough bits. Fat can turn rancid during storage. Cut the meat into portions that match your cooking needs. Smaller portions thaw faster and reduce waste.
Pre-freezing Tips
Freeze meat for 1 to 2 hours before sealing. This step firms up the meat, preventing juices from leaking. Use a tray or plate to keep pieces separate. Slightly frozen meat seals cleaner and stays fresher longer.
Step-by-step Vacuum Sealing Process
Vacuum sealing meat preserves freshness and extends shelf life. The process removes air, preventing freezer burn and bacteria growth. Follow clear steps to ensure a tight seal and maintain meat quality.
Setting Up Your Sealer
Place the vacuum sealer on a flat, clean surface. Plug it in and turn it on. Check the machine’s settings for the correct sealing mode. Use the recommended bags or rolls designed for vacuum sealing. Ensure the sealing strip is clean and dry before use.
Placing Meat In Bags
Cut meat into portions suitable for your needs. Pat each piece dry with paper towels. Place the meat flat inside the vacuum bag, leaving space at the top. Avoid overfilling to allow proper sealing. Arrange pieces to prevent sharp bones from piercing the bag.
Sealing Techniques For Different Cuts
- Steaks and Chops:Lay flat and space apart to seal individually or in pairs.
- Ground Meat:Flatten into a thin layer for even sealing and easier thawing.
- Roasts:Use larger bags, tuck edges neatly, and ensure the bag is free of wrinkles.
- Marinated Cuts:Freeze slightly before sealing to reduce liquid movement.
Storing Vacuum Sealed Meat
Storing vacuum sealed meat correctly extends its freshness and quality. Proper storage keeps the meat safe and tasty for longer. It also helps prevent freezer burn and waste. Organizing your freezer, labeling packs, and knowing storage times are key steps.
Optimal Freezer Organization
Keep vacuum sealed meat in a single layer for even freezing. Avoid stacking packs too tightly. Leave space between packs to allow cold air circulation. Store similar types of meat together. Use clear bins or baskets to group packs by type or date. This makes finding meat easier and reduces freezer time.
Labeling And Dating Packs
Write the type of meat on each pack. Include the packing or freezing date. Use a permanent marker or printed labels. Place labels on the flat side for easy reading. This helps track freshness and avoid spoilage. Update labels if you thaw and refreeze meat.
Recommended Storage Times
| Type of Meat | Freezer Storage Time |
|---|---|
| Beef (steaks, roasts) | 6 to 12 months |
| Pork (chops, roasts) | 4 to 6 months |
| Chicken (whole or pieces) | 9 to 12 months |
| Ground meat (beef, pork, chicken) | 3 to 4 months |
Use meat within these times for best taste. Vacuum sealing slows spoilage but does not stop it. Check meat for any signs of freezer burn or odd smells before cooking.

Credit: angusmeatsdirect.com
Thawing And Cooking Vacuum Sealed Meat
Thawing and cooking vacuum sealed meat requires attention to detail to keep the meat safe and flavorful. The vacuum seal locks in freshness, but how you thaw and cook the meat will determine the final taste and texture. Getting these steps right saves you from unpleasant surprises and wasted food.
Safe Thawing Methods
Thaw vacuum sealed meat safely by planning ahead. The best way is to move the sealed package from the freezer to the fridge and let it thaw slowly over 12 to 24 hours. This keeps the meat at a consistent, safe temperature and preserves its texture.
If you need to thaw meat faster, place the sealed package in a bowl of cold water. Change the water every 30 minutes until the meat is thawed. Avoid warm water, which can encourage bacterial growth.
Never thaw vacuum sealed meat at room temperature. This increases the risk of harmful bacteria multiplying, which can spoil your meat and cause illness.
Cooking Tips For Sealed Meat
Remove the meat from the vacuum seal before cooking. Cooking meat in the vacuum bag can cause uneven cooking and might release harmful chemicals from the plastic.
Pat the meat dry with paper towels to help it brown better. Season it simply to let the natural flavors shine through.
Use a meat thermometer to cook your meat to the right internal temperature. This ensures safety without overcooking. For example, cook beef steaks to 135°F for medium-rare or chicken breasts to 165°F.
Retaining Freshness After Opening
Once you open a vacuum sealed package, use the meat quickly to enjoy the best quality. If you can’t cook it immediately, store it in an airtight container or reseal it with a vacuum sealer if possible.
Keep the meat cold and avoid leaving it out for more than two hours. You might notice the texture changes a bit after opening, but proper storage slows down spoilage.
Have you tried freezing leftovers again after opening? It’s possible but only if you refreeze them within a day and the meat hasn’t been at room temperature too long.
Common Mistakes To Avoid
Vacuum sealing meat preserves freshness and extends shelf life. Avoiding common mistakes ensures the best results. Mistakes can cause spoilage or damage to the vacuum bags. Learning these pitfalls helps save time and money.
Sealing Moist Or Wet Meat Improperly
Moisture can prevent a proper seal. Water or juices may create air pockets inside the bag. These pockets let air in, causing freezer burn and spoilage.
Pat meat dry with paper towels before sealing. Use a cold, dry surface to keep meat fresh. Some vacuum sealers have special settings for moist food. Use those settings for better sealing.
Overfilling Bags
Overfilling bags causes poor sealing and bag damage. Food too close to the seal area can block sealing. It lets air leak inside, reducing storage life.
Leave enough space between meat and the bag’s edge. This space ensures a strong vacuum seal. Use appropriately sized bags for different meat portions.
Ignoring Maintenance Of Equipment
Dirty or damaged vacuum sealers do not work well. Food residue can block the sealing strip or vacuum channel. This causes weak seals or machine failure.
Clean the sealer after each use. Check for worn seals or damaged parts regularly. Replace any broken components to keep the machine working smoothly.

Credit: farmetteinbloom.com
Advanced Tips For Meat Enthusiasts
If you’re serious about preserving meat like a pro, mastering some advanced vacuum sealing techniques can elevate your kitchen game. These tips help you enhance flavor, extend freshness, and save money by making the most of every cut. Let’s dive into ways you can push vacuum sealing beyond the basics.
Marinating Before Sealing
Vacuum sealing meat with marinade inside the bag speeds up flavor absorption dramatically. Because the vacuum removes air, the marinade penetrates deeper, making your meat tastier in less time.
Try adding your favorite herbs, spices, and oils directly to the bag before sealing. You’ll notice a richer taste after just a few hours in the fridge compared to traditional marinating methods.
Have you ever thought about how much flavor you might be missing by skipping this step?
Sous Vide Cooking With Vacuum Sealed Meat
Vacuum sealing is a must for sous vide cooking. It creates a tight seal around the meat, ensuring even cooking and locking in all the juices.
After sealing, simply place the bag in your water bath at the desired temperature. The result? Perfectly tender and juicy meat every time without the risk of drying out.
If you haven’t tried sous vide yet, vacuum sealing could be the game changer you need for restaurant-quality meals at home.
Using Vacuum Sealing For Bulk Purchases
Buying meat in bulk saves money but can be tricky to store without losing quality. Vacuum sealing individual portions before freezing prevents freezer burn and keeps meat fresh longer.
Label each bag with the date and cut, so you always know what’s inside. This simple habit will save you time and reduce waste.
Imagine opening your freezer and finding perfectly preserved steaks ready to cook whenever you want—no thawing disasters or guesswork.

Credit: farmetteinbloom.com
Frequently Asked Questions
What Is The Best Vacuum Seal Method For Meat?
The best method uses a vacuum sealer with food-grade bags. It removes air fully to prevent freezer burn. This preserves freshness and flavor longer than traditional storage.
How Long Can Vacuum Sealed Meat Last?
Vacuum sealed meat can last 2-3 years in the freezer. In the fridge, it stays fresh for 1-2 weeks. Proper sealing and storage temperatures are key for safety.
Can You Vacuum Seal Cooked Meat Safely?
Yes, vacuum sealing cooked meat is safe if cooled first. Seal it quickly to avoid bacteria growth. This method extends shelf life and maintains taste.
What Types Of Meat Are Best For Vacuum Sealing?
All meat types benefit, including beef, poultry, pork, and fish. Lean cuts seal well, while fatty meats need extra care to avoid spoilage.
Conclusion
Vacuum sealing meat keeps it fresh for longer periods. It helps prevent freezer burn and preserves flavor well. You save money by buying in bulk and sealing portions. The process is simple and quick with the right tools. Always label packages with dates before sealing them.
Store sealed meat properly in the freezer or fridge. This method makes meal prep easier and reduces waste. Try vacuum sealing to enjoy fresh meat anytime you want.