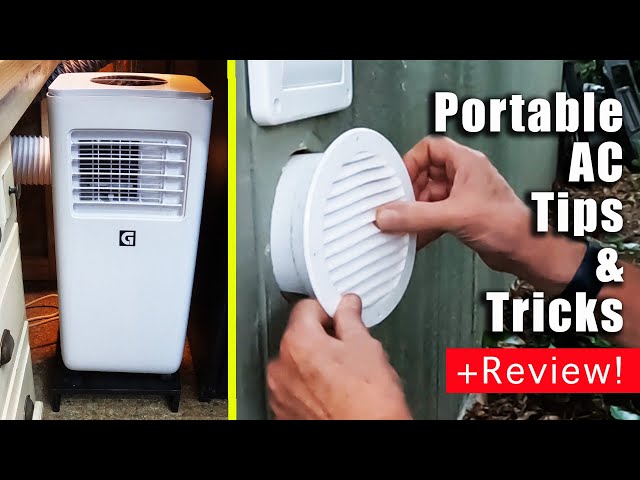
Are you struggling to keep your room cool with your portable air conditioner? One simple step could make all the difference: proper venting.
If your unit isn’t vented correctly, it won’t work as efficiently, and your energy bills might skyrocket. But don’t worry—you’re about to learn exactly how to vent your portable air conditioner the right way. By following a few easy tips, you’ll enjoy cooler air and save money at the same time.
Ready to get started? Keep reading, and you’ll have your space feeling comfortable in no time.

Credit: www.amazon.ca
Choosing The Vent Location
Choosing the right vent location is important for your portable air conditioner. It helps the unit work well and keeps your room cool.
Think about where you can easily place the vent without blocking anything or causing problems outside.
Window Selection
Windows are the most common place to vent a portable air conditioner. Pick a window close to the unit to reduce hose length.
Choose a window that opens easily and fits the vent kit. Make sure it seals well to stop hot air from coming in.
- Use a sliding or double-hung window
- Avoid windows with bars or screens that block venting
- Seal gaps with foam or weatherstripping
Door Or Wall Vent Options
You can vent through a door or wall if windows are not available. Use vent kits made for doors or walls.
Make sure the vent hose fits and the opening is well sealed to keep air from leaking in or out.
- Sliding glass doors work well with vent kits
- Small wall openings require cutting but offer a permanent solution
- Use proper sealing materials for door or wall vents
Avoiding Obstacles
Keep the vent hose clear of objects that block airflow. Obstacles reduce cooling and strain the air conditioner.
Check outside for fences, plants, or walls that might block the vent. Move the hose or choose a different location if needed.
- Avoid sharp bends in the vent hose
- Keep the hose short and straight
- Place the vent away from walkways or areas with foot traffic
Gathering Necessary Tools
Before venting your portable air conditioner, you need the right tools. This helps you set it up safely and correctly.
Gathering all parts and tools first saves time and avoids problems during installation.
Vent Kit Components
The vent kit is important to direct hot air outside your room. Most portable ACs come with these parts.
- Exhaust hose for hot air
- Window bracket or adapter
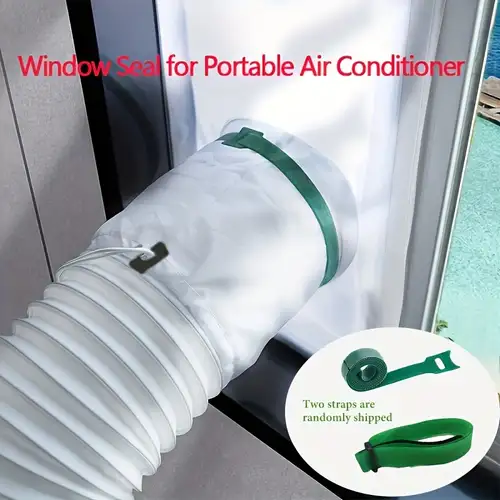
- Window seal to close gaps
- Hose clamps or connectors
Additional Tools Needed
Besides the vent kit, some tools help you install the AC more easily and securely.
| Tool | Purpose |
| Screwdriver | Fix window bracket and tighten clamps |
| Measuring tape | Measure window size for fitting |
| Utility knife | Trim window seal if needed |
| Drill (optional) | Make holes for screws if required |
| Level | Ensure the AC is even |
Preparing The Window Or Vent Opening
Properly preparing the window or vent opening is key for venting a portable air conditioner. This ensures the hot air flows outside efficiently.
Follow clear steps to measure and cut the vent panel and seal all gaps tightly. This prevents air leaks and improves cooling.
Measuring And Cutting
Measure the window or vent opening carefully before cutting the vent panel. Use a tape measure to get accurate dimensions.
- Measure the height of the window opening.
- Measure the width of the window opening.
- Mark these measurements on the vent panel.
- Use a saw or utility knife to cut along the marks.
- Check the fit of the panel in the window or vent.
Sealing Gaps
Seal all gaps between the window frame and vent panel to keep air from leaking inside. This keeps your room cooler and saves energy.
| Seal Type | Use For | How to Apply |
| Weatherstripping | Small gaps | Press along edges of the vent panel |
| Foam Tape | Medium gaps | Stick to window frame or panel edges |
| Caulk | Large gaps or cracks | Apply with a caulk gun and smooth out |
| Duct Tape | Temporary sealing | Cover gaps until permanent seal |
Installing The Exhaust Hose
Vent a portable air conditioner to remove hot air outside. The exhaust hose carries warm air from the unit to the vent.
Installing the exhaust hose is simple. Follow clear steps to connect it correctly.
Connecting To The Unit
Start by attaching the exhaust hose to the air conditioner’s exhaust port. Make sure the hose fits tightly to stop air leaks.
Most hoses twist or snap into place. Check your unit’s instructions for the exact way to connect.
- Align the hose end with the exhaust port
- Push or twist the hose until it locks
- Ensure the hose is secure and airtight
Attaching To The Vent Kit
Next, connect the other end of the hose to the vent kit. The vent kit fits in a window or wall opening.
Make sure the hose attaches firmly to the vent kit. Seal any gaps to keep hot air outside.
- Slide or snap the hose onto the vent kit adapter
- Tighten any clamps or fasteners provided
- Check that the vent kit is installed properly in the window
Securing The Vent Kit
Properly securing the vent kit is vital for your portable air conditioner to work well. This step stops hot air from coming back inside.
Two main tasks help secure the vent kit: fixing the panel in place and ensuring a tight seal around the vent.
Fixing The Panel In Place
First, attach the vent panel firmly to the window or wall. This keeps the vent hose stable and stops it from moving or falling out.
- Align the panel with the window or vent opening.
- Use screws or clips included with the kit to secure the panel.
- Check that the panel fits tightly and does not wobble.
- If needed, adjust the panel size using the sliding parts.
Ensuring A Tight Seal
After fixing the panel, seal all gaps around the vent hose and panel edges. This stops hot air or insects from entering.
| Material | Use |
| Weatherstripping foam | Fill gaps between panel and window frame |
| Silicone sealant | Seal edges for airtight fit |
| Duct tape | Secure hose connections and cover small holes |
Apply these materials carefully to ensure no air leaks remain. Check the seal by feeling for air flow around the vent kit.
Testing The Vent System
Testing the vent system of your portable air conditioner ensures it works properly. A well-vented unit cools the room efficiently.
Check the vent setup before use to avoid overheating or poor air flow problems.
Checking Airflow
Start by turning on the air conditioner and feeling the air coming from the vent hose. It should blow out warm air smoothly.
If airflow feels weak or blocked, the vent hose might be bent or clogged. Make sure it is straight and clear of dust.
- Turn on the unit and locate the vent hose
- Place your hand near the vent to feel airflow
- Look for any kinks or bends in the hose
- Remove dust or debris if airflow is weak
Adjusting If Necessary
If airflow is poor, adjust the vent hose to remove bends and twists. Keep the hose as short as possible for best results.
Check the window vent kit to ensure it fits tightly and no air leaks out. Seal gaps with tape if needed.
- Straighten the vent hose to improve air flow
- Use a shorter hose if the current one is too long
- Secure the window vent kit tightly in place
- Seal any gaps with weather-resistant tape
Maintaining The Vent Setup
Keeping your portable air conditioner’s vent setup in good shape helps it work well. Regular care stops problems and keeps air flowing freely.
Simple maintenance tasks can make your unit last longer and cool better. Check the vent often to avoid issues.
Regular Cleaning
Dust and dirt can block the vent hose. Clean the hose and filters often to keep air moving well.
Use a soft cloth or vacuum to remove dust. Avoid using water inside the hose to stop damage.
- Detach the vent hose carefully before cleaning.
- Wipe the hose inside and outside with a dry cloth.
- Clean or replace the air filter as the manual says.
- Check the window vent kit for dust and debris.
Inspecting For Damage
Look over the vent parts for cracks or holes. Damage lets hot air back inside, reducing cooling power.
Fix or replace any broken parts to keep the vent sealed tightly and working right.
- Check the vent hose for holes or tears.
- Look at the window adapter for cracks or loose fittings.
- Ensure the hose connections are tight and secure.
- Replace any damaged pieces right away.

Credit: www.reddit.com
Credit: www.temu.com
Frequently Asked Questions
How Do I Vent A Portable Air Conditioner Properly?
To vent a portable AC, connect the exhaust hose to the unit’s vent outlet. Place the other end in a window kit. Ensure a tight seal around the window to prevent hot air from entering. This setup directs hot air outside efficiently.
Can I Use Any Window For Venting My Portable Ac?
Most portable ACs work best with sliding or double-hung windows. Avoid windows that open outward or have unusual shapes. The window kit should fit snugly for effective venting. Proper window selection ensures efficient cooling and easy installation.
Why Is Venting Important For A Portable Air Conditioner?
Venting removes hot air produced during cooling. Without venting, hot air recirculates inside, reducing efficiency. Proper venting improves cooling performance and lowers energy consumption. It also prevents overheating of the unit.
What Materials Do I Need To Vent A Portable Air Conditioner?
You need the exhaust hose, window vent kit, and sealing materials. The hose connects the AC to the window kit. Seal gaps with foam or weatherstripping to prevent leaks. These materials ensure efficient and secure venting.
Conclusion
Venting a portable air conditioner is simple with the right steps. Always place the vent hose near a window or door. Seal gaps to keep hot air outside. Regularly check the hose for bends or blockages. Proper venting helps your unit cool efficiently.
It saves energy and keeps your room comfortable. Follow these tips for the best results. Stay cool and enjoy your space all summer. Easy and effective venting makes a big difference.