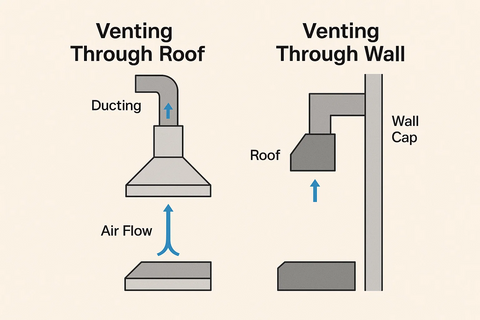
Are you tired of the lingering smell of last night’s dinner in your kitchen? Or perhaps you’ve noticed that your kitchen feels stuffier than it should?
If so, venting your range hood through the roof could be the solution you need. This guide will walk you through the process, ensuring your kitchen stays fresh and comfortable. As you read, you’ll discover simple steps to improve air quality and make your home a more pleasant place to be.
Imagine the satisfaction of cooking without the worry of odors sticking around. Ready to transform your kitchen environment? Let’s dive in and get started!

Credit: device.report
Choosing The Right Vent Hood
Choosing the right vent hood is crucial for proper kitchen ventilation. It affects air quality, cooking comfort, and energy use. The right hood clears smoke, odors, and grease efficiently. It fits your kitchen size and cooking style. This section helps you pick the best range hood for roof venting.
Types Of Range Hoods
Range hoods come in several types. Each type suits different kitchen layouts and needs.
- Under-cabinet hoods:Installed under kitchen cabinets, good for small to medium kitchens.
- Wall-mounted hoods:Fixed on the wall above the stove, ideal for open kitchens.
- Island hoods:Hang from the ceiling over kitchen islands, perfect for open floor plans.
- Downdraft hoods:Installed behind the cooktop and pull air downwards, useful for kitchens without overhead space.
Ventilation Requirements
Proper ventilation is key for safety and performance. Vent hoods must move enough air to remove smoke and smells.
- Measure your stove’s BTU or size to find needed airflow (CFM).
- Choose a hood with a CFM rating that matches or exceeds this number.
- Use ductwork sized correctly to reduce airflow loss.
- Ensure the duct runs straight to the roof to avoid blockages.
- Consider noise level ratings to keep your kitchen quiet.
Planning The Vent Path
Planning the vent path for your range hood is a critical step that impacts both the efficiency and safety of your kitchen ventilation. A well-planned route ensures that smoke, odors, and heat escape smoothly without causing damage or leaks in your home. Taking time to carefully map out the path can save you from costly fixes and improve your cooking experience.
Locating The Vent Outlet
Start by identifying the best spot on your roof for the vent outlet. You want a location that allows direct access from your range hood to the outside, minimizing the length of the duct. Check the roof slope and avoid placing the vent where water might pool or cause damage.
Think about how the vent will look from the outside. Is it easy to reach for maintenance? Positioning it near a ridge or peak often works well to prevent leaks.
Measuring The Distance To Roof
Measure the straight-line distance from your range hood to the chosen vent outlet on the roof. Include vertical and horizontal distances to get an accurate total duct length. This helps you determine the exact amount of ducting needed and avoid unnecessary bends.
Remember, every bend in the duct reduces airflow. Keep the path as short and straight as possible for better performance.
Avoiding Obstacles
Look for obstacles like ceiling joists, plumbing, electrical wiring, or attic insulation that could block or complicate the vent path. You may need to reroute around these or make small adjustments to your original plan. Don’t forget to consider attic access for installation and future maintenance.
Have you checked for anything that might cause condensation buildup? Proper insulation around the duct can prevent moisture problems and extend the life of your range hood system.
Gathering Tools And Materials
Gathering the right tools and materials is the first step to vent a range hood through the roof. Having everything ready saves time and avoids interruptions. It also ensures the job is done safely and correctly. Preparation makes the installation process smoother and more efficient.
Essential Tools
- Measuring tape to get accurate dimensions
- Drill with assorted bits for making holes
- Jigsaw or reciprocating saw to cut roof and drywall
- Caulking gun for sealing gaps
- Screwdrivers to secure parts and fasteners
- Hammer for nailing and adjustments
- Step ladder to reach the roof safely
- Safety goggles and gloves for protection
- Chalk line for marking straight cuts
Required Materials
- Range hood vent pipe, usually metal or flexible duct
- Roof vent cap to prevent water and pests
- Metal flashing to seal around the vent
- High-temperature foil tape for duct seams
- Roofing sealant to waterproof openings
- Mounting brackets or straps for support
- Drywall patch materials for interior repair
- Insulation tape to reduce noise and heat loss
Preparing The Roof
Preparing the roof is a crucial step for venting a range hood. It ensures the vent is secure and prevents leaks. Proper preparation saves time and protects your home from water damage.
Marking The Vent Location
Find the exact spot on the ceiling where the vent will exit. Use a tape measure to check the distance from walls and beams. Mark the roof above this spot carefully. Double-check measurements before cutting to avoid mistakes.
Cutting The Roof Hole
Wear safety glasses and gloves before starting. Use a saw to cut a hole in the roof at the marked spot. The hole should fit the vent pipe size exactly. Cut slowly to avoid damaging surrounding shingles or roof structure.
Weatherproofing The Opening
Apply roofing sealant around the hole edges to prevent leaks. Install a roof vent flashing over the hole for extra protection. Secure the flashing with nails and seal edges with roofing cement. This step keeps water out and maintains roof integrity.
Installing The Vent Pipe
Installing the vent pipe is a vital part of venting a range hood through the roof. This step moves the air outside and helps keep your kitchen fresh. Proper installation prevents leaks and ensures good airflow. Follow the instructions carefully for a safe and effective setup.
Connecting To The Range Hood
Begin by attaching the vent pipe to the range hood’s outlet. Use a flexible or rigid duct that fits the hood’s size. Slide the pipe over the outlet securely. Fasten it with a metal clamp or foil tape to prevent air leaks. Make sure the connection is tight but not bent or crushed.
Securing The Pipe Through Roof
Run the pipe straight up through the roof opening. Avoid sharp bends to keep air flowing easily. Use a roof flashing to protect the roof from water damage. Secure the pipe inside the attic with straps or brackets to stop movement. Check that the pipe extends above the roofline as required by code.
Sealing Joints And Seams
Seal all pipe joints and seams with foil tape or mastic sealant. This stops air and moisture from escaping. Inspect each connection carefully. Use a brush or cloth to clean surfaces before sealing. Proper sealing improves efficiency and prevents mold or water damage inside walls.

Credit: timbersill.com
Attaching The Roof Vent Cap
Attaching the roof vent cap is a crucial part of venting a range hood through the roof. It protects the vent from rain, animals, and debris. A properly installed vent cap ensures smooth airflow and prevents leaks. This section covers how to select, mount, and secure the vent cap while keeping the airflow efficient.
Selecting The Vent Cap
Choose a vent cap made of durable material like stainless steel or aluminum. It must fit the size of your vent pipe exactly. Look for a design with a weatherproof cover to block rain. A vent cap with a built-in screen helps keep out birds and insects. Pick a model that matches your roof style for a neat finish.
Mounting And Securing
Place the vent cap over the vent pipe tightly. Use roofing cement or sealant around the base to stop leaks. Secure the cap with corrosion-resistant screws. Make sure the screws go into solid wood or roofing material. Check that the cap is level and stable to avoid wind damage.
Ensuring Proper Airflow
Keep the vent cap free from blockages. Clear away leaves, nests, or other debris regularly. The cap should allow air to flow out easily without restriction. Avoid sharp bends in the duct leading to the vent cap. Proper airflow reduces cooking odors and moisture build-up in your kitchen.
Testing And Final Checks
After installing your range hood vent through the roof, it’s essential to perform thorough testing and final checks. This step ensures your kitchen stays smoke-free and that your vent system works efficiently without causing damage or leaks. Taking the time to verify everything now can save you from costly repairs later.
Checking For Leaks
Leaks around your roof vent can lead to water damage and reduce the effectiveness of your range hood. To check for leaks, inspect all the seals and flashing around the vent cap carefully. Look for gaps, cracks, or loose screws that might let water in.
You can test for leaks by running a hose over the vent area and watching inside your attic or ceiling for any water entry. If you spot any moisture, reseal the area with roofing cement or waterproof sealant. Don’t forget to check after heavy rain too, as some leaks only show up under real conditions.
Verifying Ventilation Efficiency
It’s crucial to confirm that your range hood is pulling air effectively out through the roof vent. Turn on your range hood and hold a piece of tissue or lightweight paper near the hood’s intake. The paper should be pulled toward the hood firmly, indicating strong airflow.
Another way to check is by observing if cooking odors and smoke clear quickly when the hood is running. If the air feels stagnant or smells linger, double-check your ductwork for blockages or sharp bends that might reduce airflow.
Have you noticed any unusual noises or vibrations? These can signal problems like loose parts or improper vent sizing that affect efficiency. Fixing these early keeps your system working smoothly and your kitchen fresh.
Maintenance Tips For Roof Vents
Maintaining your roof vent is key to keeping your range hood working efficiently and safely. Regular care prevents buildup, stops damage, and ensures your vent lasts longer. Let’s look at practical ways to keep your roof vent in top shape.
Cleaning The Vent Pipe
Grease and dust can build up inside the vent pipe, blocking airflow and causing your range hood to work harder. Cleaning it at least twice a year keeps air flowing smoothly and prevents unpleasant odors.
Use a long brush or flexible cleaning rods designed for ductwork to reach inside the pipe. If you notice stubborn grease, a mild degreaser can help break it down without harming the pipe.
Don’t forget to clean the vent cap on the roof, too. Leaves and debris can clog the cap, so remove them regularly to avoid blockages.
Inspecting For Damage
Damage to the vent pipe or roof flashing can lead to leaks and reduce your vent’s performance. Look for cracks, rust, or loose connections every few months, especially after storms.
If you spot any issues, address them quickly. Small cracks can be sealed with weatherproof tape or silicone, while larger damage may require professional repair.
Ask yourself: Have you checked the vent after the last heavy rain? Water infiltration can cause hidden problems, so staying proactive saves you headaches down the road.
Credit: www.hvacsite.com
Frequently Asked Questions
How Do I Vent A Range Hood Through The Roof?
To vent a range hood through the roof, install a roof cap, use a straight duct, and seal all joints. Ensure the duct runs vertically with minimal bends to promote airflow and prevent leaks.
What Materials Are Needed For Roof Vent Installation?
You need a metal duct, roof vent cap, flashing, screws, sealant, and a drill. Choose corrosion-resistant materials for durability and proper airflow.
Can I Vent A Range Hood Through An Existing Roof Vent?
No, roof vents for HVAC or attic ventilation are not suitable for range hoods. Use a dedicated duct for proper kitchen ventilation and safety.
How High Should The Roof Vent Be Installed?
The vent cap should extend at least 12 inches above the roof surface. This height prevents rain and debris from entering the duct and ensures good airflow.
Conclusion
Venting a range hood through the roof keeps your kitchen fresh and clean. Proper installation helps avoid leaks and saves energy. Always measure carefully and use the right tools for safety. Seal all joints tightly to stop air leaks. Regular checks keep the vent working well over time.
This simple guide makes the process clear and easy. Now, you can vent your range hood with confidence. Enjoy better air quality and a fresher kitchen space.