
Are you struggling to keep your portable air conditioner working at its best? One simple step can make all the difference: proper venting.
If your unit isn’t vented correctly, it won’t cool your space effectively and could even waste energy. But don’t worry—venting a portable air conditioner is easier than you think. In this guide, you’ll learn exactly how to set up your vent so your room stays cool and comfortable.
Keep reading, and you’ll discover tips that save you time, money, and frustration.
Choosing The Right Location
Placing your portable air conditioner in the right spot helps it work well. You need a good location to vent the hot air outside safely.
This guide explains what to look for when choosing a place to vent your portable air conditioner.
Near A Window Or Door
Venting near a window or door is common. It lets hot air go outside easily. Choose a window or door that opens wide enough for the vent hose.
Avoid Blocking Walkways
Do not block walkways or doors with the vent hose. It can cause accidents or damage. Pick a spot where the hose can run without obstacles.
Close To A Power Outlet
Your air conditioner needs power. Place it near an outlet to avoid long extension cords. This keeps the setup safe and tidy.
- Check the length of the vent hose
- Measure the distance to the power outlet
- Choose a flat, stable surface for the unit
Avoid Humid Or Dusty Areas
Do not vent near places with high humidity or dust. This can reduce the air conditioner’s efficiency. Pick a clean, dry area for venting.
Consider The Vent Hose Length And Direction
| Factor | Recommendation |
| Hose Length | Keep it as short as possible |
| Hose Direction | Avoid sharp bends or kinks |
| Vent Opening | Use a window or door vent kit |

Credit: www.dreo.com
Gathering Necessary Tools
Setting up a portable air conditioner needs the right tools. These tools help you vent the unit properly. Without them, the job becomes harder and may cause damage.
Gathering everything before starting saves time. It also makes sure the venting is safe and effective.
Measuring Tools
You need to measure the window or wall where the vent will go. Measuring tools help you get the right size for the vent kit.
- Tape measure
- Ruler or yardstick
- Marker or pencil
Cutting Tools
Cutting tools help make holes or adjust the vent kit parts. Choose tools that fit your venting surface.
- Utility knife
- Handsaw or jigsaw
- Scissors for plastic vents
Fastening Tools And Materials
Fastening tools hold the vent and hose in place. These tools keep the vent secure and prevent leaks.
| Tool or Material | Purpose |
| Screwdriver | Tighten screws on vent panels |
| Drill | Create holes for screws if needed |
| Screws | Secure vent kit parts |
| Adhesive tape | Seal gaps and hold hose |
| Caulk or sealant | Make vent airtight |
Safety Gear
Wear safety gear to protect yourself during installation. It keeps you safe from sharp edges and dust.
- Gloves
- Safety glasses
- Dust mask
Preparing The Window For Venting
Venting a portable air conditioner requires preparing your window properly. This helps the unit work well and keeps your room cool.
Focus on choosing the right window and measuring it carefully. These steps make sure the vent fits tightly and safely.
Selecting The Appropriate Window
Pick a window that can hold the vent kit securely. Most portable air conditioners use sliding or double-hung windows.
- Choose a window near a power outlet to avoid long cords.
- Ensure the window opens wide enough for the vent hose.
- Pick a window that faces outside without obstacles.
- Avoid windows that open inward if the vent kit is not flexible.
Measuring The Window Opening
Measure your window opening to fit the vent panel. Accurate measurements prevent air leaks and keep bugs out.
| Measurement | How to Measure |
| Width | Measure from one side of the window frame to the other |
| Height | Measure from the bottom to the top of the open window |
| Depth | Check the thickness of the window frame if the vent panel fits inside |
Installing The Window Kit
Vent your portable air conditioner by installing the window kit. This kit helps direct hot air outside through your window. Follow these simple steps to assemble and secure it properly.
Make sure you have all parts ready before starting. Proper installation ensures your air conditioner works efficiently.
Assembling The Kit Components
The window kit includes a telescoping panel, exhaust hose, and connectors. You need to fit these parts together before placing them in the window.
- Extend the telescoping panel to fit your window width or height.
- Attach one end of the exhaust hose to the air conditioner’s vent.
- Connect the other end of the hose to the window panel connector.
- Secure all connections firmly to avoid air leaks.
Securing The Kit In Place
Once assembled, place the panel in your window opening. Use the locking mechanisms to hold it tight and prevent gaps.
| Component | Purpose | Tips |
|---|---|---|
| Telescoping Panel | Blocks window opening | Adjust size to fit snugly |
| Exhaust Hose | Vent hot air outside | Keep hose straight to improve airflow |
| Connectors | Join hose and panel | Twist or snap tight for seal |
| Locking Mechanism | Secure panel in window | Check for stability before use |
Connecting The Exhaust Hose
Portable air conditioners need an exhaust hose to remove hot air. Connecting this hose correctly helps the unit work well. This guide covers how to connect the hose safely and securely.
Follow the steps below to attach the exhaust hose to your air conditioner and make sure the connection is airtight.
Attaching The Hose To The Unit
First, find the exhaust port on your portable air conditioner. This is usually at the back or side of the unit. Take the hose and push one end firmly onto the port.
- Align the hose end with the exhaust port.
- Push the hose onto the port until it fits tightly.
- Turn the hose slightly to lock it if the model uses a twist-lock.
- Check that the hose does not bend sharply or kink.
Ensuring A Tight Seal
After attaching the hose, seal the connection well. A tight seal stops hot air from leaking back inside. Use these tips to secure the hose:
- Use the rubber gasket or foam ring that came with the unit.
- Wrap duct tape around the hose and port joint.
- Check the seal for gaps or loose spots.
- Replace worn or damaged seals promptly.
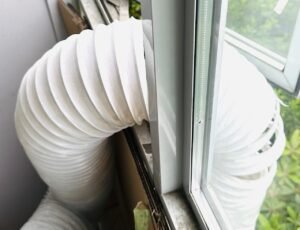
Credit: airconrescue.ca
Securing The Vent Hose
Securing the vent hose is key to a portable air conditioner’s performance. A well-secured hose helps remove hot air efficiently.
Loose or poorly placed hoses can cause leaks and reduce cooling power. Let’s look at how to keep the hose secure.
Positioning The Hose Correctly
Place the hose so it vents hot air outside your home. Usually, a window kit helps connect the hose to the window.
Keep the hose as straight and short as possible. Avoid stretching it too far or pointing it upwards.
- Use the window kit to fix the hose in place
- Ensure the hose outlet faces outside
- Keep the hose level or angled slightly downward
- Avoid placing the hose near doorways or walkways
Preventing Hose Kinks And Bends
Kinks and bends block airflow and strain the hose. This lowers your air conditioner’s efficiency.
Smooth out the hose gently. Support it with clips or hooks to keep it straight.
- Do not twist or fold the hose sharply
- Use hose supports to prevent sagging
- Check the hose regularly for damage or blockages
- Replace the hose if it shows cracks or tears
Testing The Air Conditioner
After setting up your portable air conditioner, testing it is important. This ensures it works well and vents properly.
Check the unit’s operation and look for air leaks around the vent. This helps keep the room cool and energy efficient.
Running The Unit
Turn on the air conditioner and set it to a cool temperature. Let it run for about 10 to 15 minutes.
- Check if the air coming out feels cold and steady.
- Listen for any strange noises from the unit.
- Make sure the exhaust hose is warm to the touch.
- Observe if the unit cycles on and off properly.
- Note any error lights or messages on the display.
Checking For Air Leaks
Inspect the area where the exhaust hose connects to the window or vent. Air leaks can reduce cooling efficiency.
| Leak Location | How to Check | Fix Method |
| Window seal | Look for gaps around the hose | Use weather stripping or foam tape |
| Exhaust hose joints | Feel for air escaping along hose | Tighten connections or use duct tape |
| Vent adapter | Check for loose fit | Secure with screws or tape |
Troubleshooting Common Issues
Portable air conditioners need proper venting to work well. Poor vent setup can cause problems.
This guide helps you fix common venting issues. It covers vent leaks and low cooling power.
Addressing Vent Leaks
Vent leaks let hot air enter your room. This lowers your air conditioner’s efficiency.
Check the vent hose and window kit for gaps or tears. Seal holes with tape or replace damaged parts.
- Inspect hose for cracks or holes
- Make sure window kit fits tightly
- Use duct tape to seal small leaks
- Replace worn-out vent parts
Dealing With Insufficient Cooling
If your room is not cooling well, the vent may be blocked or too long. This reduces airflow.
Keep the vent hose as short and straight as possible. Clean dust or dirt from the vent and filters regularly.
- Shorten or straighten the vent hose
- Remove any vent blockages
- Clean or replace air filters
- Check that the exhaust hose is not crushed
Maintenance Tips For Optimal Performance
Keeping your portable air conditioner in good shape helps it work better. Regular care prevents problems and saves energy.
This guide focuses on how to vent your portable air conditioner and maintain it for the best results.
Regular Cleaning
Clean your portable air conditioner often. Dust and dirt can block airflow and reduce cooling power.
Wipe the exterior and clean or replace the air filters to keep air flowing freely.
- Turn off and unplug the unit before cleaning
- Use a soft cloth to clean vents and surfaces
- Wash or replace air filters every two weeks
- Remove dust from the exhaust hose
Inspecting The Exhaust System
Check the exhaust hose regularly for cracks or leaks. Damaged hoses reduce cooling efficiency.
Make sure the hose is connected tightly and vented outside to remove hot air properly.
- Look for holes or tears in the exhaust hose
- Ensure the hose is straight and not bent sharply
- Secure the hose to the window or vent panel firmly
- Replace the hose if it shows signs of damage

Credit: sunjoyshop.com
Frequently Asked Questions
How Do I Vent A Portable Air Conditioner?
To vent a portable air conditioner, connect the exhaust hose to the unit. Attach the other end to a window kit. Secure the kit to a window, allowing hot air to escape outside efficiently.
Can I Vent A Portable Ac Through A Wall?
Yes, you can vent through a wall using a vent kit. Install a wall sleeve, then attach the exhaust hose securely. Ensure the opening is properly sealed to prevent air leaks and maintain cooling efficiency.
What Is The Best Window For Venting Portable Ac?
Choose a window near an electrical outlet and close to the unit. Sliding windows and double-hung windows work best. Ensure the window opens wide enough to fit the vent kit easily.
How Long Should The Exhaust Hose Be?
Keep the exhaust hose as short as possible, ideally under 5 feet. Longer hoses reduce cooling efficiency by increasing heat transfer. Avoid kinks and bends for optimal airflow.
Conclusion
Venting a portable air conditioner helps it cool your space well. Always connect the vent hose to a window or door opening. Make sure the hose is straight and not bent. This allows hot air to leave your room. Check the window seal to stop warm air from coming in.
Regularly clean the vent and filter for better performance. Following these steps keeps your air conditioner working efficiently. Enjoy a cooler, more comfortable home all summer long. Simple, right?