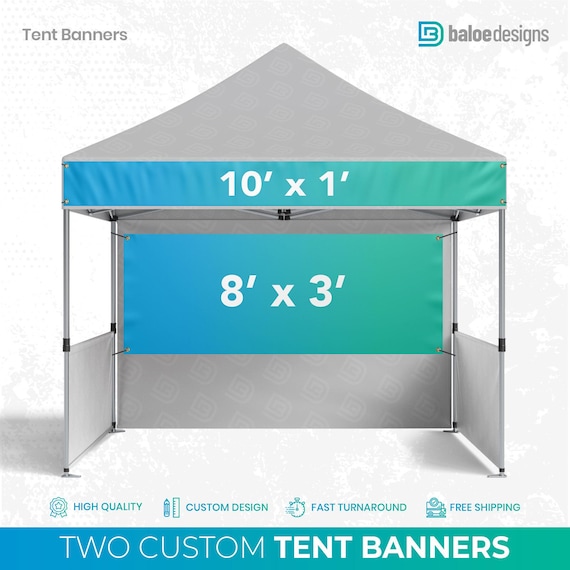
Are you setting up a 10×10 tent for your next event and wondering what size banner will fit perfectly? Choosing the right banner size is key to making your tent stand out and grabbing attention.
Too big, and it might look cluttered; too small, and your message could get lost. You’ll discover the ideal banner dimensions to make your display clear, attractive, and effective. Keep reading to find out how to make your tent banner work hard for you.

Credit: westshade.com
Choosing Banner Sizes For 10×10 Tents
Choosing the right banner size for a 10×10 tent helps you get noticed. The banner should fit well and be easy to read.
This guide explains tent dimensions, common banner sizes, and what affects your choice.
Standard Tent Dimensions
A 10×10 tent means it is 10 feet wide and 10 feet long. The height varies but is usually about 8 feet.
The frame and legs take up some space, so banners must fit around them without blocking the tent.
- Width: 10 feet (120 inches)
- Length: 10 feet (120 inches)
- Height: About 8 feet (96 inches)
Common Banner Sizes
Banners come in different sizes to fit tents. The size you pick depends on where you want to place it.
- 10 feet wide by 3 feet tall (120″ x 36″) – fits the front or back
- 10 feet wide by 2 feet tall (120″ x 24″) – good for lower space on the tent
- 3 feet wide by 3 feet tall (36″ x 36″) – fits on tent sides
- 6 feet wide by 3 feet tall (72″ x 36″) – fits on one side or part of front
Factors Influencing Size Selection
Your banner size depends on how far people will be and where you place it. Visibility matters.
Other factors include the tent frame, text size, and the amount of information on the banner.
- Distance: Bigger banners for far away viewers
- Tent frame: Avoid blocking frame parts
- Text size: Large letters for easy reading
- Banner placement: Front, back, or sides
- Information: Less text needs smaller banners
Banner Placement Options
Choosing the right banner size for a 10×10 tent is important. Placement affects visibility and impact.
Banners can be placed in different spots on the tent. Each location serves a unique purpose.
Front Valance Banners
The front valance is the fabric strip along the front edge of the tent roof. It is a popular spot for banners.
Front valance banners show your brand clearly to people walking by. They are easy to see from a distance.
- Banner size usually fits the 10-foot width of the tent
- Height is typically 12 to 18 inches
- Good for logos, business names, or short messages
Sidewall Banners
Sidewall banners attach to the tent’s sidewalls. They offer extra space for graphics and information.
These banners help attract visitors from the sides and provide more advertising area.
- Size can vary but often 8 feet wide by 4 feet tall
- Can display product details or contact info
- Good for creating a private space inside the tent
Back Wall Banners
The back wall banner covers the rear of the tent. It is visible to people behind the tent.
This banner is ideal for bold messages or large images that attract attention from behind.
- Usually matches the 10-foot width of the tent
- Height can range from 6 to 8 feet
- Good for large graphics or sponsor logos
Material And Design Considerations
Choosing the right banner size for a 10×10 tent depends on material and design. These factors affect the banner’s look and how long it lasts outside.
Good material and design help your banner stand out and resist weather damage. This guide covers key points to think about for your banner.
Durability And Weather Resistance
Strong materials keep your banner safe in sun, rain, and wind. Vinyl and mesh are popular choices. Vinyl blocks water well, while mesh lets wind pass through.
- Use vinyl for water and sun protection.
- Choose mesh if wind is strong to avoid tears.
- Look for UV-resistant inks to keep colors bright.
- Consider reinforced edges and grommets for hanging.
Visibility And Readability
Make sure your banner is easy to see and read from a distance. Large text and simple fonts help visitors quickly understand your message.
| Feature | Recommendation |
| Font Size | At least 4 inches tall |
| Text Style | Clear, sans-serif fonts |
| Contrast | High contrast colors |
| Banner Size | Fits well on tent side or front |
Branding And Color Choices
Colors and logos show your brand clearly. Use your brand colors and keep the design simple to attract attention.
- Pick 2-3 main colors from your brand palette.
- Use bright colors to catch eyes but avoid clutter.
- Make sure text color contrasts with background color.
- Place your logo where it is easy to see.

Credit: www.amazon.com
Measuring For The Perfect Fit
Choosing the right banner size for a 10×10 tent is important. The banner should fit well without hanging too low or being too tight.
Accurate measurements help you get a banner that looks good and stays secure during events.
Tools Needed For Accurate Measurement
To measure your tent correctly, gather the right tools. These tools make measuring easier and more precise.
- Measuring tape (at least 25 feet long)
- Notebook and pen to record measurements
- Step ladder for higher points
- Helper to hold the tape for long distances
Measuring Tent Dimensions
Start by measuring the width and height of each tent side where you want the banner. Use a tape measure for accuracy.
Measure from the top frame bar down to the bottom edge. Also, check the full width from one side to the other.
- Measure tent width (usually 10 feet for a 10×10 tent)
- Measure tent height from frame to ground
- Note any uneven parts or slopes
Adjusting For Ties And Attachments
Leave extra space for ties, hooks, or Velcro strips that hold the banner in place. This space prevents the banner from stretching too tight.
Add about 2 to 4 inches on each side to your measurements. This gives room for fasteners and allows easy setup.
- Measure tie points on the tent frame
- Add extra inches to width and height for attachments
- Check that banner material can handle the extra tension
Installation Tips For Banner Display
Choosing the right banner size for a 10×10 tent is important. The banner should fit well and look neat.
Proper installation keeps the banner secure and visible. It also helps the banner last longer.
Using Grommets And Bungee Cords
Grommets are metal rings in the banner corners. They make it easy to attach the banner to the tent.
Bungee cords stretch and hold the banner tight. They reduce stress on the banner in wind or rain.
- Place grommets at each corner and sides
- Use bungee cords to hook through grommets
- Stretch cords to keep banner flat and tight
- Check cords often to keep tension even
Securing Banners In Windy Conditions
Wind can pull hard on banners. Secure the banner well to avoid damage or loss.
Use extra ties or weights to keep the banner steady. Avoid large banners that catch too much wind.
- Add extra bungee cords or zip ties on all sides
- Use sandbags or weights on tent legs
- Choose a banner size smaller than the tent frame
- Lower the banner if wind gets very strong
Maintaining Banner Appearance
Keep your banner clean and smooth for the best look. Dirt and wrinkles reduce its effect.
Store the banner dry and rolled to avoid damage. Check for tears before each use.
- Wipe the banner with a soft cloth and mild soap
- Roll the banner instead of folding to prevent creases
- Inspect grommets and edges for wear or tears
- Fix small tears quickly with repair tape

Credit: www.bannerbuzz.ca
Custom Vs. Pre-made Banners
Choosing the right banner size for a 10×10 tent can be tricky. You can pick custom banners or pre-made ones.
Both options have pros and cons. This guide helps you decide which fits your needs better.
Benefits Of Custom Sizing
Custom banners fit your 10×10 tent perfectly. They look neat and professional.
You get to choose the exact size, shape, and design. This helps your banner stand out.
- Fits tent sides exactly without extra material
- Better use of space for logos and messages
- Options for unique shapes and cuts
- High-quality appearance for events
Cost And Time Considerations
Pre-made banners cost less upfront. They are ready to ship or buy in stores.
Custom banners take more time to make. They may also cost more, but fit better.
- Pre-made banners save time and money
- Custom banners need design and production time
- Custom prices vary by size and material
- Plan ahead if you want custom banners
Where To Order Custom Banners
You can order custom banners from local print shops or online services. Many offer easy design tools.
Look for companies that specialize in event or tent banners. Check reviews and sample work.
- Local printing shops often provide personal help
- Online services offer fast turnaround options
- Compare prices and shipping times
- Ask about material types and weather resistance
Frequently Asked Questions
What Size Banner Fits A 10×10 Tent Best?
A 6-foot wide by 2-foot tall banner fits well across the front of a 10×10 tent. This size offers clear visibility without overwhelming the tent’s frame.
Can I Use A Full 10×10 Banner On My Tent?
Using a full 10×10 banner is not practical. It may block airflow and visibility, causing a cluttered look and potential damage.
How Do I Measure For A Tent Banner?
Measure the tent’s front width and available hanging height. Subtract a few inches for clearance to ensure the banner fits properly.
What Material Is Best For 10×10 Tent Banners?
Vinyl is ideal for 10×10 tent banners. It’s durable, weather-resistant, and produces vibrant, long-lasting prints suitable for outdoor use.
Conclusion
Choosing the right banner size for your 10×10 tent is crucial. A well-fitted banner ensures your message stands out. Measure your tent space carefully. Consider visibility from different angles. A banner should not overwhelm the tent. Instead, it should complement your setup.
Use eye-catching colors and clear fonts. This helps attract attention. Remember, the goal is to communicate your message effectively. A properly sized banner makes a big impact. It draws people in and keeps them interested. With these tips, you can enhance your event presence.
Happy decorating!