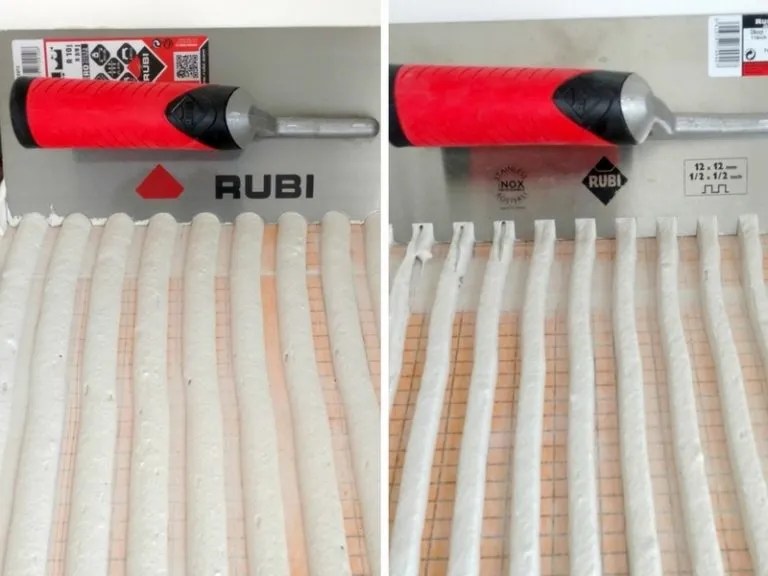
Choosing the right trowel size for your mosaic tile sheets can make all the difference in how your project turns out. If you use a trowel that’s too big or too small, your tiles might not stick properly or could look uneven.
You want your mosaic to look flawless and last for years, right? You’ll discover exactly which trowel size works best for mosaic tile sheets and why it matters. Keep reading to avoid common mistakes and get professional results every time.

Credit: www.tilemountain.co.uk
Choosing The Right Trowel Size
Picking the correct trowel size is important for laying mosaic tile sheets. The right size helps spread the adhesive evenly. This makes the tiles stick well and stay flat.
If the trowel is too small, you may not get enough adhesive under the tiles. If it is too large, you waste adhesive and make a mess. Let’s look at some factors to help you choose.
Factors To Consider
Think about the size of the mosaic tiles and the backing mesh. Small tiles need less adhesive. Larger sheets or tiles need more. The surface you are tiling matters too. Rough surfaces need more adhesive to fill gaps.
The type of adhesive also plays a role. Some adhesives spread easier and need a different notch size. Always check the tile and adhesive instructions for recommended trowel sizes.
- Tile size and thickness
- Backing mesh or sheet size
- Surface texture and flatness
- Type of adhesive used
- Manufacturer’s recommendations
Common Trowel Sizes For Mosaic
For most mosaic tile sheets, a small notched trowel works best. A 1/4 inch by 1/4 inch square-notch trowel is common. It spreads enough adhesive without waste. Some installers use a 3/16 inch notch for very small mosaics.
If your mosaic tiles are larger or set on a rough surface, a 1/4 inch by 3/8 inch notch may be better. This holds more adhesive and creates a strong bond.
| Trowel Notch Size | Best Use |
|---|---|
| 3/16″ x 5/32″ | Very small mosaic tiles (less than 1 inch) |
| 1/4″ x 1/4″ | Standard mosaic tile sheets (around 1 inch tiles) |
| 1/4″ x 3/8″ | Larger mosaics or rough surfaces |

Credit: www.amazon.ca
Understanding Mosaic Tile Sheets
Mosaic tile sheets are small tiles attached to a mesh backing. This setup helps you place many tiles quickly and evenly.
Choosing the right trowel size for mosaic tile sheets is important. It affects how well the adhesive holds the tiles.
Types Of Mosaic Tiles
Mosaic tiles come in different types based on their material and finish. Each type needs careful handling and proper installation.
- Glass mosaic tiles: shiny and colorful, often used for backsplashes.
- Stone mosaic tiles: natural look, durable for floors and walls.
- Ceramic mosaic tiles: versatile and affordable, good for many areas.
- Metal mosaic tiles: add a modern or industrial style to spaces.
Material Considerations
| Material | Recommended Trowel Size | Notes |
| Glass | 1/8 inch notch | Use a smooth, even coat for better adhesion. |
| Stone | 1/4 inch notch | Thicker adhesive layer needed to support weight. |
| Ceramic | 1/8 to 1/4 inch notch | Depends on tile thickness and surface. |
| Metal | 1/8 inch notch | Avoid thick adhesive to prevent unevenness. |
Select a trowel that matches the tile sheet type and surface texture. This choice helps prevent tiles from shifting or popping out.
Trowel Types For Mosaics
Choosing the right trowel is important when installing mosaic tile sheets. The trowel size and shape help spread the adhesive evenly.
Mosaic tiles are smaller than regular tiles. This means you need a trowel that works well with small tiles and thin sheets.
Square-notch Trowels
Square-notch trowels have small square-shaped teeth. These teeth leave ridges in the adhesive for better grip.
For mosaic tile sheets, use a square-notch trowel with 1/8 inch or 3/16 inch notches. This size spreads thin layers of adhesive.
- Good for flat and even surfaces
- Helps avoid too much adhesive under tiles
- Creates strong bond with mosaic sheets
V-notch Trowels
V-notch trowels have V-shaped teeth. They leave thinner ridges than square-notch trowels.
Use a V-notch trowel with 1/8 inch notches for delicate mosaic tiles. This trowel spreads the right amount of adhesive.
- Works well on uneven surfaces
- Prevents adhesive squeeze-out
- Suitable for very small mosaic sheets
Installation Techniques
Choosing the right trowel size is key for mosaic tile sheets. The trowel helps spread thinset evenly.
Good installation means smooth thinset and correct angles. These steps improve tile adhesion and look.
Spreading Thinset Evenly
Use a notched trowel to spread thinset over the surface. It creates ridges that help tiles stick well.
Pick a trowel size that matches the mosaic tile sheet. Thinset should cover the back of the tiles fully.
- For small mosaic sheets, a 3/16-inch square notch trowel works best
- Spread thinset in one direction first, then cross back for even coverage
- Check for voids under tiles to avoid weak spots
Proper Troweling Angles
Hold the trowel at a 45-degree angle to spread thinset correctly. This angle forms good ridges.
Too shallow or too steep angles can cause uneven thinset layers. Keep a steady hand and angle.
- 45 degrees creates ridges that allow tiles to press in
- Use consistent pressure for uniform thinset thickness
- Adjust angle slightly for different tile sheet sizes
Common Mistakes To Avoid
Choosing the right trowel size is key for mosaic tile sheets. Mistakes can cause poor adhesion and uneven tiles. Understanding common errors helps you get better results.
This guide covers two main mistakes. Avoid these to ensure your mosaic tiles stick well and look great.
Using Incorrect Trowel Size
Using the wrong trowel size can cause many problems. If the trowel is too small, adhesive may not hold the tiles firmly. A too-large trowel wastes adhesive and makes cleanup hard.
- Small trowels leave gaps under tiles.
- Large trowels create thick adhesive layers.
- Uneven adhesive causes tiles to sit at different heights.
- Wrong trowel size may cause tile sheets to curl or lift.
Inadequate Adhesive Coverage
Not spreading enough adhesive is a common error. It weakens the bond and allows tiles to move or fall off. Proper coverage is vital for strong, lasting installation.
| Adhesive Coverage | Effect |
| Less than 80% | Tiles may loosen or fall |
| 80% to 95% | Good bond, stable tiles |
| More than 95% | Ideal coverage, best results |
Expert Tips For Perfect Finish
Choosing the right trowel size is key for installing mosaic tile sheets well. The right trowel helps the adhesive spread evenly. This prevents tiles from slipping or uneven surfaces.
Use the correct trowel size to make your mosaic tiles stick properly. This guide shares expert tips for a smooth and level finish.
Ensuring Level Surface
Use a 1/4 inch square-notched trowel for mosaic tile sheets. This size spreads the right amount of adhesive. It helps keep the tiles flat and steady.
Press the tiles gently into the adhesive. Check for any high or low spots. Use a level to make sure the surface is even before the adhesive dries.
- Use 1/4 inch square-notched trowel for mosaic sheets
- Spread adhesive evenly to avoid gaps
- Press tiles firmly but gently into adhesive
- Check with a level for an even surface
Grout And Sealant Application
After tiles set, apply grout to fill gaps. Use a rubber float to spread grout smoothly. Work diagonally to avoid pulling grout out of joints.
Seal grout after it dries. This protects against moisture and stains. Use a small brush or applicator for sealant to cover all grout lines well.
- Apply grout with rubber float, pressing into gaps
- Remove excess grout with a damp sponge
- Allow grout to dry fully before sealing
- Seal grout lines with a brush for protection
Tools And Materials Checklist
Choosing the right trowel size is important for installing mosaic tile sheets. The trowel helps spread the adhesive evenly. Using the correct tools and materials makes the job easier and gives better results.
This checklist covers the essential tools and recommended materials you need for mosaic tile sheet installation.
Essential Tools
Using the right tools helps you install mosaic tiles neatly and securely. The trowel size should match the tile sheet backing for proper adhesive coverage.
- 1/4 inch x 1/4 inch square notch trowel – best for most mosaic tile sheets
- Rubber grout float – for applying grout between tiles
- Tile spacers – to keep even gaps between tiles
- Level – to ensure tiles are straight
- Measuring tape – to measure the area accurately
- Bucket and sponge – for cleaning excess grout and adhesive
Recommended Materials
Select quality materials to achieve a strong and lasting mosaic tile installation. Use materials suited to the tile sheet and surface type.
- Thin-set mortar – use a pre-mixed or powder form suitable for mosaic tiles
- Mesh-backed mosaic tile sheets – for easy handling and installation
- Grout – select the right color and type for your tiles
- Sealer – to protect grout and tiles from stains and moisture
- Primer – if installing on porous or uneven surfaces

Credit: www.reddit.com
Frequently Asked Questions
What Size Trowel Is Best For Mosaic Tile Sheets?
A 1/8-inch notch trowel is ideal for mosaic tile sheets. It provides the right amount of adhesive coverage. This size ensures tiles stick well without excess mortar oozing out.
Can I Use A Larger Trowel For Mosaic Tiles?
Using a larger trowel can cause too much mortar. It may create uneven surfaces and weak adhesion. Stick to recommended sizes for best results.
How Does Trowel Size Affect Tile Installation?
Trowel size controls adhesive thickness and coverage. Proper size ensures tiles bond securely and lay flat. Incorrect size leads to poor adhesion or uneven tiles.
Should I Choose A Square Or V-notch Trowel?
Square-notch trowels are preferred for mosaic tiles. They distribute mortar evenly and hold tile sheets firmly. V-notch trowels may cause uneven mortar spread.
Conclusion
Choosing the right trowel size makes tile installation easier and neater. Small mosaic tile sheets work best with a 1/8-inch notch trowel. This size helps spread adhesive evenly without excess. Using the correct trowel improves tile grip and prevents gaps.
Always check tile and adhesive instructions before starting. Proper tools save time and effort on your project. Remember, careful preparation leads to beautiful, long-lasting results.