Choosing the right trowel for your 12×24 tile project can make all the difference between a smooth, professional finish and a frustrating, uneven mess. You might think any trowel will do, but using the wrong one can cost you time, money, and effort.
This guide will help you pick the perfect trowel size and style, so your tiles lay flat, stick well, and look amazing. Keep reading to find out exactly what you need to get the job done right the first time.
Credit: www.homehardware.ca
Choosing The Right Trowel Size
Choosing the correct trowel size is important for installing 12×24 tiles. The right trowel helps spread adhesive evenly. It also ensures strong tile bonding and prevents future problems.
This guide explains how tile size and thickness affect trowel choice. You will learn about notch dimensions and the difference between square and U-notch trowels.
Tile Size And Thickness Impact
Large tiles like 12×24 inches need more adhesive than small tiles. Thick tiles also require more adhesive to hold them firmly. Using the wrong trowel can cause weak spots under tiles.
Recommended Notch Dimensions
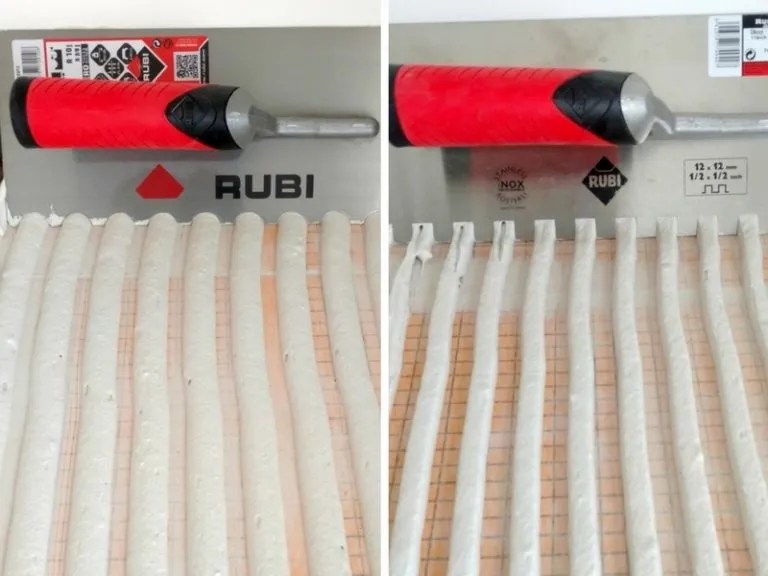
Notch size controls how much adhesive gets spread. For 12×24 tiles, a 1/2 inch by 1/2 inch square notch is a common choice. This size works well for standard thickness tiles.
| Tile Thickness | Notch Size | Notch Type |
|---|---|---|
| 1/4 inch to 3/8 inch | 1/4 inch x 1/4 inch | Square |
| 3/8 inch to 1/2 inch | 1/2 inch x 1/2 inch | Square |
| Over 1/2 inch | 1/2 inch x 1/2 inch | U-Notch |
Comparing Square And U-notch Trowels
Square and U-notch trowels create different adhesive patterns. Square notches leave square ridges. U-notches leave rounded ridges. Each pattern affects tile adhesion.
- Square notch spreads adhesive in sharp, square lines.
- U-notch spreads adhesive in rounded, wave-like lines.
- U-notch trowels hold more adhesive for thicker tiles.
- Square notches work well for thin and medium tiles.
Material Types For Trowels
Choosing the right trowel is important for laying 12×24 tiles well. The material of the trowel affects how easy it is to use and how well it holds up over time.
Trowels come in different materials like steel and plastic. Each type has its own benefits and downsides for tile installation.
Steel Vs. Plastic Trowels
Steel trowels are strong and hold their shape well. They give a smooth finish on tile adhesive. Plastic trowels are lighter and easier to handle but may wear out faster.
Steel trowels work best for heavy tile work. Plastic trowels are good for small jobs or thinset that is softer.
- Steel trowels resist bending and chipping
- Plastic trowels are lightweight and flexible
- Steel is better for long projects
- Plastic can be cheaper but less durable
Durability And Maintenance
Steel trowels last longer and handle rough use well. They need cleaning after use to stop rust. Plastic trowels do not rust but can crack or wear down faster.
Proper care helps both trowel types last longer. Store them dry and clean after each use.
- Steel trowels need drying to avoid rust
- Plastic trowels resist rust but can break
- Both need cleaning to remove adhesive
- Regular checks prevent damage and wear
Comfort And Grip Features
Trowel handles affect comfort during tile work. Steel trowels often have firm, solid handles. Plastic trowels usually have softer grips that reduce hand strain.
Good grip helps control the trowel and improves precision. Choose a handle that feels secure and fits your hand well.
- Steel trowels have rigid handles for control
- Plastic trowels often have cushioned grips
- Ergonomic designs reduce hand fatigue
- Non-slip grips improve safety and accuracy
Trowel Techniques For 12×24 Tiles
Using the right trowel can make tile installation easier. For 12×24 tiles, choosing the correct trowel size is important. It ensures the tiles stick properly.
Learn how to apply thinset evenly and avoid common mistakes. Follow these guidelines for a smooth installation process.
Applying Thinset Evenly
Applying thinset evenly is crucial for tile stability. Use a notched trowel for the best results.
- Hold the trowel at a 45-degree angle.
- Spread thinset in small sections.
- Use consistent pressure for even distribution.
Ensuring Proper Adhesion
Proper adhesion keeps tiles from moving. Press tiles firmly into the thinset.
Check for air pockets by lifting a tile occasionally. Adjust as needed to ensure full contact.
Avoiding Common Installation Errors
Common errors can lead to problems later. Avoid these mistakes for a flawless finish.
| Error | Solution |
| Uneven thinset application | Use a consistent trowel angle |
| Tiles not aligned | Use spacers for even gaps |
| Insufficient thinset coverage | Check tile back for full coverage |

Credit: www.reddit.com
Tools And Accessories To Complement Trowels
Choosing the right trowel is important for installing 12×24 tiles. Along with the trowel, some tools and accessories help make the job easier and better.
These tools help with spacing, leveling, mixing, and cleaning. They support smooth tile installation and lasting results.
Tile Spacers And Leveling Systems
Tile spacers keep tiles evenly spaced for a neat look. They come in different sizes to match grout width.
Leveling systems stop tiles from shifting as thinset dries. They help avoid lippage, making the floor or wall smooth.
- Spacers fit between tiles to keep equal gaps
- Leveling clips and wedges hold tiles flat
- Use both for clean, professional results
Mixing And Applying Thinset
Thinset mortar holds the tile in place. Mixing it right is key to strong adhesion.
Use a bucket and drill mixer to blend thinset to a smooth, peanut butter-like texture. Apply with the proper notched trowel for 12×24 tiles.
- Mix thinset in small batches for freshness
- Use a 1/2 inch by 1/2 inch notched trowel
- Spread thinset evenly on the surface
- Comb thinset with trowel notches for better grip
Cleaning And Care Tips
Clean tools right after use to keep them in good shape. Dried thinset is hard to remove.
Use water and a brush to clean trowels and other tools. Store tools in a dry place to avoid rust.
- Wipe off thinset before it dries
- Use a stiff brush for stubborn spots
- Rinse tools with water after cleaning
- Dry tools completely before storage
Troubleshooting Tile Installation
Installing 12×24 tiles can be tricky without the right tools and methods. Using the correct trowel helps ensure tiles stick well and stay flat. This guide helps fix common tile problems during installation.
We cover how to handle uneven surfaces, fix hollow spots, and adjust for different floor types. Following these tips can make your tile job smoother and last longer.
Dealing With Uneven Surfaces
Uneven floors make tile installation hard. You need a trowel that spreads adhesive evenly to fill low spots. A 1/2 inch by 1/2 inch square-notch trowel works well for 12×24 tiles on uneven surfaces.
- Check the floor for bumps or dips before starting.
- Use a leveling compound if needed.
- Choose a trowel with bigger notches to apply more adhesive.
- Press tiles firmly to fill gaps under them.
Fixing Hollow Spots
Hollow spots happen when adhesive does not cover the tile back fully. This causes tiles to crack or break later. Use the right trowel notch size to avoid this problem.
| Trowel Notch Size | Adhesive Coverage | Result |
| 1/4 inch square | Low | Many hollow spots under tiles |
| 1/2 inch square | Good | Proper coverage, fewer hollow spots |
| 3/4 inch square | High | Too much adhesive, messy work |
Adjusting For Different Substrates
Tiles stick differently on wood, concrete, or backer board. Pick a trowel that works best for each surface. For example, wood needs more adhesive than concrete.
Use this guide for choosing trowels by substrate:
- Concrete:1/2 inch square-notch
- Wood:3/4 inch square-notch for better grip
- Backer board:1/2 inch square-notch is usually enough

Credit: alsyedconstruction.com
Frequently Asked Questions
What Size Trowel Is Best For 12×24 Tile?
A 1/2 inch x 1/2 inch square-notched trowel is ideal. It provides proper mortar coverage and support for 12×24 tiles.
Can I Use A Smaller Trowel For 12×24 Tiles?
Using a smaller trowel may cause insufficient mortar coverage. This can lead to weak adhesion and tile cracking over time.
Why Choose A Square-notched Trowel For Large Tiles?
Square-notched trowels create uniform mortar ridges. This ensures even bonding and reduces air pockets under large 12×24 tiles.
How Does Trowel Size Affect Tile Installation?
The correct trowel size controls mortar thickness. Proper thickness prevents tile lippage and ensures a stable, long-lasting installation.
Conclusion
Choosing the right trowel makes tile installation easier and cleaner. For 12×24 tiles, a 1/2 inch x 1/2 inch square-notch trowel works best. It holds enough thinset for good adhesion and smooth setting. Using the correct trowel helps prevent lippage and uneven tiles.
Remember, simple tools lead to better results and less frustration. Take your time and apply thinset evenly. This small step ensures your tiles stay strong and look great for years.