Is your dishwasher not cleaning your dishes as well as it used to? You might be surprised to learn that the culprit could be a clogged or dirty rinse aid dispenser.
This small component plays a big role in ensuring your dishes come out sparkling clean and streak-free. Over time, it can accumulate gunk and residue that impair its function. But don’t worry, cleaning it is simpler than you think. By following a few straightforward steps, you can restore your dishwasher’s performance and extend its lifespan.
Ready to reclaim those gleaming dishes? Let’s dive into how you can effortlessly clean your dishwasher’s rinse aid dispenser and enjoy spotless results every time.

Credit: www.reddit.com
Rinse Aid Dispenser Basics
The rinse aid dispenser is a small but vital part of your dishwasher. It helps make your dishes look clean and spot-free. Understanding its basics can help you keep it working well. A clean dispenser ensures your dishwasher works at its best every time.
Purpose Of Rinse Aid
Rinse aid helps water slide off dishes quickly. It stops water droplets from forming spots and streaks. This makes glassware and plates shine. The dispenser releases the right amount of rinse aid during the rinse cycle. It improves drying and leaves dishes spotless.
Signs Of A Dirty Dispenser
A dirty dispenser can block rinse aid flow. You might notice spots or streaks on dishes. Glasses may look cloudy or dull. The dispenser may also have visible buildup or residue. Your dishwasher might smell unpleasant. These signs show the dispenser needs cleaning.
Gathering Cleaning Supplies
Before you dive into cleaning your dishwasher’s rinse aid dispenser, gathering the right supplies makes the job easier and more effective. Having everything ready helps you avoid interruptions and ensures you use safe products that won’t damage your appliance. What tools and cleaners should you have on hand to tackle this task efficiently?
Essential Tools
Start with basic tools that help you access and clean the rinse aid dispenser thoroughly. A soft cloth or sponge is perfect for wiping away residue without scratching surfaces. You’ll also want a small brush, like an old toothbrush, to reach tight corners and crevices where buildup often hides.
Keep a pair of rubber gloves handy to protect your hands from cleaning agents. Additionally, a toothpick or a cotton swab can be useful for removing stubborn deposits in narrow areas. These simple tools work together to make the cleaning process smoother and more detailed.
Safe Cleaning Agents
Choosing gentle, non-abrasive cleaning agents protects your dishwasher from damage while still removing grime effectively. Mild dish soap mixed with warm water is a safe and accessible option that won’t harm the dispenser’s plastic parts. Avoid harsh chemicals or bleach, as they can cause discoloration or corrosion.
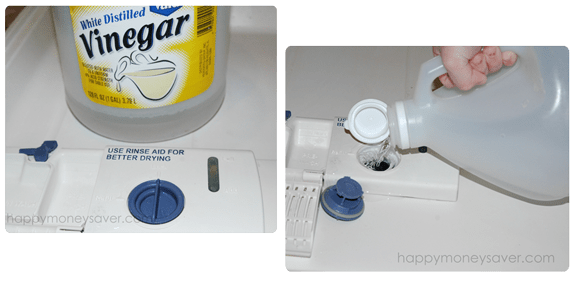
White vinegar is another excellent choice. Its natural acidity breaks down mineral buildup and rinse aid residue without leaving toxic fumes behind. Have you ever noticed cloudy water spots on your dishes? Vinegar can help prevent those by keeping your rinse aid dispenser clean.
Preparing The Dishwasher
Preparing your dishwasher before cleaning the rinse aid dispenser is essential. This step ensures safety and makes the cleaning process easier. Taking time to prepare helps avoid damage to the appliance and prevents accidents.
Turning Off The Power
Start by turning off the dishwasher’s power. This stops the machine from running during cleaning. You can switch off the power at the circuit breaker or unplug the dishwasher. Confirm the dishwasher is completely off to avoid any electric hazards.
Accessing The Dispenser
Open the dishwasher door fully to reach the rinse aid dispenser. The dispenser is usually located on the inside of the door. Remove the cap or cover carefully to avoid spilling any leftover rinse aid. Keep a towel nearby to catch any drips during this step.
Cleaning The Dispenser
Cleaning the dishwasher rinse aid dispenser is essential for keeping your dishes spotless and your appliance running smoothly. Over time, residue and buildup can clog the dispenser, preventing it from releasing rinse aid properly. Taking a few minutes to clean the dispenser can save you from spotting and cloudy glasses.
Removing The Dispenser Cap
Start by locating the rinse aid dispenser inside your dishwasher door. The cap usually twists off easily—try turning it counterclockwise. If it feels stuck, avoid forcing it; instead, use a damp cloth to get a better grip and twist gently.
Keep a small bowl or cloth nearby to catch any rinse aid that might spill. Removing the cap gives you direct access to the dispenser’s interior, which is the next step to a thorough clean.
Wiping The Interior
Use a soft cloth or sponge dampened with warm water to wipe the inside of the dispenser. Avoid harsh chemicals or abrasive materials that can damage the plastic. Pay close attention to corners where residue tends to build up.
If you notice stubborn spots, a cotton swab can reach small crevices more effectively. Cleaning the interior regularly helps maintain consistent rinse aid flow and prevents blockages.
Clearing Blockages
Sometimes, the rinse aid dispenser nozzle gets clogged with thickened liquid or hard water deposits. To clear blockages, use a toothpick or a soft brush to gently remove any buildup. Be careful not to poke too hard and damage the dispenser.
If the blockage is persistent, rinsing the dispenser under warm running water can loosen debris. Have you checked your dispenser recently? Even a small clog can affect your dishwasher’s performance more than you might expect.
Deep Cleaning Tips
Deep cleaning your dishwasher rinse aid dispenser helps keep your appliance running smoothly. Dirt, residue, and buildup can clog the dispenser and affect rinse aid flow. Cleaning it thoroughly ensures better dish drying and prevents unpleasant odors. Use simple household items and gentle techniques for effective results.
Using Vinegar Or Baking Soda
Vinegar and baking soda work well to remove grime and buildup. Vinegar breaks down mineral deposits and grease. Baking soda acts as a gentle scrub to lift dirt. Use these natural cleaners to avoid harsh chemicals that might damage the dispenser.
- Pour white vinegar directly into the dispenser.
- Let it sit for 10-15 minutes to dissolve residue.
- Use a soft brush or cloth to scrub inside the dispenser gently.
- For tough stains, sprinkle baking soda and add a little water to make a paste.
- Scrub the paste gently inside the dispenser and rinse well.
Soaking Techniques
Soaking the rinse aid dispenser parts loosens stubborn buildup. Remove the dispenser cap and any removable parts carefully. Soak them in warm, soapy water or a vinegar solution for about 30 minutes. This softens dried rinse aid and grime, making it easier to clean.
- Fill a bowl with warm water and mild dish soap or vinegar.
- Submerge the dispenser parts completely in the solution.
- Let them soak for 30 minutes to loosen residue.
- Use a soft brush or cloth to remove softened dirt.
- Rinse all parts thoroughly before reassembling.
Reassembling And Testing
After cleaning your dishwasher rinse aid dispenser, it’s time to put everything back together and make sure it works properly. Reassembling the parts correctly ensures the rinse aid will flow smoothly during each wash cycle. Testing the dispenser after reassembly helps you catch any issues early before they affect your dishes.
Replacing The Cap
Start by securely placing the cap back on the rinse aid dispenser. Make sure it fits snugly to prevent any leaks during the wash. You might feel a slight resistance or hear a click, which usually means the cap is properly sealed.
If the cap isn’t tight, rinse aid can spill inside the dishwasher, causing a sticky mess. Take your time aligning the threads carefully before twisting it closed. Have you ever noticed a strong smell of rinse aid after a cycle? That often means the cap wasn’t sealed well.
Running A Test Cycle
Once the dispenser is reassembled, run a short or quick wash cycle without dishes inside. This helps you check if the rinse aid is dispensing correctly. Keep an eye on the dispenser area to see if any liquid leaks or drips.
If you notice no leaks and the rinse aid is used during the cycle, you’ve done the job right. However, if the rinse aid doesn’t seem to dispense or you smell it strongly afterward, double-check the cap and dispenser for proper assembly. Testing this way saves you from surprises during your next full load.
Maintaining The Dispenser
Maintaining the dishwasher rinse aid dispenser keeps your appliance working well. It prevents buildup that blocks the dispenser and affects cleaning. Regular care extends the life of your dishwasher and improves rinse aid use. Simple steps help avoid common problems and ensure the dispenser stays clean and efficient.
Regular Cleaning Schedule
Clean the rinse aid dispenser every month. Empty the dispenser before cleaning. Use a soft cloth or sponge and warm soapy water. Gently wipe inside and around the dispenser. Avoid harsh cleaners that may damage parts. Rinse well to remove soap residue. Dry the area completely before refilling with rinse aid. This routine stops buildup and keeps the dispenser working smoothly.
Avoiding Common Issues
Check the dispenser cap for tight sealing. Loose caps cause leaks and waste rinse aid. Use the right type of rinse aid recommended by the manufacturer. Avoid overfilling the dispenser to prevent clogging. Inspect the dispenser for cracks or damage regularly. Replace any broken parts promptly to avoid leaks. Clear any visible residue or deposits with a soft brush. These actions prevent common dispenser problems and keep your dishwasher efficient.

Credit: www.budget101.com

Credit: www.searshomeservices.com
Frequently Asked Questions
How Often Should I Clean The Dishwasher Rinse Aid Dispenser?
Clean the rinse aid dispenser every 1 to 3 months. Regular cleaning prevents clogs and ensures proper rinse aid flow. This maintains dishwasher efficiency and keeps dishes spot-free.
What Tools Do I Need To Clean The Rinse Aid Dispenser?
You need a soft cloth, warm water, mild detergent, and a small brush. These tools help remove residue without damaging the dispenser components.
Can I Use Vinegar To Clean The Rinse Aid Dispenser?
Yes, vinegar is effective for dissolving buildup. Use a diluted vinegar solution to clean the dispenser gently. Avoid harsh chemicals to prevent damage.
How Do I Know If The Rinse Aid Dispenser Is Clogged?
Signs include poor drying, water spots, or detergent residue on dishes. Inspect the dispenser for visible buildup. Cleaning usually resolves clogging issues.
Conclusion
Cleaning your dishwasher rinse aid dispenser keeps your dishes spotless. Regular cleaning stops clogs and buildup. Use a soft cloth and mild cleaner for best results. Check the dispenser often to avoid problems. Clean parts help your dishwasher work well.
A clean dispenser saves time and effort. Keep this simple habit for better dishwashing every time.