Are you ready to upgrade your kitchen with a sleek wall oven but don’t know where to start? Installing a wall oven might seem tricky, but with the right steps, you can do it yourself and save both time and money.
Imagine having your new oven perfectly fitted, ready to bake your favorite meals just the way you like. In this guide, you’ll find simple, clear instructions that make the process straightforward and stress-free. Keep reading, and by the end, you’ll feel confident to tackle the installation on your own—no expert needed.
Tools And Materials Needed
Installing a wall oven requires the right tools and materials to ensure safety and a proper fit. Gathering these items before you start saves time and avoids interruptions.
This guide covers the main tools and materials you will need to install a wall oven correctly in your kitchen.
Basic Tools
You need some basic hand tools to handle the installation tasks. These tools help with measuring, cutting, and securing the oven in place.
- Tape measure
- Level
- Cordless drill with drill bits
- Flathead and Phillips screwdrivers
- Adjustable wrench
- Utility knife
- Stud finder
Electrical Materials
Wall ovens need proper electrical connections. Use the right materials to connect your oven safely to the power supply.
| Material | Description |
|---|---|
| Electrical wire | Appropriate gauge for oven’s power needs |
| Wire nuts | For secure wire connections |
| Circuit breaker | Dedicated breaker to protect oven circuit |
| Electrical box | Mounted near oven location for wiring |
Installation Materials
Other materials help fix the oven in place and finish the installation neatly.
- Mounting brackets (usually included with oven)
- Wood screws
- Caulk or sealant
- Heat-resistant insulation (if needed)
- Protective gloves
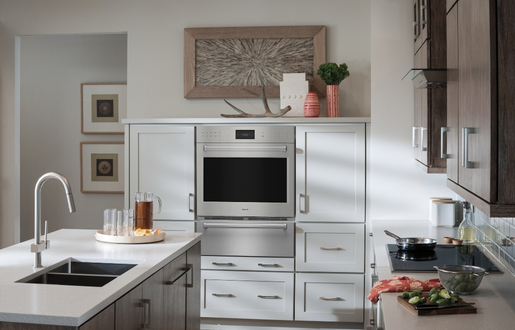
Credit: www.artisanwestappliance.com
Choose The Right Wall Oven
Installing a wall oven is a great way to save space in your kitchen. Before buying one, you need to choose the right oven for your needs.
Picking the right oven means thinking about size, style, and how you will use it every day.
Types Of Wall Ovens
Wall ovens come in different types. You can find single ovens, double ovens, and convection ovens.
Single ovens are good if you cook for a small family. Double ovens let you cook two dishes at once. Convection ovens cook food faster with a fan.
- Single wall oven: one cooking space, simple to use
- Double wall oven: two compartments for cooking different foods
- Convection wall oven: uses a fan to cook food evenly and quickly
Measuring The Space
Measure the space where you want to install the wall oven. This helps you pick the right size.
Check the width, height, and depth of the cabinet or wall opening. Also, leave room for ventilation and wiring.
- Measure the width of the opening in inches
- Measure the height from top to bottom
- Check the depth for the oven to fit properly
- Allow extra space for air flow and cables
Prepare The Installation Area
Installing a wall oven needs careful preparation. You must get the space ready before starting the work.
Preparing the area helps keep the process safe and smooth. Check everything to avoid problems later.
Turn Off Power And Gas
Always turn off the electricity and gas before removing the old oven. This stops accidents and injuries.
Find the circuit breaker for the oven and switch it off. Close the gas valve that leads to the oven.
- Switch off the oven’s power at the main breaker panel
- Locate and close the gas supply valve
- Use a tester to check that power is off
- Ensure no gas smell before starting work
Remove Old Oven
Take out the old oven carefully. It may be heavy, so ask for help if needed.
Disconnect the oven from power and gas. Remove any screws or brackets holding it in place.
- Unplug the oven from the electrical outlet
- Disconnect the gas line using a wrench
- Remove mounting screws or clips
- Carefully slide out the oven from the wall
Check Electrical And Gas Connections
Inspect the electrical wiring and gas pipes before installing the new oven. Make sure they are safe.
Fix any damage or wear you find. Use a professional if you are unsure about the connections.
- Look for frayed or damaged electrical wires
- Check gas pipes for leaks or cracks
- Verify the gas line matches the oven’s requirements
- Test the electrical outlet with a voltage tester
Install The Wall Oven
Installing a wall oven can improve your kitchen’s look and function. This guide helps you install it safely and correctly.
Follow each step carefully to position, secure, and connect your wall oven.
Position The Oven
Place the oven near the cabinet opening. Make sure the space is clean and free of obstacles. Check that the oven fits the cutout size.
Use helpers to hold the oven steady. Avoid tilting it too much to protect internal parts.
Secure The Oven
Attach the oven to the cabinet using screws. Align the mounting brackets with the cabinet sides. Tighten screws firmly but do not over-tighten.
Check if the oven sits flush with the cabinet. Adjust if needed to ensure it is level and stable.
Connect Electrical Wiring
Turn off the main power before working with wires. Connect the oven’s power cable to the electrical box. Match wire colors: black to black, white to white, and green to ground.
Use wire nuts to secure connections. Push wires carefully into the electrical box. Restore power and test the oven’s electrical function.
Connect Gas Line (if Applicable)
If your oven uses gas, turn off the gas supply first. Attach the gas line to the oven’s inlet fitting. Use pipe thread sealant on the connection.
Tighten the connection with a wrench. Check for leaks by applying a soap solution to the joint. Turn on the gas and watch for bubbles.
Test The Oven
After installing your wall oven, testing it ensures everything works safely. Testing involves restoring power and gas, then running initial checks.
Follow these steps carefully to confirm your oven is ready for use without issues.
Restore Power And Gas
Turn on the electrical power at the circuit breaker. Open the gas valve if your oven uses gas. This restores the essential utilities for the oven to operate.
- Switch on the breaker controlling the oven’s power.
- Confirm the gas supply valve is fully open.
- Check for any unusual smells indicating leaks.
- If you detect a gas smell, do not proceed and call a professional.
Run Initial Tests
Use the oven controls to start a test bake or broil cycle. Watch for normal heating sounds and lights. Make sure the oven heats evenly and the timer works.
| Test | What to Check | Expected Result |
|---|---|---|
| Power | Oven lights and display | Lights turn on, display is clear |
| Heating | Oven temperature rise | Oven reaches set temperature |
| Gas flow (if applicable) | Burner ignition | Burner lights quickly and stays lit |
| Timer and Controls | Timer countdown and beep | Timer counts down and beeps at end |

Credit: www.youtube.com
Safety Tips And Troubleshooting
Installing a wall oven requires careful attention to safety. Follow these guidelines to ensure a safe installation process.
Proper installation not only protects your home but also ensures the oven functions correctly. Here’s a guide to safety tips and troubleshooting.
Check Electrical Connections
Make sure the power is off before working with electrical connections. Use a voltage tester to confirm.
- Double-check wiring diagrams
- Secure connections to avoid sparks
- Consult a professional if unsure
Ensure Proper Ventilation
Good ventilation prevents overheating and ensures efficient operation. Check that air can circulate freely around the oven.
Improper ventilation can cause performance issues or damage. Adjust placement if necessary.
Level The Oven
A level oven ensures even cooking. Use a spirit level to check alignment.
- Adjust feet if needed
- Recheck after moving the oven
- Ensure stability before use
Troubleshoot Common Issues
If the oven doesn’t heat, check the circuit breaker. Ensure all connections are secure.
Unusual noises might indicate loose parts. Tighten screws and check for obstructions.
Test Oven Functions
After installation, test all functions. Set the oven to different temperatures to ensure proper heating.
Check the timer and other features to confirm they work as expected.

Credit: www.youtube.com
Frequently Asked Questions
How Do I Prepare The Wall For Oven Installation?
First, measure the oven dimensions accurately. Then, ensure the wall has proper electrical wiring and ventilation. Remove any drywall or obstacles where the oven will fit. Finally, reinforce the wall if needed to support the oven’s weight safely.
What Tools Are Needed To Install A Wall Oven?
You’ll need a drill, screwdriver, level, measuring tape, wire strippers, and possibly a stud finder. Safety gear like gloves and goggles is essential. Having these tools ready makes the installation smoother and safer.
Can I Install A Wall Oven Myself Safely?
Yes, if you have basic electrical and carpentry skills. Follow the manufacturer’s instructions carefully. Turn off power before starting. If unsure, consult a professional to avoid hazards and ensure proper installation.
How Do I Connect The Electrical Wiring For A Wall Oven?
Turn off the power at the breaker. Connect the oven wires to the corresponding house wires: typically black to black, white to white, and green or bare wire to ground. Use wire nuts to secure connections, then carefully tuck wires into the junction box.
Conclusion
Installing a wall oven can seem tricky at first. Take your time and follow each step carefully. Double-check measurements and connections to ensure safety. Ask for help if needed, especially with electrical parts. A properly installed oven makes cooking easier and safer.
Enjoy your new kitchen upgrade with confidence and ease.