Are you ready to upgrade your kitchen with a sleek, built-in wall oven but unsure how to install it yourself? Installing a wall oven might seem tricky at first, but with the right steps, you can do it safely and confidently.
Imagine the satisfaction of cooking your favorite meals in a stylish oven that fits perfectly into your kitchen space. In this guide, you’ll discover simple, clear instructions that make the installation process straightforward—no confusion, no stress. Keep reading, and you’ll be one step closer to transforming your kitchen and enjoying the convenience of your new wall oven.
Tools And Materials Needed
Installing a wall oven needs the right tools and materials. This helps make the job safe and easier.
Gather everything before you start. This saves time and avoids problems during installation.
Measuring Tape
A measuring tape helps you check the oven space and wall cutout. Accuracy is important for a good fit.
Measure both width and height of the cabinet opening carefully to match your oven size.
Screwdrivers
You need screwdrivers to remove old appliances and attach the new oven. A Phillips and flathead screwdriver are common.
Choose screwdrivers with comfortable handles for better control and less hand strain.
Power Drill
A power drill helps make holes for screws and anchors quickly. It speeds up the installation process.
Use the right drill bits for your wall type, such as wood or drywall bits.
Level
A level ensures your oven sits straight in the wall. An uneven oven can cause problems with cooking and safety.
Check the level both side to side and front to back before securing the oven.
Wire Strippers
Wire strippers help you prepare electrical wires for connection. They remove insulation cleanly without damage.
Use the right size stripper for your wire gauge to ensure safe electrical work.
Safety Gear
Wear safety glasses and gloves to protect your eyes and hands. Safety is important when working with tools and electricity.
Use ear protection if you work with loud power tools for a long time.
Wall Oven Unit
Choose a wall oven that fits your kitchen space and electrical setup. Read the manual for specific installation needs.
Make sure the oven comes with mounting brackets and hardware for installation.
Mounting Brackets And Screws
Mounting brackets hold the oven securely in place inside the wall. Use screws that fit the brackets and wall material.
- Check the oven manual for recommended bracket types
- Use screws that are strong and the right length
- Keep extra screws handy for adjustments
Electrical Supplies
You may need wire nuts, electrical tape, and a junction box. These help connect the oven safely to your home power.
Confirm your home wiring matches the oven’s electrical requirements before installation.
Caulk And Sealant
Use caulk or sealant to close gaps around the oven. This helps keep heat inside and stops dust from entering.
Choose a heat-resistant sealant designed for kitchen appliances.
Preparing The Installation Area
Before installing a wall oven, you need to prepare the area carefully. Proper preparation helps the oven fit well and work safely.
This preparation includes measuring the space, checking electrical needs, and clearing the wall cavity.
Measuring The Space
Measure the width, height, and depth of the wall opening. Use a tape measure for accuracy.
Compare these measurements to the oven’s size. Make sure there is enough room for ventilation around the oven.
- Measure width at top, middle, and bottom
- Measure height on left, center, and right sides
- Check depth from front to back of the cavity
- Leave extra space for air flow as per oven manual
Checking Electrical Requirements
Wall ovens usually need a dedicated electrical circuit. Check your home’s power supply before installation.
Look at the oven’s electrical specifications. Confirm the voltage and amperage match your circuit breaker and wiring.
- Find the oven’s voltage and amperage on the label
- Check your circuit breaker for matching rating
- Verify wiring size is suitable for oven power
- Consider hiring an electrician if unsure
Clearing The Wall Cavity
Remove anything blocking the wall cavity. This includes old appliances, debris, or loose wires.
Make sure the cavity walls are clean and smooth. Fix any damage or holes before installing the oven.
- Take out old oven or debris
- Clean the cavity walls and floor
- Check for nails or screws sticking out
- Repair damaged drywall or wood
Removing The Old Oven
Removing an old wall oven requires care and safety. You must follow certain steps to avoid damage or injury.
This guide covers disconnecting power, detaching the oven, and handling disposal.
Disconnecting Power
Always turn off the power to the oven before removal. This stops electrical shocks or accidents.
Find the circuit breaker that controls the oven and switch it off. Use a voltage tester to confirm no power is present.
- Locate the oven’s circuit breaker in your main electrical panel.
- Switch off the breaker to cut power to the oven.
- Use a voltage tester on the oven wires to ensure power is off.
Detaching The Oven
Remove screws or brackets that hold the oven in place. Check the oven’s manual for exact locations.
Carefully pull the oven out of the wall cabinet. Ask for help if the oven is heavy or hard to move.
- Remove any trim or panels covering mounting screws.
- Unscrew the mounting screws or bolts securing the oven.
- Gently slide the oven out of the wall opening.
- Have a helper support the oven to avoid dropping it.
Handling And Disposal
Handle the old oven with care to avoid injury or damage. Use gloves and a dolly if needed.
Dispose of the oven according to local rules. Many areas have special recycling programs for appliances.
- Wear gloves to protect your hands from sharp edges.
- Use a dolly or cart to move the oven safely.
- Check local recycling centers for appliance disposal options.
- Never leave the oven where it can cause hazards.
Credit: www.artisanwestappliance.com
Installing The New Wall Oven
Installing a new wall oven requires careful steps to ensure safety and proper function.
Follow the guidelines to position, secure, and connect your oven correctly.
Positioning The Oven
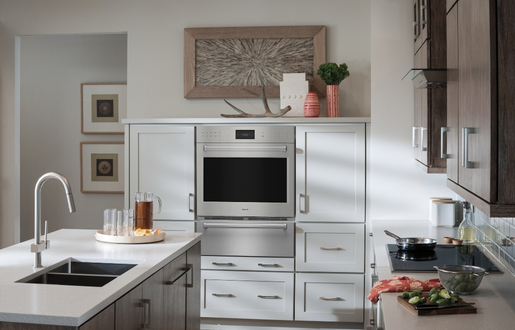
Place the oven near the existing cabinet space designed for it. Make sure the wall opening matches the oven’s size. Check the level and adjust if needed. The oven should fit snugly without gaps.
Securing The Oven In Place
Use screws to attach the oven to the cabinet frame. This keeps it stable during use. Tighten all screws evenly to avoid tilting. Do not overtighten, which can damage the oven or cabinet.
- Find the mounting holes on the oven frame.
- Align the oven with the cabinet opening.
- Insert screws into the holes.
- Tighten screws with a screwdriver.
- Double-check the oven is level and secure.
Connecting Electrical Wiring
Before starting, turn off power at the circuit breaker. Connect the oven wires to the matching wires in the wall. Use wire nuts to secure connections. Follow the oven’s manual for wire colors and placement.
| Wire Color | Connection |
| Black | Hot (Live) Wire |
| Red | Second Hot Wire (if needed) |
| White | Neutral Wire |
| Green or Bare Copper | Ground Wire |
Testing And Final Adjustments
After installing a wall oven, you need to check if it works correctly. Testing and making final adjustments help keep your oven safe and efficient.
This step ensures the oven performs well and fits properly in its space.
Powering On The Oven
First, turn on the power to the oven from the circuit breaker. Make sure the oven is connected to the right power source.
Check the oven display or lights to see if it powers up without errors.
Checking Functionality
Test the oven by setting it to bake and broil modes. Watch if it heats up evenly and reaches the correct temperature.
- Set the oven to 350°F and wait 10 minutes
- Use an oven thermometer to check accuracy
- Test the oven light and timer functions
- Check if the door opens and closes smoothly
Listen for unusual noises and watch for error codes on the display.
Sealing And Finishing Touches
Seal any gaps between the oven and the wall cabinet. Use heat-resistant caulk or trim to make the fit tight.
Clean the oven and surrounding area. Check that all screws and brackets are secure for safety.

Credit: www.youtube.com
Safety Tips And Maintenance
Installing a wall oven requires attention to detail. Safety and maintenance are key.
Follow these guidelines for a safe installation. Keep your appliance in top condition.
Avoiding Common Hazards
Prevent hazards by ensuring proper installation. Incorrect wiring can be dangerous.
- Check electrical connections before use
- Ensure the oven is level to avoid tipping
- Keep flammable items away from the oven
Regular Cleaning
Regular cleaning keeps your oven running efficiently. It also extends its lifespan.
Clean the oven’s interior monthly using a mild detergent.
Remove any food debris to prevent fire hazards.
Scheduling Professional Inspections
Professional inspections ensure your oven is safe. Schedule them annually for peace of mind.
| Inspection Type | Frequency |
| Electrical Check | Annually |
| Gas Line Inspection | Every 2 years |
| Overall Safety Review | Annually |

Credit: www.youtube.com
Frequently Asked Questions
What Tools Do I Need To Install A Wall Oven?
You need a drill, screwdriver, voltage tester, level, and measuring tape. These tools help ensure a safe and precise installation.
How Do I Prepare The Wall For A Wall Oven?
Measure the space, ensure proper electrical wiring, and create a sturdy frame. Proper preparation prevents installation issues and ensures safety.
Can I Install A Wall Oven Myself Safely?
Yes, if you follow instructions and have basic electrical skills. However, hiring a professional is recommended for complex setups.
How Do I Connect The Electrical Wiring For A Wall Oven?
Turn off power, match wires by color, and use wire nuts. Double-check connections to prevent electrical hazards.
Conclusion
Installing a wall oven is easier than it seems. Follow each step with care and patience. Measure your space to ensure the oven fits well. Turn off the power before starting any work. Connect the oven securely to avoid any hazards.
Test the oven after installation to check its function. Take your time and ask for help if needed. A properly installed wall oven will last for years. Enjoy cooking with your new appliance safely and confidently.