Are you ready to add a splash of color and fun to your baked treats? Making tie dye icing is easier than you think, and it’s a fantastic way to turn ordinary cakes and cupcakes into eye-catching masterpieces.
Imagine your friends and family’s surprise when they see those vibrant, swirling colors on your desserts. In this guide, you’ll discover simple steps to create stunning tie dye icing that will make your baking stand out. Keep reading, and let’s bring your sweet creations to life with a burst of colorful flair!
Choosing The Right Icing
Choosing the right icing is key to vibrant tie dye colors. Use smooth, spreadable icing that holds food coloring well. Soft buttercream works best for easy blending and bright patterns.
Choosing the right icing is crucial for achieving that stunning tie-dye effect on your cakes or cupcakes. The type of icing you choose can significantly impact the final appearance and taste of your sweet creations. It’s not just about colors; it’s about texture and flavor too.Buttercream Vs Royal Icing
Both buttercream and royal icing have their unique strengths and can be used for tie-dye designs, but they offer different results. Buttercream is creamy, rich, and easy to work with. Its smooth texture allows colors to blend beautifully, creating a soft, swirled effect. However, it can be a bit challenging to achieve sharp lines due to its softer nature. Royal Icing, on the other hand, dries hard, offering a crisp and glossy finish. It’s perfect for intricate designs where you want more defined lines. But be prepared for a bit of a crunch when you bite into it. Which do you prefer: a softer, more blended look, or a sharp, vibrant design?Consistency Tips
Achieving the right consistency is key to mastering tie-dye icing. The icing should be firm enough to hold its shape but soft enough to spread and blend colors. For buttercream, aim for a medium consistency. Too stiff, and it won’t swirl easily. Too soft, and it might run off the cake. With royal icing, start with a thicker consistency for defined lines. You can then thin it slightly with water for areas where you want colors to blend more seamlessly. Experiment with small batches to find what works best for your design. Do you notice how a slight adjustment changes the whole look? Don’t be afraid to tweak and test until you’re satisfied. The right icing choice and consistency make all the difference in your tie-dye icing adventure. Which one will you try first?
Credit: www.youtube.com
Selecting Vibrant Food Colors
Selecting vibrant food colors is key to achieving that stunning tie dye icing effect. The right colors make your designs pop and bring excitement to your baked creations. But not all food colors are created equal, and choosing the best type and combination can change your whole decorating experience.
Gel Vs Liquid Colors
Gel colors are thicker and more concentrated than liquid ones. This means you get brighter colors with just a small amount, which keeps your icing from becoming too runny. I’ve found gel colors easier to control, especially when mixing multiple shades for that perfect tie dye look.
Liquid colors are easier to find and often less expensive, but they can thin out your icing. If you prefer liquid, add it sparingly to avoid losing the right consistency. Think about how much time you want to spend adjusting your icing’s texture.
Color Combinations
Choosing colors that blend well together is crucial. Pairing complementary colors like blue and orange or red and green can create vibrant contrasts. But don’t shy away from analogous colors like pink, purple, and blue for a softer, flowing tie dye effect.
Try mixing warm and cool colors for unexpected results. For example, adding a splash of yellow with purple can give your icing a lively, dynamic look. What colors excite you the most when you see tie dye patterns?
Preparing The Base Icing
Preparing the base icing is the first key step in making tie dye icing. This icing needs to be smooth and soft to allow colors to blend easily. A good base creates vibrant patterns and makes decorating fun and easy.
Mixing Techniques
Start with powdered sugar and softened butter or shortening. Use a hand mixer or stand mixer for even mixing. Add a small amount of milk or water slowly. Mix at low speed to avoid air bubbles. Scrape the bowl sides often for uniform texture. Stop mixing when the icing is thick but spreadable.
Achieving Smooth Texture
Check the icing for lumps or graininess. Use a spatula to press out any clumps. Add a few drops of liquid if the icing feels too stiff. Mix gently until smooth and creamy. The icing should hold its shape but be easy to spread. This texture helps colors flow without running together.
Credit: www.selefina.com
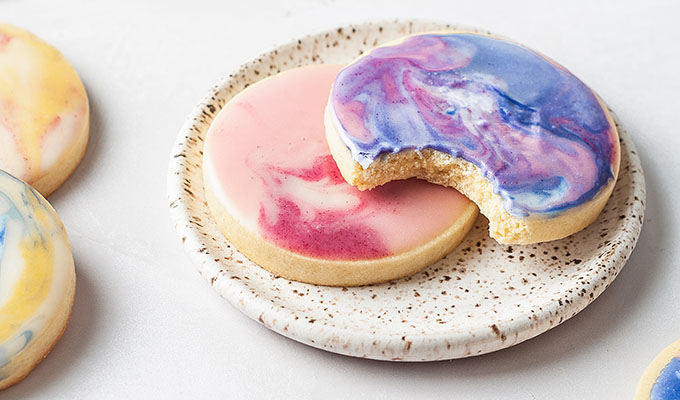
Creating Tie Dye Colors
Creating tie dye colors for your icing is a fun and creative process that lets you bring vibrant patterns to your baked treats. The key lies in mixing the right colors and handling the icing carefully to maintain those beautiful swirls. Let’s dive into how to divide and color your icing effectively and keep those colors crisp and separate.
Dividing And Coloring Icing
Start by dividing your base icing evenly into several small bowls. This makes it easier to add different colors without mixing them prematurely. Use gel food coloring rather than liquid; it gives you brighter, more vivid colors without thinning your icing.
Add a few drops of color to each bowl, then stir gently. You want to achieve a rich tone but avoid overmixing, which can dull the color. If you want softer shades, add less color or mix in a bit of white icing.
Have you ever tried mixing unusual color combos like teal with coral or lavender with lime? These unexpected pairs can make your tie dye icing truly unique.
Avoiding Color Bleeding
Color bleeding happens when different colored icings blend too much, losing that signature tie dye effect. To prevent this, keep the icings thick and slightly stiff. Thin icing tends to run and merge, which muddies your design.
When you combine the colors on your cookie or cake, do it gently. Use a toothpick or a skewer to swirl the colors just enough to create patterns but not so much that they blend completely. Patience here pays off.
Also, chilling your finished icing briefly before serving or stacking can help set the colors in place. Have you noticed how a quick chill can transform your tie dye from blurry to sharp? It’s a simple trick that makes a big difference.
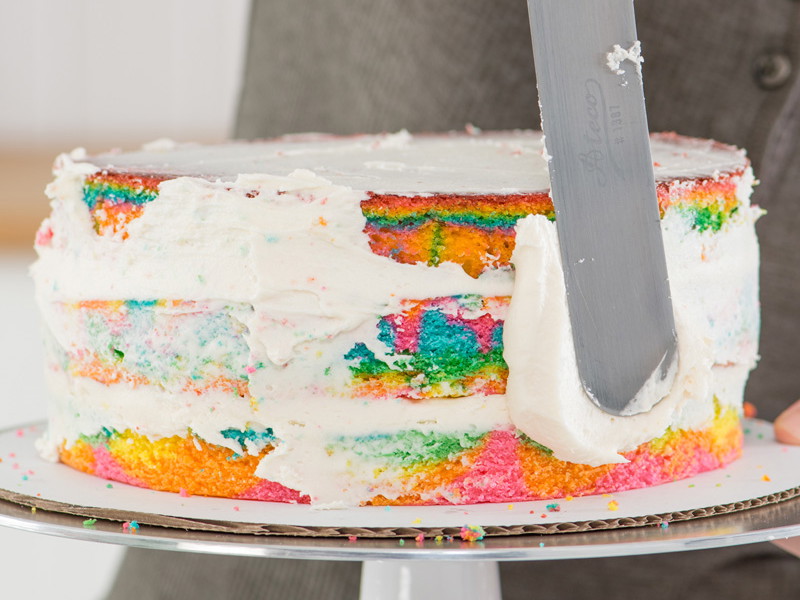
Applying Tie Dye Icing To Cakes
Applying tie dye icing to cakes brings a vibrant and playful look. This technique uses colorful icing swirled together to create a unique pattern. It adds a fun twist to any cake and makes it visually stunning.
To get the perfect tie dye effect, the way you spread and layer the colors matters. Each step shapes the final design and texture of the cake.
Spreading Methods
Start with a smooth base layer of white or light-colored icing. Use an offset spatula or a butter knife to spread the icing evenly over the cake.
Next, add small dollops of different colored icings randomly on the surface. Spread gently in circular or swirling motions. Avoid mixing the colors too much to keep the tie dye look.
Try these spreading tips:
- Use light pressure to blend colors softly.
- Spread in short strokes to control the pattern.
- Work quickly before the icing sets.
Layering Colors
Layering builds depth and richness in the tie dye design. After the first color layer, add more dollops of icing in different shades.
Alternate colors to create contrast. Spread each new layer gently over the previous one. This technique prevents colors from blending into a single shade.
For a bold look, apply thicker layers of bright colors. For a softer effect, use thin layers and pastel shades.
Keep a clean spatula to help lift and spread colors without muddying them. Layering carefully gives the cake a lively, artistic feel.

Credit: www.ocado.com
Finishing Touches
Finishing touches bring your tie dye icing to life. They add detail and make your design pop. Small adjustments can turn simple icing into a stunning decoration. Focus on creating smooth patterns and clean lines. These final steps enhance the overall look and appeal.
Adding Patterns
Patterns create interest and depth in your icing. Use a toothpick or a skewer to drag colors gently. Swirl the colors in circles or zigzags for a fun effect. Try dots, stripes, or waves to match your theme. Keep your movements light to avoid mixing colors too much.
Using Piping Bags
Piping bags help you control the icing flow. Use different tips for varied effects like stars or flowers. Fill each bag with a different color for multicolored designs. Squeeze gently to create fine lines or bold shapes. Practice on parchment paper before decorating your cake.
Troubleshooting Common Issues
Tie dye icing can turn your baked goods into vibrant masterpieces, but sometimes things don’t go as planned. Troubleshooting common issues quickly can save your icing and keep your project on track. Whether it’s unexpected color blending or the wrong icing texture, knowing how to fix these problems will boost your confidence and results.
Fixing Color Mixing Mistakes
Colors can blend too much, creating muddy or dull shades instead of the bright tie dye effect you want. If your colors start to bleed together, try using a toothpick to gently separate them before they set. This small action can restore distinct color lines and save your design.
Too much liquid coloring can cause colors to run. Use gel food coloring instead of liquid to keep colors vibrant and prevent bleeding. If the colors still mix, you might need to let the base icing set slightly before adding different colors on top.
Have you ever noticed one color overpowering the others? Balance your colors by using smaller amounts of the more intense shades. This helps keep your tie dye effect colorful without one color taking over the entire design.
Adjusting Icing Consistency
The consistency of your icing directly affects how well it spreads and holds your tie dye pattern. If your icing is too runny, it will blend too much and lose the tie dye look. Add powdered sugar a little at a time to thicken it up until it spreads smoothly but keeps its shape.
On the other hand, if your icing is too thick, it will be hard to spread and may crack or clump. Add small amounts of milk or water to loosen it gradually. Be cautious—you want it fluid enough to flow but not so thin that it drips off your baked goods.
Have you tried doing a test spread on a plate before icing your cake? This quick step helps you see if your consistency is right and prevents surprises on your final piece. Adjustments are easier to make early than after decorating.
Storing And Serving Tips
Storing and serving tie dye icing properly ensures your colorful creation stays vibrant and delicious. Without the right care, the beautiful swirls can fade or the icing can dry out. Let’s dive into some practical tips to keep your tie dye icing fresh and looking its best when you serve it.
Keeping Icing Fresh
Always store your tie dye icing in an airtight container to prevent it from drying out. If you want to keep it for more than a day, place the container in the refrigerator. Before using chilled icing, let it come to room temperature and stir gently to restore its creamy texture.
Did you know that adding a tiny bit of water or milk can help revive stiff icing? Be careful not to add too much—just a few drops can make a big difference. This simple trick saved my batch once when the fridge had turned the icing a little too firm.
Best Serving Practices
Serve your tie dye icing on a cool cake or cupcakes to keep the colors sharp and prevent melting. If you’re applying the icing ahead of time, avoid exposing it to direct sunlight or warm rooms, as this can cause the colors to blur.
Consider using piping bags with different colored icings side by side to recreate the tie dye effect directly on your desserts. This not only looks stunning but lets your guests appreciate the fresh swirls of color up close. Have you tried swirling the colors with a toothpick just before serving? It’s a fun way to add a personal touch.
Frequently Asked Questions
How Do You Create Tie Dye Icing Colors?
To create tie dye icing, divide white icing into bowls. Add different food color drops to each bowl. Swirl colors gently without fully mixing. This forms a vibrant, multi-colored tie dye effect.
What Type Of Icing Works Best For Tie Dye?
Buttercream or royal icing works best for tie dye. These icings hold color well and maintain smooth texture. Their spreadability helps blend colors subtly for a perfect tie dye look.
Can I Use Gel Food Coloring For Tie Dye Icing?
Yes, gel food coloring is ideal for tie dye icing. It provides vibrant colors without thinning the icing. Gels blend smoothly and retain intensity, making your tie dye icing pop.
How Do You Apply Tie Dye Icing On Cakes?
Apply tie dye icing by spooning swirled icing onto cake. Use a spatula to spread gently in circular motions. This technique preserves the color patterns, creating a beautiful tie dye effect.
Conclusion
Tie dye icing adds fun and color to your baked treats. Mixing simple ingredients creates vibrant, swirling patterns easily. You can customize colors to match any party or mood. This technique brings a playful touch to cakes and cookies alike.
Practice a few times to improve your skill and confidence. Enjoy the process as much as the final result. Brighten your desserts with tie dye icing today.