
Is your garden hose leaking or damaged? It can be frustrating when you need to water your plants, but your hose won’t cooperate.
The good news is, you don’t have to buy a new one right away. You can fix your garden hose yourself, saving time and money. You’ll discover simple, step-by-step methods to repair your hose quickly and easily. Keep reading to learn how to get your hose working like new again—no special tools or skills needed!
Common Hose Problems
Garden hoses are essential tools for watering plants. They face various problems over time. Understanding these issues helps in maintaining them better.
There are some common problems that gardeners face. These include leaks, kinks, and worn connectors. Each problem requires a different repair method.
Leaks And Cracks
Leaks and cracks are common in old hoses. They cause water wastage and reduce pressure. Regular checks can help spot them early.
To fix leaks, cut out the damaged section. Use a repair kit to connect the hose ends. This restores the hose’s efficiency.
- Cut out the damaged hose part
- Use a repair kit for connection
- Test the hose for leaks
Kinks And Twists
Kinks and twists restrict water flow. They can cause the hose to split over time. Proper storage and use help prevent them.
Unroll the hose fully before use. Gently pull to straighten it. Avoid sharp bends while storing.
- Unroll the hose completely
- Straighten gently by pulling
- Store without sharp bends
Worn Connectors
Connectors wear out with frequent use. They may leak or break. Replacing them increases hose life.
To replace, unscrew the old connector. Attach a new one tightly. Ensure a snug fit to prevent leaks.
- Unscrew the old connector
- Attach a new connector
- Check for leaks after fitting
Credit: www.amazon.com
Tools And Materials Needed
Fixing a garden hose is simple if you have the right tools. These tools help stop leaks and cracks fast.
Knowing which materials to use can save time and money. Here is what you need to repair your garden hose.
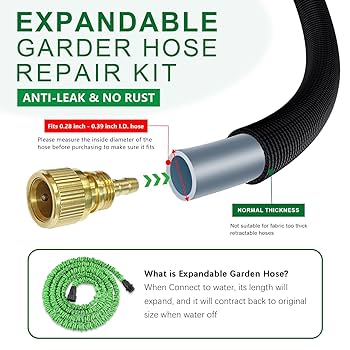
Basic Repair Kit
A basic repair kit has everything to fix small holes and breaks. You can buy kits or make your own.
- Hose repair connectors
- Rubber washers
- Hose clamps
- Utility knife or scissors
- Sandpaper or cloth for cleaning
Replacement Parts
Some hose parts wear out faster than others. Keep these replacement parts handy for quick fixes.
- Hose end fittings
- Spray nozzles
- O-rings and seals
- Quick-connect couplers
- Hose sections for patching
Safety Gear
Wear safety gear to protect yourself during repairs. It helps avoid cuts and irritation.
- Work gloves to protect hands
- Safety glasses to guard eyes
- Long sleeves to avoid scratches
Fixing Leaks And Cracks
Garden hoses often develop leaks and cracks from regular use. Fixing these issues quickly saves water and keeps your hose working well.
Small leaks can be repaired at home with simple tools. Larger damage may need replacing parts of the hose.
Using Hose Repair Tape
Hose repair tape is a flexible tape that seals leaks and cracks. It sticks tightly and stops water from escaping.
Clean the hose area, dry it, and wrap the tape around the leak. Stretch the tape as you wrap to ensure a tight seal.
- Cut a piece of tape longer than the leak
- Stretch and wrap the tape around the damaged spot
- Overlap the tape layers for better sealing
- Press firmly to remove air bubbles
Applying Waterproof Sealant
Waterproof sealant can fill small cracks and holes in your garden hose. It creates a strong, water-resistant layer.
Dry the hose area, apply the sealant with a brush or finger, and let it dry fully before using the hose again.
- Clean and dry the damaged hose part
- Apply sealant evenly over the leak
- Allow 24 hours to dry completely
- Test for leaks by turning on the water
Replacing Damaged Sections
If a hose has large cracks or holes, replacing the damaged section is best. This keeps your hose strong and leak-free.
Cut out the broken part, then join new hose pieces using hose connectors. Secure the connectors with clamps to prevent leaks.
- Cut the hose cleanly on both sides of damage
- Insert a hose connector into each cut end
- Tighten hose clamps around the connector and hose
- Check the repair by turning on water pressure
Credit: www.homedepot.com
Straightening Kinks And Twists
A garden hose can develop kinks and twists after use or storage. These bends block water flow and can damage the hose. Fixing these problems helps the hose last longer.
This guide covers ways to straighten your hose safely and prevent future kinks.
Manual Untwisting Techniques
Start by laying the hose flat on the ground. Follow the twisted section and gently pull it straight. If the hose is tight, try these moves to ease the twist:
- Hold the hose at both ends and rotate it in the opposite direction of the twist.
- Walk along the hose, straightening as you go.
- Use your hands to smooth out small kinks by pressing and bending gently.
- Avoid sharp bends that can cause new kinks.
Using Heat Methods
Heat can soften the hose material, making it easier to remove kinks. Use warm water or sunlight safely to avoid damage.
| Heat Method | How to Use | Safety Tips |
| Warm Water | Run warm water through the hose for 5 minutes. | Water should not be too hot to avoid melting the hose. |
| Sunlight | Lay the hose in direct sun for 30 minutes. | Check often to prevent overheating. |
| Hair Dryer | Use on low heat along the kinked area. | Keep dryer moving to avoid burning the hose. |
Preventing Future Kinks
Proper storage and care stop kinks before they start. Follow these tips to keep your hose smooth and ready for use:
- Always drain water from the hose after use.
- Store the hose coiled loosely on a reel or hanger.
- Avoid sharp bends or tight loops during storage.
- Use a hose made from kink-resistant materials.
- Keep the hose out of extreme cold or heat when not in use.
Replacing Hose Connectors
Replacing hose connectors can fix leaks and improve water flow. It is a simple task that anyone can do with basic tools.
This guide covers how to remove old connectors, install new fittings, and test for a secure fit.
Removing Old Connectors
First, turn off the water supply and drain the hose. Use a wrench or pliers to loosen the old connector.
If the connector is stuck, gently twist it back and forth. Cut the hose end if the connector cannot be removed.
Installing New Fittings
Choose the right size connector for your hose. Slide the hose end over the barbed fitting on the new connector.
- Push the hose firmly onto the connector.
- Slide the clamp over the hose and fitting.
- Tighten the clamp with a screwdriver or wrench.
- Check that the hose is secure and does not pull off.
Testing For Secure Fit
Turn the water supply back on slowly. Check the new connector for leaks or drips.
| Test | What to Look For |
|---|---|
| Water Pressure | Strong flow without leaks |
| Visual Check | No water dripping from the connector |
| Physical Pull | Hose stays attached firmly |
Maintenance Tips For Longevity
Repairing a garden hose can save money and time. Taking care of your hose helps it last longer.
Simple maintenance steps keep your hose working well. These tips focus on storage, inspection, and seasonal care.
Proper Storage Practices
Store your garden hose in a cool, dry place. Avoid leaving it in direct sunlight or on hot surfaces.
Keep the hose coiled loosely to prevent kinks and cracks. Use a hose reel or hanger to keep it off the ground.
- Avoid sharp bends or tight coils
- Keep away from chemicals and sharp objects
- Use a hose reel for neat storage
Regular Inspection
Check your hose often for leaks, cracks, and worn areas. Early fixes stop small problems from getting worse.
Look at the connectors and fittings. Tighten or replace them if they are loose or damaged.
- Look for wet spots or water loss
- Feel for thin or cracked areas
- Check connectors for rust or damage
Seasonal Care
Before winter, drain your hose completely. Water left inside can freeze and cause cracks.
Store the hose indoors during cold months. Bring it outside again in spring after checking for damage.
- Drain water before storing for winter
- Keep hose indoors in freezing weather
- Inspect for damage before spring use

Credit: www.youtube.com
Frequently Asked Questions
How Do You Fix A Leaking Garden Hose?
To fix a leaking garden hose, first locate the leak. Cut out the damaged section, then use a hose repair kit. Insert the connectors and secure with clamps. This stops water leakage and restores hose functionality quickly and effectively.
What Tools Are Needed To Repair A Garden Hose?
You need a hose repair kit, scissors or a utility knife, and pliers. The repair kit includes connectors and clamps. These tools make cutting, connecting, and sealing the hose easy for a durable repair.
Can I Repair A Garden Hose Without A Repair Kit?
Yes, you can temporarily fix leaks using waterproof tape or duct tape. Wrap the tape tightly around the damaged area. This is a quick fix but not as durable as using a proper repair kit.
How Long Does A Garden Hose Repair Usually Take?
A garden hose repair typically takes 10 to 20 minutes. It depends on the damage size and your experience. Using a repair kit speeds up the process and ensures a long-lasting fix.
Conclusion
Repairing a garden hose saves money and avoids waste. Small leaks or cracks do not need a new hose. Using simple tools and parts makes the job quick. A tight seal stops water from dripping out. Regular checks keep your hose in good shape.
Fixing it yourself feels good and is easy. Keep your garden healthy with steady water flow. Try these steps next time your hose breaks. You will enjoy a working hose again in no time.