
Your bike helmet is your best protection on every ride. But if it doesn’t fit right, it won’t keep you safe.
Imagine speeding down a trail or cruising through the city, knowing your helmet is snug, secure, and comfortable. How good would that feel? In this guide, you’ll learn simple steps to fit your bike helmet perfectly. By the end, you’ll have the confidence that your helmet won’t let you down when it matters most.
Keep reading to discover how easy it is to protect yourself the right way.
Choosing The Right Helmet
Picking the right bike helmet is important for safety and comfort. A good helmet fits well and protects your head.
There are many helmets to choose from. Knowing the types, materials, and safety standards helps you decide.
Helmet Types And Styles
Bike helmets come in different styles for various riding types. Each style offers unique features.
Road helmets are light and well-ventilated. Mountain bike helmets are stronger with more coverage. Commuter helmets focus on comfort and visibility.
- Road helmets: light, good airflow
- Mountain helmets: extra protection, visor
- Commuter helmets: comfort, reflective parts
- Kids’ helmets: smaller size, fun designs
Material And Construction
Helmet shells usually use hard plastic or fiberglass. Inside, foam padding absorbs impact during crashes.
Some helmets have a hard outer shell with a foam liner. Others add extra layers for better shock absorption.
- Outer shell: hard plastic or fiberglass
- Inner liner: foam to absorb shocks
- Straps: keep the helmet secure
- Ventilation holes: keep your head cool
Safety Certifications
Look for helmets with safety certifications. These show the helmet meets safety rules and tests.
Common certifications include CPSC, ASTM, and Snell. Certified helmets provide better protection in crashes.
- CPSC: Required in the US for bike helmets
- ASTM: Sets standards for sports helmets
- Snell: High safety standards, often for racing

Credit: riiroo.com
Measuring Your Head Size
Wearing a bike helmet is crucial for safety. To ensure a good fit, measure your head accurately. This guide helps you find the right helmet size.
Knowing your head size prevents discomfort and enhances protection. Follow these steps to measure correctly.
Tools Needed For Measurement
Gathering the right tools ensures precise measurements. Use simple items available at home.
- Flexible measuring tape
- Mirror
- Pen and paper
Measuring Techniques
Using proper techniques helps in getting the correct measurement. Follow these steps carefully.
Wrap the tape around your head, just above your eyebrows. Make sure the tape is level and not too tight. Check the measurement in a mirror.
Finding Your Size Range
Once you have your measurement, find your helmet size. Different brands may have varied size ranges.
| Measurement (cm) | Helmet Size |
| 50-54 | Small |
| 55-58 | Medium |
| 59-62 | Large |
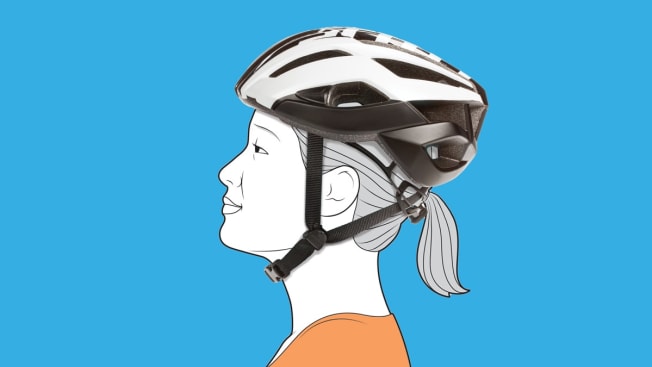
Adjusting The Helmet Fit
Fitting your bike helmet correctly is important for safety and comfort. A well-adjusted helmet protects your head in case of a fall.
This guide focuses on adjusting the helmet fit through positioning, strap adjustment, and using fit pads.
Positioning On Your Head
Place the helmet level on your head. It should sit low on your forehead, about one to two finger-widths above your eyebrows. The helmet must cover the top of your head and sit evenly.
Strap Adjustment Tips
- Adjust the side straps to form a “V” shape under your ears.
- Buckle the chin strap and tighten it until it feels snug but comfortable.
- Make sure you can fit one or two fingers between the strap and your chin.
- Check that the straps are not twisted and lie flat against your skin.
- Shake your head gently to confirm the helmet stays in place.
Using Fit Pads And Liners
| Type | Purpose | How to Use |
|---|---|---|
| Foam Pads | Fill small gaps for a snug fit | Stick inside helmet where needed |
| Gel Liners | Increase comfort and reduce pressure | Place under foam pads or helmet shell |
| Adjustable Dial Fit System | Fine-tune helmet size | Turn dial to tighten or loosen fit |

Credit: www.safetyandhealthmagazine.com
Testing Helmet Comfort
Fitting a bike helmet properly keeps you safe and comfortable. Testing comfort means checking how the helmet feels on your head.
Try different ways to find if the helmet fits well. Focus on pressure, airflow, and stability.
Checking For Pressure Points
Put the helmet on and tighten the straps. Wear it for a few minutes to feel if any spots press too hard.
- Look for pain or redness on your forehead or sides.
- Adjust padding or straps to reduce pressure.
- Try a different size if discomfort lasts.
Ensuring Proper Ventilation
Good airflow keeps your head cool during rides. Check if air moves well through the helmet vents.
| Vent Location | Comfort Effect |
| Front vents | Bring cool air in |
| Top vents | Allow heat to escape |
| Rear vents | Improve overall airflow |
Movement And Stability Checks
Move your head from side to side and up and down. The helmet should stay firmly in place.
- Shake your head gently to test stability.
- Check if the helmet slips or shifts.
- Tighten straps if the helmet feels loose.
- Make sure the chin strap is snug but not too tight.
Maintaining Helmet Safety
Keeping your bike helmet safe is important to protect your head. A well-maintained helmet works better during a crash.
Learn how to care for your helmet to make sure it stays strong and reliable.
Helmet Lifespan And Replacement
Bike helmets do not last forever. Most last about 3 to 5 years. After that, the materials may weaken.
- Check the helmet’s age by looking inside for the manufacture date.
- Replace the helmet every 3 to 5 years, even if it looks fine.
- Replace the helmet after any crash, even if you see no damage.
Cleaning And Care
Keep your helmet clean to help it last longer and stay comfortable.
- Use mild soap and water to clean the helmet shell.
- Do not use harsh chemicals or strong cleaners.
- Remove and wash the padding by hand if possible.
- Let the helmet air dry away from direct sunlight.
Recognizing Damage And Wear
| Type of Damage | What to Look For | Action Needed |
|---|---|---|
| Cracks in Shell | Visible breaks or splits in the helmet shell | Replace helmet immediately |
| Foam Compression | Soft spots or dents in the foam inside | Replace helmet |
| Strap Wear | Frayed or weakened straps and buckles | Replace straps or helmet if not repairable |
| Loose Parts | Parts that move or rattle | Tighten or replace parts as needed |
Credit: www.consumerreports.org
Frequently Asked Questions
How Tight Should A Bike Helmet Fit?
A bike helmet should fit snugly without causing discomfort. It must stay securely in place when you shake your head. Avoid gaps between your scalp and the helmet’s padding for optimal protection and comfort.
Where Should The Helmet Sit On Your Head?
Position the helmet level on your head, covering your forehead. It should sit about one to two finger-widths above your eyebrows. This placement ensures maximum protection for your forehead and temple areas.
How To Adjust Bike Helmet Straps Properly?
Adjust the side straps to form a “V” shape under your ears. Buckle the chin strap snugly, allowing only one or two fingers to fit underneath. Proper strap adjustment keeps the helmet stable during rides.
How To Check If A Bike Helmet Fits Well?
Shake your head side to side and nod up and down. The helmet should stay firmly in place without sliding. If it moves, tighten the straps or choose a smaller size for a better fit.
Conclusion
Wearing a bike helmet that fits well keeps you safe on every ride. Adjust the straps and size so the helmet feels snug, not tight. Check that it sits level and covers your forehead properly. A good fit stops the helmet from moving around.
Remember to replace your helmet after any crash. Stay safe, enjoy cycling, and protect your head with the right fit. Simple steps make a big difference in safety. Keep your helmet fit right every time you ride.