Have you ever felt the frustration of a broken fishing rod just when you were ready to cast your line? It’s a common problem that can quickly ruin your fishing plans.
But don’t worry—fixing your fishing rod might be easier than you think. You’ll discover simple, step-by-step methods to repair your rod and get back to fishing in no time. Keep reading, and you’ll learn how to save money, avoid buying new gear, and enjoy your favorite hobby without interruption.
Your next great catch is waiting—let’s make sure your rod is ready!

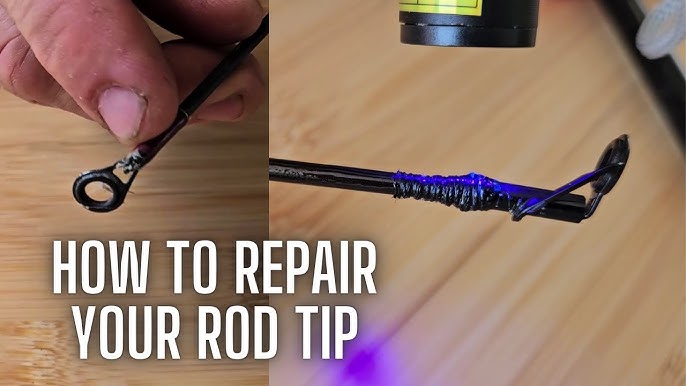
Credit: www.youtube.com
Identify The Damage
Fixing a broken fishing rod starts with finding the damage. You need to see what is wrong before you can repair it.
Look closely at your fishing rod to spot cracks or breaks. This helps you decide what tools and materials you need.
Inspect The Rod Carefully
Hold the rod in good light and check all parts. Turn it slowly to see every angle. Look for cracks, splits, or missing pieces.
Check the rod’s guides, handle, and tip. Small damage can cause big problems later if not fixed.
Spot Common Break Points
Fishing rods often break at the joints or near the tip. These points face the most stress when you cast or catch fish.
- Rod tip: This is thin and can snap easily.
- Joints: The places where rod sections connect may crack.
- Handle area: It can get loose or cracked from impact.
- Guides: Rings where the line passes can bend or break.
Gather Essential Tools
Fixing a broken fishing rod needs the right tools. Having these ready makes the repair easier and safer.
This guide helps you collect all tools before starting your repair work on the fishing rod.
What You Need For Repairs
Start by gathering common items used in rod repairs. These include items to clean, hold, and fix the rod parts.
- Sandpaper or fine file to smooth rough edges
- Cleaning cloth to remove dirt and oil
- Rod wrapping thread for securing parts
- Small scissors or cutters for trimming thread
- Heat source like a lighter or heat gun for curing adhesives
- Protective gloves to keep hands safe
- Masking tape to hold pieces temporarily
Choosing The Right Adhesives
Choosing the correct glue affects the strength and durability of the repair. Use adhesives made for rods and water exposure.
| Adhesive Type | Use | Dry Time |
| Epoxy Resin | Strong bonding, good for major breaks | 5-30 minutes |
| Super Glue (Cyanoacrylate) | Quick fixes, small cracks | Seconds to 1 minute |
| Thread Sealant Glue | Secures thread wraps | 10-15 minutes |
| UV Cure Resin | Fast curing with UV light | 1-3 minutes |
Fixing Small Cracks
Small cracks in a fishing rod can weaken it over time. Fixing them early helps keep your rod strong and ready to use.
This guide shows simple steps to repair small cracks using basic materials at home.
Cleaning And Preparing The Area
Start by cleaning the cracked area well. Remove dirt, dust, and old glue to make the repair last longer.
- Use a soft cloth with rubbing alcohol to clean the spot
- Gently sand the cracked area with fine sandpaper
- Wipe off sanding dust with a dry cloth
- Make sure the area is dry before applying glue
Applying Epoxy Or Glue
Choose a strong epoxy or fishing rod glue for the crack. Mixing and applying it correctly is important for a solid fix.
| Type | Use | Drying Time |
|---|---|---|
| Two-part Epoxy | Best for deep cracks and strong repair | 5 to 30 minutes |
| Super Glue (Cyanoacrylate) | Good for small surface cracks | 1 to 5 minutes |
Mix the epoxy well if needed. Apply a thin layer over the crack using a toothpick or small brush. Avoid excess glue for a clean finish.
Curing And Drying Tips
Let the glue dry fully before using the rod. Proper curing makes the repair strong and long-lasting.
- Keep the rod still in a dry place
- Avoid touching the glued area during drying
- Check the glue package for exact drying time
- After drying, gently sand the area for smoothness

Credit: www.amazon.ca
Repairing Broken Rod Sections
Fixing a broken fishing rod can save money and extend its life. You can repair the broken sections with simple tools and materials.
Careful alignment and reinforcement are key to making the rod strong again. This guide covers how to do it step-by-step.
Aligning The Broken Pieces
Start by matching the broken rod parts carefully. Make sure the pieces fit perfectly without gaps.
Hold the pieces in line to keep the rod straight. You can use tape to keep them steady during repair.
Using Rod Splints And Sleeves
Rod splints or sleeves cover the break to hold the rod together. They add strength and protect the joint.
Choose a splint or sleeve that fits snugly over the broken parts. Slide it over and center it on the break.
- Use a metal or fiberglass sleeve for durability
- Make sure the sleeve extends beyond the break on both sides
- Apply glue inside the sleeve before sliding it on
Reinforcing The Joint
After placing the splint, reinforce the joint with tape or thread wrap. This keeps the pieces tightly bonded.
Use epoxy or strong glue to seal the repair. Let it dry fully before using the rod again.
- Wrap thread tightly around the joint
- Cover thread with epoxy for a smooth finish
- Allow at least 24 hours for the glue to cure
Replacing Guides And Tips
Fixing a broken fishing rod often means replacing guides and tips. These parts help control the fishing line.
Learn how to remove old guides and install new ones properly. This keeps your rod working well.
Removing Damaged Guides
Start by checking which guides are broken or loose. Removing them carefully avoids damage to the rod.
Use a heat source like a lighter or heat gun to soften the glue. This makes guides easier to remove.
- Heat the guide wrap gently for 10-15 seconds
- Use a sharp blade to cut the thread wrap
- Pull the guide off slowly without bending the rod
- Clean leftover glue with rubbing alcohol
Installing New Guides Properly
Place the new guide in the right position along the rod. Alignment helps the line flow smoothly.
Wrap thread tightly around the guide foot. Use epoxy glue to secure the thread and protect it.
- Position the guide on the rod correctly
- Wrap thread evenly and tightly around the foot
- Apply thin epoxy coat over thread wrap
- Let epoxy dry for 24 hours before use
Finishing Touches
Fixing a broken fishing rod requires care until the final steps. The finishing touches help your rod look and work like new. These steps protect the repair and make it smooth to handle.
Two main tasks remain: sanding and smoothing the repaired area, and applying a protective coating. Both help keep the rod strong and ready for your next fishing trip.
Sanding And Smoothing Repairs
After the glue or filler dries, sanding removes rough edges and bumps. Smooth repairs reduce the chance of cuts or snags on your fishing line. Use fine-grit sandpaper for best results.
- Start with 220-grit sandpaper to shape the repair area.
- Switch to 400-grit sandpaper to smooth the surface.
- Wipe the area with a damp cloth to remove dust.
- Check the repair for any uneven spots.
- Repeat sanding if needed until smooth.
Applying Protective Coating
Protective coating seals the repair and guards against water damage. It also adds shine to the rod. Use a clear epoxy or rod finish designed for fishing gear.
| Coating Type | Purpose | Dry Time |
| Epoxy Resin | Strong, waterproof seal | 24 hours |
| Polyurethane | Flexible and durable finish | 4-6 hours |
| Rod Finish | Specifically made for rods | 12 hours |
Apply the coating in thin layers. Let each layer dry before adding the next. Avoid thick coats to prevent drips and bubbles. A smooth finish helps your rod last longer.
Testing Your Repair
After fixing your broken fishing rod, you need to check if the repair holds up. Testing will show if the rod is strong and flexible enough for fishing.
This guide will help you test the strength and flexibility of your rod and practice safe casting.
Checking Strength And Flexibility
First, gently bend your fishing rod to see if it feels firm but flexible. Avoid forcing it too hard during this test.
- Hold the rod near the handle and slowly bend it downwards.
- Look for any cracks or weak spots near the repaired area.
- Check if the rod returns to its original shape without bending permanently.
- Apply light pressure on the tip to see if it flexes evenly.
Safe Casting Practices Post-repair
After testing strength and flexibility, try casting in an open area. Use gentle motions to avoid stressing the repair.
| Safe Casting Tips | Reason |
| Cast slowly and smoothly | Reduces stress on repair |
| Use light fishing line | Less tension on the rod |
| Avoid casting heavy lures | Prevents damage to weak spots |
| Stop casting if rod feels unstable | Protects from further breaks |

Credit: www.amazon.ca
Preventing Future Damage
Fixing a broken fishing rod is important, but preventing damage is better. Taking care of your rod helps it last longer.
Proper storage and regular maintenance keep your rod strong and ready for your next trip.
Proper Storage Tips
Store your fishing rod in a dry, safe place away from direct sunlight. Heat and moisture can weaken the rod over time.
Use a rod holder or rack to keep rods straight and avoid bending or pressure on the rod blank.
- Keep rods vertical or horizontal on a rack
- Use rod tubes or sleeves for extra protection
- Avoid placing heavy items on top of rods
- Store rods away from extreme temperatures
- Keep rods away from sharp objects that can scratch them
Regular Maintenance Habits
Clean your fishing rod after each use. Remove dirt, salt, and debris to prevent damage and rust.
Check guides and reel seats for cracks or loose parts. Fix problems early to avoid bigger damage.
- Wipe rod with a soft cloth after fishing
- Use mild soap and water for deeper cleaning
- Inspect guides for cracks or missing inserts
- Tighten reel seats and handle grips as needed
- Apply light oil to metal parts to stop rust
Frequently Asked Questions
How Can I Repair A Broken Fishing Rod Tip?
To fix a broken fishing rod tip, first remove the damaged tip. Measure and buy a replacement tip. Use heated glue or epoxy to attach the new tip securely. Allow it to dry fully before fishing.
What Tools Are Needed To Fix A Broken Fishing Rod?
You need replacement rod tips, epoxy or rod tip glue, scissors or cutters, sandpaper, and a lighter or heat source. These tools help you remove the broken tip and attach the new one properly.
Can I Fix A Cracked Fishing Rod Blank Myself?
Yes, minor cracks in the rod blank can be fixed with rod blank repair tape and epoxy. Clean the area, wrap the tape tightly, and apply epoxy to strengthen the crack. Let it cure before use.
How Do I Prevent Fishing Rod Damage In The Future?
Store your rod in a protective case and avoid bending it excessively. Handle it gently and avoid exposing it to extreme temperatures. Regular inspections can catch damage early, preventing serious breaks.
Conclusion
Fixing a broken fishing rod can be simple. With patience and basic tools, you can restore it. Start by identifying the problem. Whether it’s the tip, guide, or reel seat, each requires specific attention. Use glue for minor cracks. For major damage, a replacement might be needed.
Practice makes perfect. Over time, you’ll become more confident in repairs. Keep your tools handy. Maintain your rod regularly to prevent future breaks. Fishing is enjoyable when your gear works well. Happy fishing!