Have you ever struggled to see what’s behind your car while reversing? Installing a rear view camera can change that instantly.
It not only makes parking easier but also keeps you and others safe. In this guide, you’ll learn exactly how to install a car rear view camera step-by-step. Whether you’re a beginner or just want to save on installation costs, this article will give you clear instructions and helpful tips.
Keep reading to take control of your driving safety with a simple upgrade you can do yourself.
Choosing The Right Camera
Installing a car rear view camera helps you see better when backing up. Picking the right camera is important for safety and ease of use.
This guide explains different types of cameras, features to check, and budget tips. It will help you choose the best option for your car.
Types Of Rear View Cameras
There are several types of rear view cameras. Each type works differently and fits different cars.
- Wired Cameras:Connect to the car’s display with wires. They offer a steady signal.
- Wireless Cameras:Use Wi-Fi or Bluetooth. Easier to install but can have signal issues.
- License Plate Cameras:Mount on or near the license plate for a clear view.
- Flush Mount Cameras:Installed inside the car’s body for a neat look.
- Mirror-Mounted Cameras:Built into the rear view mirror for space-saving.
Key Features To Look For
Some features improve the camera’s usefulness. Choose a camera with the right features for your needs.
- Wide Viewing Angle:Shows more area behind your car for better safety.
- Night Vision:Lets you see clearly in low light or dark conditions.
- Waterproof:Protects the camera from rain and dirt.
- Parking Guidelines:Lines on the screen help judge distances.
- High Resolution:Clear images help spot obstacles easily.
Budget Considerations
Rear view cameras come in different price ranges. Set a budget before shopping.
Cheaper cameras may lack some features but work well for basic needs. Higher-priced models offer better image quality and extra functions.
- Basic cameras cost less and are easy to install.
- Mid-range cameras have better picture quality and features.
- Premium cameras include wireless options and advanced night vision.
Gathering Necessary Tools
Installing a car rear view camera needs some tools. Getting these ready helps you work faster.
Having the right tools makes the installation safe and smooth. Let’s see what you need.
Basic Tools Required
You need some basic tools to install the rear view camera. These tools help you connect and fix parts.
- Screwdrivers (flathead and Phillips)
- Wire strippers and cutters
- Electrical tape
- Power drill with drill bits
- Multimeter to check electrical connections
- Panel removal tool or trim removal tool
- Zip ties or cable clips
Optional Accessories
Some extra accessories can make installation easier or improve camera performance. These are not needed but helpful.
- Heat shrink tubing for better wire protection
- Fuse tap for easy power connection
- Extension wires if your cables are short
- Double-sided tape for securing small parts
- Waterproof connectors to prevent moisture damage
Preparing Your Vehicle
Installing a rear view camera needs careful preparation. This helps ensure a clean setup and good camera performance.
Start by choosing the right place for the camera. Then, clean and check the area well before installation.
Selecting The Camera Mounting Location
Pick a spot that gives a clear view behind the vehicle. Avoid places blocked by the trunk, license plate, or spare tire.
- Choose a location near the center of the rear bumper or above the license plate.
- Make sure the spot is flat and stable for mounting.
- Avoid areas with too much vibration or exposure to dirt.
- Check for any wiring access points nearby.
Cleaning And Inspecting The Area
Clean the mounting spot well to remove dirt and grease. This helps the camera stick firmly and stay in place.
| Cleaning Step | Tools Needed | Reason |
|---|---|---|
| Remove dirt and dust | Soft cloth, water | Ensures surface is clean |
| Use rubbing alcohol | Alcohol wipes | Removes grease and oils |
| Inspect for damage | Good lighting | Find cracks or loose parts |
Check the area for cracks or loose panels. Fix any issues before attaching the camera to avoid damage later.

Credit: www.ebay.com
Installing The Camera
Installing a rear view camera helps you see behind your car. It improves safety while reversing.
This guide covers how to mount the camera and run the wiring inside your vehicle.
Mounting The Camera Securely
Choose a spot on the back of your car for the camera. Usually, it goes above the license plate.
Clean the area well before attaching the camera. Use screws or strong adhesive to fix it in place.
- Make sure the camera lens is clear and faces backward
- Check that the mount is tight and will not move
- Avoid places where the camera can get damaged easily
Running The Wiring Through The Vehicle
Run the camera wires from the back to the front of the car. Hide them under panels or carpets.
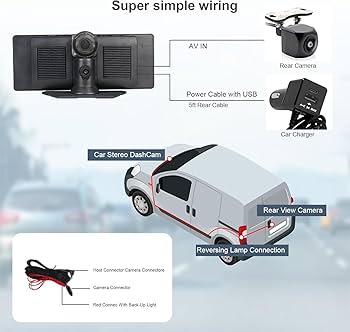
Connect the power wire to the car’s reverse light. This makes the camera turn on when you back up.
- Use cable ties to keep wires neat and secure
- Avoid sharp edges that can cut the wires
- Test the camera before putting all panels back
Connecting To The Display
Connecting your car rear view camera to the display is a key step. It lets you see the camera feed inside your vehicle. This guide covers wiring to the monitor or head unit and power supply connections.
Follow the instructions carefully to ensure a secure and clear video signal. Proper connections help avoid image issues and power problems.
Wiring To The Monitor Or Head Unit
Locate the video input on your monitor or head unit. This is usually an RCA connector marked as “Camera In” or “Video In.” Use the video cable from the rear view camera to connect here.
- Run the video cable from the camera to the front of the vehicle.
- Secure cables away from moving parts and heat sources.
- Connect the RCA plug into the video input port on the display.
- Check for a tight and clean connection to prevent signal loss.
- Test the video feed before finalizing the installation.
Power Supply Connections
The rear view camera needs power to work. It usually runs on 12 volts, supplied by your car’s reverse light circuit. This way, the camera turns on only when you shift to reverse.
| Connection Point | Wire Color | Purpose |
|---|---|---|
| Reverse Light Positive | Red | Power supply to camera |
| Ground (Chassis) | Black | Completes electrical circuit |
| Video Signal | Yellow | Transmits video to display |
Use a multimeter to find the reverse light positive wire. Connect the camera’s red wire here. Attach the black wire to a metal part of the car body for grounding.
Testing The System
After installing your car rear view camera, testing it is important. This ensures the camera works well and shows a clear image.
Check the camera angle and view first. Then fix any common problems that appear during testing.
Checking Camera Angle And View
Turn on your car and shift to reverse to see the camera display. Check if the image shows the rear clearly.
- Make sure the camera is centered and not tilted.
- Adjust the angle so the ground and rear bumper are visible.
- Look for any blurry or dark spots in the image.
- Test in different light conditions, like day and night.
Troubleshooting Common Issues
If the camera does not work well, try these checks. They help fix most common problems.
| Problem | Possible Cause | Solution |
| No image on screen | Loose connection | Check all cables and plugs |
| Blurry picture | Dirty camera lens | Clean the lens with a soft cloth |
| Flickering image | Weak power supply | Check battery or fuse |
| Wrong angle | Camera position shifted | Re-adjust and tighten camera mount |
Final Adjustments
After installing your car rear view camera, it is important to make final adjustments. These steps ensure the camera works well and stays safe.
Take time to secure wires and set the camera for the best view. This will help you drive more safely.
Securing Loose Wires
Loose wires can cause problems if they move or get damaged. Make sure all wires are tight and safe.
Use clips or zip ties to keep wires in place. Avoid sharp edges or hot parts that might harm the wires.
- Find all loose wires around the camera and screen.
- Use zip ties to bundle wires together neatly.
- Attach wires to the car frame with clips or tape.
- Keep wires away from moving parts and heat sources.
- Check that wires do not block any car controls.
Adjusting Camera Settings
Adjust the camera settings for a clear and useful view. Good settings help you see obstacles easily.
Set the brightness, contrast, and angle to fit your needs. Test the view with the car in different positions.
- Turn on the camera and check the image on the screen.
- Adjust brightness to avoid too dark or too bright images.
- Change contrast to make objects clear and sharp.
- Move the camera angle to cover the rear area well.
- Test the camera view while parking or reversing slowly.

Credit: www.amazon.com
Maintenance Tips
Keeping your car rear view camera in good shape is important for safety. Simple maintenance helps the camera work clearly and last longer.
This guide covers easy ways to care for your rear view camera. Follow these tips to avoid common problems.
Cleaning The Camera Lens
Clean the camera lens often to keep the image clear. Dirt, dust, and water spots can blur the view. Use soft materials to avoid damage.
- Use a soft microfiber cloth to wipe the lens gently.
- Apply a mild glass cleaner if needed, but avoid harsh chemicals.
- Do not scratch or press hard on the lens surface.
- Clean after rain, snow, or dusty trips to remove buildup.
Regular System Checks
Check your camera system regularly to ensure it works properly. Look for loose wires, screen issues, or unclear images.
| Check Item | What to Look For | Action Needed |
| Camera Lens | Clean and clear image | Clean lens if blurry |
| Wiring | No loose or damaged cables | Secure or replace wires |
| Screen Display | Sharp image, no flicker | Adjust settings or repair screen |
| Mounting | Camera firmly attached | Tighten screws or brackets |
Credit: dashcamtalk.com
Frequently Asked Questions
How Do I Choose The Right Rear View Camera?
Choosing the right rear view camera depends on your vehicle and budget. Consider camera resolution, viewing angle, and night vision capabilities. Wireless cameras are easier to install, while wired ones offer better reliability. Ensure compatibility with your car’s display system for optimal functionality.
What Tools Are Needed For Installation?
To install a rear view camera, you’ll need basic tools like screwdrivers, wire strippers, and a drill. A voltage tester helps check electrical connections. Some installations may require a wrench or socket set. Follow the camera’s manual for any specific tools required for your model.
Can I Install A Rear View Camera Myself?
Yes, you can install a rear view camera yourself with basic tools and skills. Follow the camera’s instructions carefully. Online tutorials and videos can guide you through the process. If you’re uncomfortable with wiring or drilling, consider professional installation for safety and reliability.
How Long Does Installation Usually Take?
The installation of a rear view camera typically takes 1 to 3 hours. The exact time depends on your experience and vehicle model. Some installations may require additional time for wiring. Carefully following instructions and having all necessary tools will streamline the process.
Conclusion
Installing a car rear view camera improves your driving safety. You can see blind spots clearly while reversing. The process is simple with basic tools and steps. Follow the instructions carefully for the best results. Test the camera before finalizing the setup.
This small device can make parking easier and safer. Take your time and double-check connections. Enjoy the added confidence on the road.