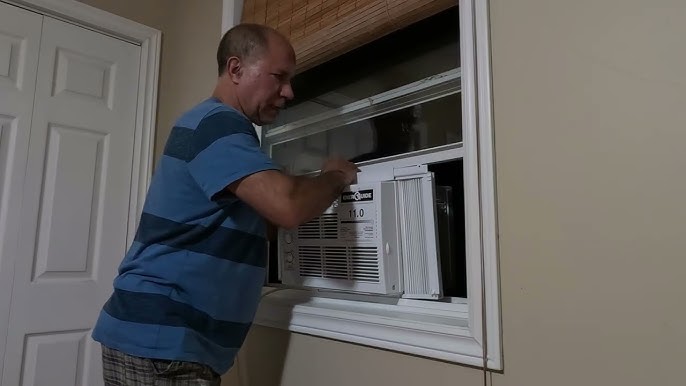
Looking to stay cool this summer without breaking the bank? Installing a wall air conditioner unit could be the perfect solution for your home.
You might think it’s complicated or costly, but with the right steps, you can do it yourself and enjoy refreshing comfort all season long. In this guide, you’ll find simple, clear instructions that make the process easy—even if you’re not a DIY expert.
Ready to take control of your comfort and save money? Keep reading to learn exactly how to install your wall air conditioner unit quickly and safely.
Choosing The Right Wall Ac Unit
Picking a wall air conditioner needs some thought. The right choice keeps your room cool and saves energy.
You should consider size, efficiency, and extra features before buying a unit.
Size And Cooling Capacity
Choose a size that fits your room. An AC too small won’t cool well. Too big wastes energy.
| Room Size (sq ft) | Cooling Capacity (BTU) |
| 100 to 150 | 5,000 to 6,000 |
| 150 to 250 | 6,000 to 8,000 |
| 250 to 350 | 8,000 to 10,000 |
| 350 to 450 | 10,000 to 12,000 |
Energy Efficiency Ratings
Look for units with high energy efficiency. They use less power and cost less to run.
- Check the Energy Efficiency Ratio (EER) or Seasonal Energy Efficiency Ratio (SEER)
- Higher numbers mean better efficiency
- Look for Energy Star labels for certified efficiency
Additional Features To Consider
Extra features can add comfort and convenience to your AC unit.
- Remote control for easy operation
- Timer settings to save energy
- Adjustable fan speeds for better airflow
- Sleep mode for quiet and energy-saving cooling
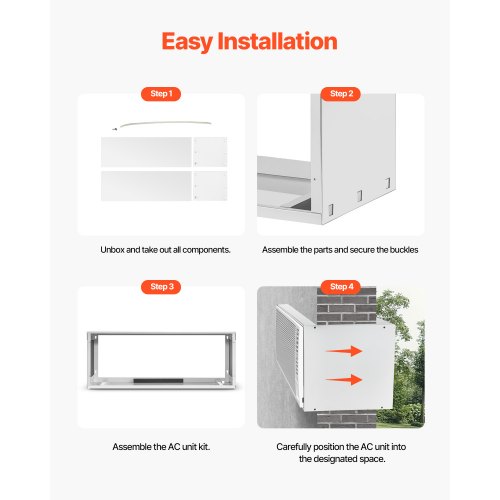
Credit: www.vevor.ca
Preparing The Installation Site
Installing a wall air conditioner requires careful site preparation. Proper planning ensures the unit works efficiently and lasts longer.
This guide covers key steps to get your installation site ready for the air conditioner unit.
Selecting The Installation Location
Choose a location with good airflow and easy access to power. Avoid spots near heat sources or direct sunlight.
The wall should be strong enough to hold the unit’s weight and near a window or opening for venting.
- Pick a spot away from obstacles like furniture
- Ensure the location allows drainage for condensation
- Keep the unit away from noisy appliances
- Check for nearby electrical outlets
Measuring Wall Thickness And Space
Measure the wall thickness to confirm it fits the air conditioner’s depth. Check the space around the unit for proper airflow.
| Measurement | Recommended Size | Why It Matters |
| Wall Thickness | At least 6 inches | Supports unit securely |
| Clearance Around Unit | Minimum 12 inches | Allows airflow and maintenance |
| Window or Opening Size | Matches unit dimensions | Proper venting and installation |
Gathering Necessary Tools And Materials
Collect all tools and materials before starting. This helps avoid delays during installation.
- Drill and drill bits
- Measuring tape
- Screwdriver set
- Level
- Mounting brackets and screws
- Sealant or weatherstripping
- Protective gloves and safety glasses
Safety Precautions
Installing a wall air conditioner unit requires care and attention to safety. You must follow important steps to avoid accidents.
These safety tips help protect you and ensure the unit works properly after installation.
Turning Off Power Supply
Always turn off the power supply before starting the installation. This stops electric shocks and accidents.
Find the circuit breaker that controls the air conditioner’s power and switch it off. Double-check that power is off using a tester.
Using Proper Protective Gear
Wear the right safety gear to protect yourself during installation. This includes gloves, goggles, and sturdy shoes.
Gloves protect your hands from sharp edges. Goggles keep debris out of your eyes. Shoes prevent foot injuries from dropped tools.
- Use insulated gloves for electrical work
- Wear safety glasses at all times
- Wear closed-toe shoes or boots
Handling Electrical Components Safely
Be careful when working with electrical parts. Handle wires and connections gently to avoid damage.
Use tools with insulated handles and do not touch wires with wet hands. Always follow the manufacturer’s wiring instructions closely.

Credit: www.angi.com
Installing The Support Bracket
The support bracket holds the wall air conditioner unit securely. You must install it properly for safety and performance. This guide helps you place and fix the bracket on the wall.
Take your time to measure and check the bracket position. A strong bracket prevents damage to your wall and AC unit.
Marking The Wall For Bracket Placement
First, find the right spot on the wall for the bracket. Use the AC unit’s manual to know the bracket height and position.
Use a pencil and level tool to mark where the bracket holes will go. Accurate marks help with easy and correct drilling later.
- Measure the bracket height from the floor
- Check for studs or solid wall areas
- Mark hole locations with a pencil
- Use a level to ensure horizontal alignment
Drilling Holes And Anchoring Bracket
Drill holes where you marked on the wall. Use a drill bit that fits the wall anchors and screws you have.
Insert wall anchors into the holes if you do not drill into studs. Then, fix the bracket with screws tightly to hold weight.
- Use a drill with the correct bit size
- Drill straight holes to avoid damage
- Push anchors fully into the holes
- Screw the bracket firmly into place
Ensuring Bracket Levelness And Stability
Check the bracket with a level tool again after fixing it. The bracket must be perfectly horizontal to support the AC unit.
Test the bracket stability by applying light pressure. It should not move or feel loose on the wall.
- Use a bubble level for accuracy
- Adjust screws if the bracket is not level
- Push and pull the bracket gently to check strength
- Tighten any loose screws before mounting the AC
Preparing The Wall Opening
Installing a wall air conditioner unit needs a proper wall opening. The opening must fit the unit perfectly. Preparing this space carefully helps the unit work well.
This guide covers marking and cutting the wall, sealing edges, and inserting the sleeve or frame. Follow these steps to get a good fit and protect your home from weather.
Marking And Cutting The Wall
First, measure the air conditioner unit’s dimensions. Mark the wall where you want to place the unit. Use a level to keep the marks straight. Then, cut the wall carefully following the marks.
- Measure the width and height of the AC unit.
- Mark the outline on the wall with a pencil.
- Check the marks with a level for accuracy.
- Cut the wall using a saw or appropriate tool.
- Remove debris and smooth the edges.
Sealing Edges For Weatherproofing
Sealing the edges around the opening stops air and water leaks. Use weatherproof sealant or caulk. Apply it evenly to all edges. This step helps keep your home warm in winter and cool in summer.
| Material | Purpose | Tips |
|---|---|---|
| Silicone Sealant | Waterproofing and air sealing | Use a smooth bead for full coverage |
| Weatherstripping Tape | Extra insulation around edges | Apply to dry surfaces only |
| Foam Backer Rod | Fill large gaps before sealing | Choose correct thickness for gap size |
Inserting The Sleeve Or Frame
Insert the sleeve or frame of the air conditioner into the wall opening. Make sure it fits snugly. Use screws to secure it in place. Check that it is level and stable before installing the unit.
Mounting The Air Conditioner Unit
Mounting your wall air conditioner properly is key for good cooling. This guide helps you fit the unit safely and securely. Follow each step carefully to avoid damage or leaks.
This section covers sliding the unit into place, securing it to the bracket, and connecting drainage and insulation.
Sliding Unit Into The Sleeve
First, slide the air conditioner unit gently into the sleeve. Make sure the unit is aligned with the wall opening. Avoid forcing it to prevent damage to the casing or the wall.
Check that the unit fits flush with the wall surface. If it feels tight, slightly adjust the sleeve or the wall opening. The unit should slide in smoothly without gaps.
Securing Unit To The Bracket
Once the unit is in place, secure it to the mounting bracket. This keeps the air conditioner stable and prevents movement during use.
- Locate the mounting holes on the unit and bracket.
- Insert screws into the holes.
- Tighten screws evenly to hold the unit firmly.
- Check the unit is level and adjust if needed.
Connecting Drainage And Insulation
Proper drainage and insulation prevent water damage and keep your home energy efficient. Connect the drainage pipe and add insulation around the unit.
| Task | Details |
| Drainage Connection | Attach the drainage hose to the outlet. Ensure it slopes downward to drain water outside. |
| Insulation | Fill gaps around the unit with foam or weather stripping to block air leaks. |
| Check for Leaks | Run water through the drainage and inspect for any leaks or blockages. |
Electrical Connections
Installing a wall air conditioner requires careful electrical work. Proper connections keep the unit safe and working well.
Follow all steps to connect power, test safety, and set controls correctly.
Wiring The Unit To Power Source
Turn off the main power before starting any wiring. This prevents electric shock and damage.
Use the correct wire size for your air conditioner’s power needs. Connect wires to the unit’s terminals as shown in the manual.
- Connect the black wire to the live terminal
- Connect the white wire to the neutral terminal
- Attach the green or bare wire to the ground terminal
- Secure all connections tightly
Testing Electrical Safety
After wiring, check all connections for safety. Use a voltage tester to confirm no power is flowing before touching wires.
Check that the ground wire is properly connected. This helps avoid electrical shock and protects the unit.
- Turn the main power back on
- Test the voltage at the unit’s terminals
- Ensure the circuit breaker does not trip
- Look for sparks or loose wires
Setting Up Controls And Thermostat
Connect the control panel wires according to the manual. This allows you to operate the unit easily.
Set the thermostat to your preferred temperature. Make sure it responds correctly to changes.
- Attach control wires to the correct terminals
- Install the thermostat in a shaded area
- Test the thermostat by adjusting temperature settings
- Confirm the unit turns on and off as expected

Credit: thelenmechanical.com
Final Checks And Testing
After installing your wall air conditioner, it is important to perform final checks. These ensure the unit works well and keeps your room cool. Testing helps find any problems before regular use.
This guide covers powering on the unit, checking cooling performance, and inspecting for air leaks and noise. Follow each step carefully to confirm a good installation.
Powering On The Unit
Turn on the air conditioner using the power switch or remote control. Make sure the unit lights up and the fan starts running. This shows the electrical connection is correct.
- Plug in the unit securely to the power outlet.
- Switch on the circuit breaker if you turned it off during installation.
- Use the remote or control panel to power on the air conditioner.
- Listen for the fan and compressor starting.
- Check the display or indicator lights for normal operation.
Checking Cooling Performance
Make sure the air conditioner cools the room effectively. Set it to a low temperature and high fan speed to test. Measure the airflow and temperature change.
| Test Aspect | What to Check |
|---|---|
| Temperature Drop | Room temperature should lower within 10-15 minutes. |
| Airflow | Strong and steady airflow from the vents. |
| Humidity | Room feels less humid if unit has dehumidify mode. |
| Control Response | Unit responds quickly to temperature and fan speed changes. |
Inspecting For Air Leaks And Noise
Check around the unit for any air leaks or unusual sounds. Leaks reduce cooling efficiency. Noise may indicate loose parts or installation issues.
- Look for gaps between the unit frame and wall.
- Feel for cold air escaping from edges or seams.
- Listen for rattling, buzzing, or other strange noises.
- Tighten any loose screws or brackets.
- Seal gaps with weatherstripping or foam if needed.
Maintenance Tips For Longevity
Installing a wall air conditioner unit is just the first step. Proper care helps it last longer and work well. Regular maintenance keeps the unit clean and efficient.
Simple checks and cleaning can stop problems before they start. This guide covers key tips to maintain your air conditioner.
Cleaning Filters Regularly
Dirty filters block air and make the unit work harder. Clean the filters every month during heavy use. This keeps air flowing and improves cooling.
Remove the filter gently and wash it with warm water. Let it dry completely before putting it back. Replace filters if they are damaged or very dirty.
- Turn off the unit before removing filters
- Use mild soap if needed
- Do not use hot water that may damage the filter
- Dry filters fully before reinstalling
Inspecting Seals And Insulation
Check the seals around the air conditioner to stop air leaks. Good seals keep cool air inside and save energy. Look for cracks or gaps in the insulation and seals.
Replace worn-out seals to keep the unit efficient. Adding insulation around the unit helps block heat from outside. This reduces the load on your air conditioner.
- Look for cracks or gaps in the frame
- Use weatherstripping or foam tape to seal leaks
- Inspect insulation for wear or damage
- Replace damaged insulation to improve cooling
Scheduling Professional Servicing
Have a professional check your air conditioner at least once a year. Experts clean parts you cannot reach and check for problems. Regular servicing keeps the unit running smoothly.
A technician can refill refrigerant and test the system’s performance. Early fixes prevent costly repairs later. Set a yearly reminder for service appointments.
- Book service before the cooling season starts
- Ask for a full inspection and cleaning
- Check that all electrical parts work well
- Keep a record of all maintenance done
Frequently Asked Questions
How Do I Prepare The Wall For Air Conditioner Installation?
First, measure the wall opening to fit the unit. Then, ensure the wall is clean and sturdy. Remove any obstructions and mark the installation points clearly. This preparation helps secure the unit firmly and prevents air leaks.
What Tools Are Needed To Install A Wall Ac Unit?
You need a drill, level, screwdriver, measuring tape, sealant, and mounting brackets. These tools ensure precise installation and a secure fit for your air conditioner. Having the right tools simplifies the process and prevents damage.
How Do I Safely Install A Wall Air Conditioner?
Turn off the power before starting. Use mounting brackets to secure the unit in the wall opening. Seal gaps with weatherproof sealant to prevent air leaks. Follow the manufacturer’s instructions carefully to ensure safety and efficiency.
Can I Install A Wall Air Conditioner Myself?
Yes, if you follow the instructions and have basic DIY skills. Ensure proper measurements, use appropriate tools, and seal the unit correctly. For complex setups, consider professional help to avoid damage or safety risks.
Conclusion
Installing a wall air conditioner unit can be simple. Follow the steps, and you’ll enjoy cool air soon. Make sure to measure correctly. Use the right tools for safety. Secure the unit firmly in the wall. Check for proper electrical connections.
Test the air conditioner to ensure it works well. If needed, seek help from a professional. Remember, a cool room means comfort. With the right installation, you can relax and enjoy. Stay comfortable with your new wall air conditioner.