
Are you worried about your car’s safety? Installing an alarm on your car can give you peace of mind and protect your investment.
But where do you start? You might think it’s complicated or expensive, but it doesn’t have to be. In this guide, you’ll learn simple, step-by-step instructions to install a car alarm yourself. By the end, you’ll feel confident knowing your car is safer than ever.
Keep reading, and let’s get your car protected today.
Credit: www.subaruoutback.org
Choosing The Right Car Alarm
Installing a car alarm helps protect your vehicle from theft. Choosing the right alarm is important for your safety and peace of mind.
Different alarms have different features. You need to pick one that fits your needs and budget.
Types Of Car Alarms
Car alarms come in various types. Each type offers different levels of security and convenience.
- Shock Sensors: Detect impacts on the car body.
- Door Sensors: Trigger alarm if doors open unexpectedly.
- Motion Sensors: Sense movement inside or near the vehicle.
- GPS Alarms: Track the car’s location if stolen.
- Keyless Entry Alarms: Allow remote locking and unlocking.
Features To Look For
Good car alarms have features that increase protection and ease of use. Look for these key features before buying.
| Feature | Benefit |
| Two-way Communication | Alerts you if alarm triggers |
| Remote Start | Start car engine from a distance |
| Shock Sensors | Detects bumps or impacts |
| Battery Backup | Keeps alarm active if power fails |
| GPS Tracking | Helps locate your car if stolen |
Budget Considerations
Car alarms vary widely in price. You should balance cost with the features you want.
- Basic alarms cost less but have fewer features.
- Mid-range alarms offer more sensors and alerts.
- High-end alarms include GPS tracking and remote controls.
- Installation costs can add to the total price.
- Consider long-term benefits over initial cost.
Credit: www.techwizardsolutions.co.ke
Preparing For Installation
Installing an alarm on your car helps protect it from theft. You need to prepare well before starting the installation.
Good preparation makes the process easier and safer. Start by gathering the right tools and materials.
Gathering Tools And Materials
Before installing the alarm, collect all tools and parts. This saves time and avoids interruptions.
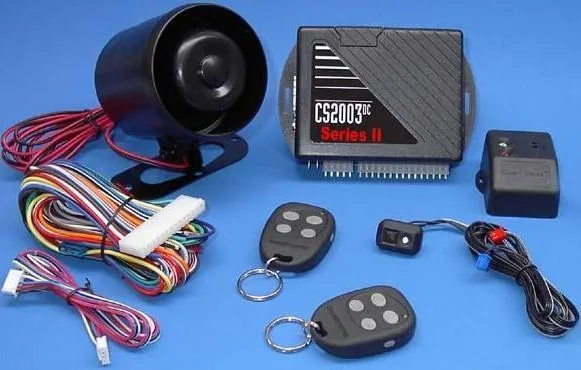
- Car alarm kit with wiring and control module
- Wire strippers and cutters
- Electrical tape and connectors
- Screwdrivers (flathead and Phillips)
- Multimeter or test light
- Zip ties for organizing wires
- Owner’s manual or wiring diagram of your car
Safety Precautions
Safety is very important when working on your car’s electrical system. Follow basic rules to avoid injury or damage.
- Disconnect the car battery before starting work
- Wear insulated gloves to protect from electric shock
- Work in a well-lit, dry area
- Avoid loose clothing that can get caught in parts
- Check all wires for damage before handling
Locating Vehicle Wiring
Find the right wires in your car to connect the alarm. Use your car’s manual to help identify them.
Common wires to locate include power, ground, door sensors, and ignition wires. Use a multimeter to test wires safely.
- Power wire: usually red, provides 12V when the ignition is on
- Ground wire: black or brown, connects to the car body
- Door sensor wires: trigger alarm if a door opens
- Ignition wire: signals when the car is started
Wiring The Alarm System
Wiring the alarm system is a key part of installing a car alarm. It makes sure all parts work together.
Follow the wiring steps carefully to avoid problems and keep your car safe.
Connecting Power And Ground
Power and ground wires give electricity to the alarm system. Connect them to the car’s battery.
Use a fuse on the power wire to protect the alarm from damage. Connect the ground wire to a clean metal part of the car.
- Locate the car battery and find the positive (+) terminal.
- Attach the alarm’s power wire to the positive terminal with a fuse.
- Find a metal part of the car frame for grounding.
- Secure the ground wire tightly to the metal surface.
Integrating With Door Sensors
Door sensors detect when a door opens. Connect them to the alarm to trigger alerts.
Find the wires for the car’s door switches. Connect these wires to the alarm system’s sensor inputs.
- Remove door panel to access door switch wires.
- Use a multimeter to find the correct wires.
- Connect the alarm sensor wires to these door wires.
- Test by opening doors to see if the alarm triggers.
Linking The Siren And Shock Sensors
The siren makes sound when the alarm activates. Shock sensors detect impacts or vibrations.
Connect the siren wire to the alarm output. Attach shock sensor wires to the alarm’s sensor input.
- Mount the siren under the hood, away from heat and water.
- Run the siren wire to the alarm control unit and connect it.
- Place shock sensors on solid parts of the car body.
- Connect shock sensor wires to the alarm’s sensor input pins.

Credit: www.amazon.ca
Installing The Control Module
The control module is the main part of a car alarm system. It connects all alarm parts and controls the signals.
Installing the module correctly is important for the alarm to work well and stay safe from damage.
Selecting The Mounting Location
Choose a hidden spot inside the car to mount the control module. It should be dry and away from heat.
A good place is under the dashboard or behind the glove box. Avoid areas near moving parts or water leaks.
- Keep the module hidden from view
- Pick a dry and cool location
- Avoid areas near pedals or vents
- Make sure wires can reach the module easily
Securing The Module
Use screws or strong double-sided tape to fix the module firmly in place. Loose modules can cause connection problems.
Make sure the module does not move when the car shakes or drives on rough roads.
- Use mounting screws if possible
- Double-sided tape works for smooth surfaces
- Check that wires are not strained or pinched
- Keep the module stable and secure
Testing Module Connections
After mounting, check all wires are connected correctly to the module. Loose connections can stop the alarm from working.
Test each function of the alarm system to confirm the module responds properly to signals.
- Check power and ground wires for tight fit
- Verify sensor wires connect to correct terminals
- Test remote control signals for proper response
- Ensure siren and lights activate as expected
Setting Up Remote Controls
Setting up remote controls is key to using your car alarm system. Remotes let you arm and disarm the alarm from a distance.
This guide covers pairing remotes, programming their functions, and testing their range.
Pairing Remotes With The Alarm
Pairing links your remote control to the car alarm. This lets the alarm recognize signals from your remote.
Start by putting the alarm system in pairing mode. This often involves pressing a button on the alarm unit or inside the car.
- Turn on the car’s ignition without starting the engine
- Press and hold the alarm’s programming button
- Press a button on the remote to pair it
- Wait for a signal like a beep or light flash
- Repeat for each remote you want to pair
Programming Remote Functions
Programming sets what each button on your remote does. Common functions include arming, disarming, and triggering the panic alarm.
Use the alarm’s manual to assign buttons. Some alarms let you customize functions by pressing buttons in a certain order.
- Enter programming mode on the alarm
- Press the button you want to program on the remote
- Choose the function for that button
- Confirm the setting by pressing the alarm’s button or turning the ignition off
Testing Remote Range
Testing remote range ensures your remote works from a good distance. This helps you know how far you can be from the car.
Walk away from the car while pressing buttons on the remote. Note the maximum distance the alarm responds.
- Start close to the car and press a button
- Walk backward and press the button repeatedly
- Stop when the alarm no longer responds
- Mark this as your remote’s range limit
Final Checks And Testing
After installing the car alarm, it is important to perform final checks. Testing ensures the alarm works correctly and protects your vehicle.
Follow these steps to verify the sensors and alarm functions. Fix any issues before you finish the installation.
Verifying Sensor Responses
Test each sensor to make sure it reacts properly. Sensors detect movement, opening doors, or glass breaking.
Activate each sensor one at a time. Watch if the alarm system receives the signal and responds.
- Open and close each door or trunk
- Tap on windows to test shock sensors
- Move inside the car to trigger motion sensors
- Check if each sensor triggers the alarm indicator
Triggering The Alarm
Activate the alarm manually using the remote or control panel. Confirm the siren sounds and lights flash.
Try triggering the alarm by opening doors or breaking sensors. The alarm should start immediately each time.
- Use the remote to arm the alarm
- Open a door or window to test response
- Check that the siren and lights activate
- Disarm the alarm to stop the siren
Troubleshooting Common Issues
If the alarm does not trigger correctly, check connections first. Loose wires cause many problems.
Make sure the sensors have power and the remote control batteries are good. Reset the system if needed.
- Check all wiring connections for tight fit
- Replace weak or dead batteries in remote
- Reset the alarm system by disconnecting power
- Test sensors again after fixes
Frequently Asked Questions
How Do I Choose The Right Car Alarm System?
Choose a car alarm based on your vehicle type and security needs. Consider features like remote control, shock sensors, and GPS tracking. Look for systems with easy installation and good reviews. Ensure compatibility with your car’s electrical system for best performance.
What Tools Are Needed To Install A Car Alarm?
Basic tools include screwdrivers, wire strippers, electrical tape, and a multimeter. You may also need pliers, a drill, and zip ties. Having these tools ready ensures a smooth installation and secure wiring. Follow the alarm manual for specific tool requirements.
Can I Install A Car Alarm Myself Safely?
Yes, if you follow the instructions carefully and have basic electrical knowledge. Disconnect the car battery before starting. Take time to route wires neatly and avoid damage. If unsure, consult a professional to ensure safety and proper functioning.
How Long Does It Take To Install A Car Alarm?
Installation typically takes 1 to 3 hours depending on your experience and alarm complexity. Simple systems install faster, while advanced alarms with GPS take longer. Planning and preparation can reduce installation time and prevent errors.
Conclusion
Installing a car alarm helps protect your vehicle from theft. Follow each step carefully for best results. Take your time and double-check all connections. A working alarm gives peace of mind and safety. Regularly test the system to ensure it works well.
Protect your car and enjoy safer drives. Simple steps can make a big difference. Stay safe and secure on the road.