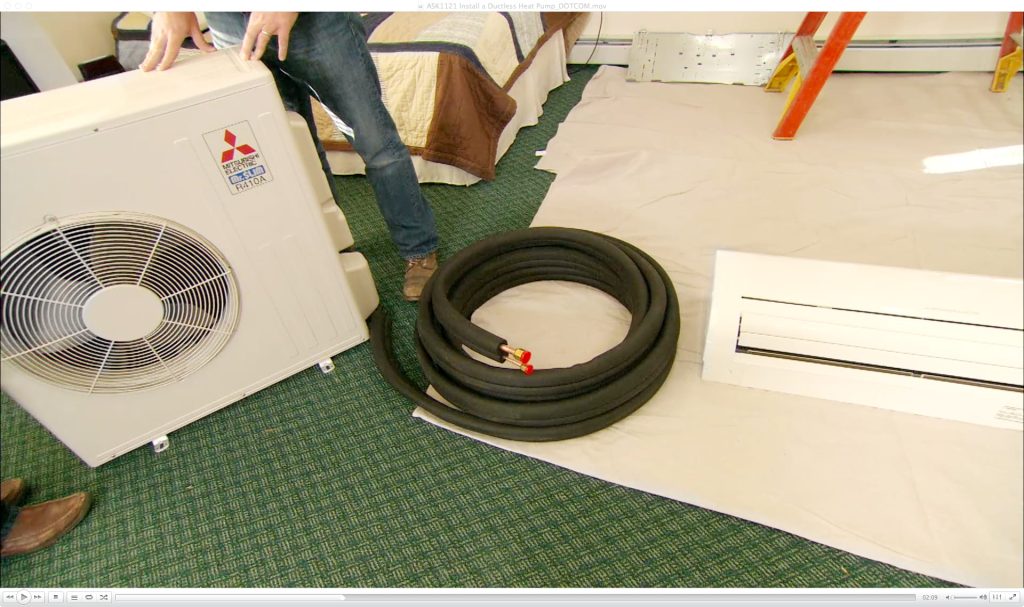
Are you ready to upgrade your home’s comfort and save on energy bills? Installing a heat pump air conditioner can be a smart choice for cooling and heating your space efficiently.
But how do you get started? This guide will walk you through each step, making the process simple and clear. By the end, you’ll feel confident handling the installation yourself or knowing exactly what to expect from a professional. Keep reading to discover the easy way to bring year-round comfort to your home.
Benefits Of Heat Pump Air Conditioners
Heat pump air conditioners offer an efficient way to heat and cool your home. They work by moving heat instead of generating it. This method saves energy and reduces bills.
Many people choose heat pumps for their eco-friendly features and reliable performance all year round. They can be a smart investment for comfort and savings.
Energy Efficiency
Heat pump air conditioners use less electricity than traditional heating or cooling systems. They transfer heat instead of creating it, which lowers energy use. This makes them more cost-effective and better for the environment.
Year-round Comfort
Heat pumps can both heat and cool your home. They provide warm air in winter and cool air in summer. This dual function means you only need one system for all seasons.
Lower Carbon Footprint
Because heat pumps use less energy and no fuel combustion, they produce fewer carbon emissions. Using a heat pump helps reduce your home’s impact on the planet.
Easy Maintenance
Heat pump systems require less upkeep than many other HVAC units. Regular filter changes and occasional professional checks keep them running smoothly. This ease of care saves time and money.
Cost Savings Over Time
Initial installation costs for heat pumps can be higher. Still, lower energy bills and fewer repairs save money over the years. Many users find the total cost worthwhile.
- Reduced electricity bills
- Fewer repairs needed
- Longer system lifespan
- Potential rebates and incentives
Quiet Operation
Heat pump air conditioners run quietly compared to traditional heating or cooling machines. This makes your home environment more peaceful and comfortable.
| Benefit | Detail |
| Energy Efficiency | Uses less electricity, saves money |
| Year-Round Use | Heats and cools with one system |
| Lower Emissions | Reduces carbon footprint |
| Maintenance | Simple care and fewer repairs |
| Quiet | Runs with low noise |
Selecting The Right Heat Pump System
Choosing the right heat pump system is important for comfort and energy savings. The right system fits your home and climate.
Consider your needs before buying a heat pump air conditioner. This guide helps you pick the best system.
Types Of Heat Pump Systems
There are several types of heat pump systems. Each type works differently and suits different homes.
- Air-Source Heat Pumps:These take heat from outside air. They work well in mild climates.
- Ground-Source Heat Pumps (Geothermal):These use the earth’s stable temperature. They are very efficient but cost more.
- Mini-Split Heat Pumps:These have no ducts and cool or heat individual rooms. Good for homes without ductwork.
- Dual-Fuel Heat Pumps:These combine a heat pump with a gas furnace. They switch between fuel types for best performance.
Factors To Consider
Pick a heat pump system based on your home size, climate, and budget. These factors affect how well the system works.
- Climate:Cold areas may need ground-source or dual-fuel systems.
- Home Size:Larger homes may need bigger or multiple units.
- Energy Efficiency:Look for high SEER and HSPF ratings for lower bills.
- Installation Cost:Some systems cost more to install but save money over time.
- Space Availability:Ground-source pumps need yard space for underground loops.
- Noise Levels:Some units run quieter than others, important for bedrooms.
Tools And Materials Needed
Installing a heat pump air conditioner requires the right tools and materials. This helps ensure the job is done safely and correctly.
Gathering everything before you start saves time and avoids delays during installation.
Basic Tools
Several common tools help with mounting and connecting the heat pump units.
- Drill with various drill bits
- Screwdrivers (flathead and Phillips)
- Adjustable wrench
- Pipe cutter for copper tubing
- Level to ensure proper alignment
- Measuring tape
- Wire stripper and cutter
Installation Materials
These materials are necessary to connect and secure the heat pump system.
| Material | Purpose |
| Copper refrigerant tubing | Connects indoor and outdoor units |
| Insulation tape | Prevents energy loss on tubing |
| Electrical wires | Power supply and control connections |
| Mounting brackets | Secure outdoor unit to wall or ground |
| Sealant or caulk | Seal holes to keep weather out |
| Drain pipe | Directs condensate water away |
Safety Equipment
Wear safety gear to protect yourself during installation.
- Safety goggles to protect eyes
- Work gloves for hand safety
- Dust mask if drilling into walls
- Hearing protection if using loud tools

Credit: aquariushomeservices.com
Preparing For Installation
Installing a heat pump air conditioner requires careful preparation. Planning helps ensure the system works well and lasts long.
Before starting, check the site and follow safety rules. This guide covers what to do first.
Assessing The Installation Site
Choose a place that allows good airflow around the unit. Avoid spots near heat sources or direct sunlight.
- Check for enough space around the outdoor unit.
- Make sure the wall or floor can support the unit’s weight.
- Keep the unit away from noise-sensitive areas.
- Ensure easy access for maintenance and repairs.
- Look for a nearby power supply that meets the unit’s needs.
Safety Precautions
Safety is key during installation. Follow these precautions to protect yourself and others.
| Precaution | Reason |
| Turn off electricity | Prevent electric shock |
| Wear protective gear | Protect eyes, hands, and skin |
| Use proper tools | Avoid accidents and damage |
| Follow manufacturer instructions | Ensure safe and correct setup |
| Work with a partner | Help in case of emergency |
Installing The Indoor Unit
Installing the indoor unit of a heat pump air conditioner is key for good cooling and heating. The process needs care to ensure the unit works well and lasts long.
Follow the steps carefully to mount the unit and connect the electrical wires safely. This guide covers these two important parts.
Mounting The Unit
First, choose a strong wall to hold the indoor unit. The wall must support the weight and allow good airflow around the unit.
Use the mounting plate that comes with the unit. Fix it tightly with screws and make sure it is level. This keeps the unit stable and prevents vibrations.
- Find a wall without direct sunlight or heat sources
- Install the mounting plate securely with screws
- Check the plate is level using a spirit level
- Leave space around the unit for air circulation
Connecting Electrical Wires
Turn off the main power before working with electrical wires. This prevents shocks and accidents during installation.
Connect the wires from the indoor unit to the power supply and control system. Follow the wiring diagram in the manual carefully to avoid mistakes.
- Use the correct wire size for safety
- Match wire colors as shown in the manual
- Secure all wire connections with terminal blocks
- Double-check connections before turning power on

Credit: aquariushomeservices.com
Installing The Outdoor Unit
Installing the outdoor unit of a heat pump air conditioner requires careful planning. The right placement and secure fixing help the unit work efficiently. This guide covers key points for positioning and securing the outdoor unit.
Follow the instructions below to ensure your outdoor unit is stable and performs well.
Positioning The Unit
Choose a flat, stable surface to place the unit. Avoid areas with direct sunlight or strong winds. The unit needs space around it for air flow and maintenance access.
- Place the unit at least 12 inches away from walls or obstacles.
- Ensure the area is free from leaves, dust, and debris.
- Keep the unit away from noise-sensitive areas to reduce disturbance.
- Check local building codes for height and distance requirements.
- Position near electrical and refrigerant lines for easier connections.
Securing The Unit
Secure the outdoor unit properly to prevent movement or damage. Use bolts and brackets designed for outdoor use. The unit must stay level to function correctly.
| Item | Purpose | Material |
|---|---|---|
| Mounting Brackets | Hold the unit firmly | Galvanized steel or aluminum |
| Anchor Bolts | Fix brackets to the ground or wall | Stainless steel |
| Vibration Pads | Reduce noise and vibration | Rubber or neoprene |
| Leveling Tools | Ensure unit is flat | Bubble level or laser level |
Connecting Refrigerant Lines
Connecting refrigerant lines is a key part of installing a heat pump air conditioner. Proper connections ensure the system runs efficiently and safely.
This section covers bending and flaring pipes, and sealing connections to prevent leaks and damage.
Bending And Flaring Pipes
Bending pipes correctly avoids kinks that block refrigerant flow. Flaring creates a smooth, tight seal for connections.
- Measure and mark the pipe where it needs to bend.
- Use a pipe bender to make a gentle curve without flattening the pipe.
- Cut the pipe end cleanly with a pipe cutter.
- Use a flaring tool to shape the pipe end into a cone.
- Check the flare for smoothness and even shape before connecting.
Sealing Connections
Sealing ensures no refrigerant escapes. Use the right materials and tighten connections just enough.
| Material | Purpose | Notes |
| Refrigerant oil | Lubricates flare and fitting | Apply lightly on flare surface |
| Torque wrench | Tightens fittings to proper level | Follow manufacturer torque specs |
| Leak detector | Checks for leaks after connection | Use soap solution or electronic detector |
Electrical Connections
Installing a heat pump air conditioner needs careful electrical work. Proper connections keep the system safe and working well.
Follow the correct steps to connect power and test the electrical parts before use.
Connecting To Power Supply
Turn off the main power before starting any electrical work. This keeps you safe from shocks.
Use the right wires and circuit breakers for your heat pump model. Check the manual for power needs.
- Use copper wires for good conductivity
- Install a dedicated circuit breaker
- Connect wires to correct terminals
- Follow local electrical codes
- Secure all wire connections tightly
Testing Electrical Components
After wiring, check all parts to make sure they work. This prevents problems later.
Use a multimeter to test voltage and continuity. Confirm the compressor and fan receive power.
- Test voltage at the power terminals
- Check wire continuity for breaks
- Verify capacitor function
- Inspect circuit breaker operation
- Listen for normal motor sounds
Testing The System
After installing a heat pump air conditioner, testing the system is essential. This step ensures the unit works safely and efficiently.
Testing helps find issues like leaks or poor performance before regular use starts.
Checking For Leaks
Leaks can cause refrigerant loss and reduce system efficiency. Check all connections and pipes carefully.
Use a leak detector or soapy water to find bubbles that show leaks.
- Inspect all joints and fittings
- Apply soapy water to suspect areas
- Look for bubbles or foam forming
- Use an electronic leak detector for accuracy
- Fix leaks immediately before proceeding
Ensuring Proper Functionality
Test the heat pump in both heating and cooling modes. Check if it reaches the right temperatures.
Listen for unusual noises and watch for steady airflow. Make sure the thermostat controls respond correctly.
- Turn on the system and set cooling mode
- Measure the air temperature from vents
- Switch to heating mode and check temperature again
- Listen for strange sounds or vibrations
- Verify the thermostat changes settings properly

Credit: www.youtube.com
Maintenance Tips
Keeping your heat pump air conditioner in good shape ensures it works well. Regular maintenance helps save energy and extend the unit’s life.
This guide covers simple cleaning and seasonal checks to keep your system running smoothly.
Regular Cleaning
Dust and dirt can block airflow and reduce efficiency. Clean parts regularly to avoid problems.
- Turn off the power before cleaning.
- Wipe the exterior with a damp cloth.
- Clean or replace air filters every month.
- Remove debris from outdoor units.
- Use a soft brush to clean coils.
Seasonal Checks
Check your heat pump before summer and winter to ensure it handles changing weather.
| Check Item | What to Do | Frequency |
| Refrigerant Level | Inspect and refill if low | Yearly |
| Thermostat Settings | Test and adjust for comfort | Every season |
| Electrical Connections | Tighten loose wires | Yearly |
| Drainage System | Clear clogs to prevent water damage | Every 6 months |
| Fan Operation | Check for noise and smooth running | Every season |
Frequently Asked Questions
What Tools Are Needed To Install A Heat Pump Air Conditioner?
You need a drill, screwdriver, level, wrench, tubing cutter, vacuum pump, and electrical tools. Safety gear like gloves is essential. Having these tools ensures a smooth, efficient installation.
How Long Does It Take To Install A Heat Pump Air Conditioner?
Installation typically takes 4 to 8 hours. It depends on the system complexity and home layout. Professional help can speed up the process and ensure proper setup.
Can I Install A Heat Pump Air Conditioner Myself?
DIY installation is possible if you have technical skills. However, professional installation is recommended for safety and warranty reasons. Incorrect setup may reduce efficiency and cause damage.
What Maintenance Is Required After Installing A Heat Pump?
Regularly clean or replace filters every 1-3 months. Inspect coils and outdoor units for debris. Schedule annual professional servicing to keep the system efficient and prolong its lifespan.
Conclusion
Installing a heat pump air conditioner can save energy and money. Start by choosing the right unit for your space. Follow each step carefully to avoid mistakes. Use proper tools and safety measures during the process. Check that all connections are secure and tight.
Test the system to ensure it works well. Regular maintenance keeps your unit running smoothly. Enjoy cool air in summer and warmth in winter. This guide makes the installation easier and stress-free. Take your time and feel confident with each step.