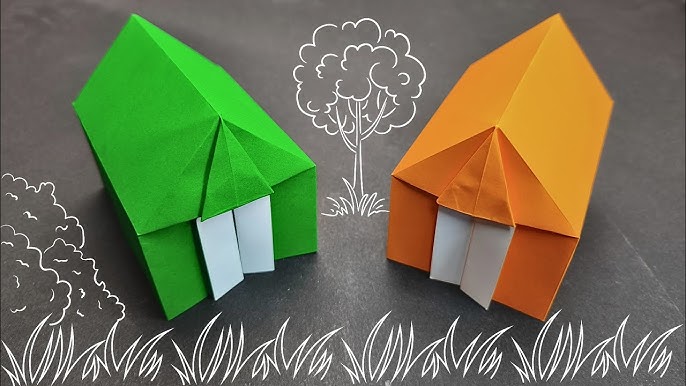
Have you ever wanted to create something simple, fun, and practical with just a piece of paper? Making a paper tent is easier than you think, and it’s a great way to spark your creativity while enjoying a hands-on activity.
Whether you’re looking for a cool decoration, a quick craft for kids, or a clever way to organize small items, this guide will walk you through every step. Keep reading, and you’ll discover how to turn a plain sheet of paper into a neat little tent in minutes.
Ready to impress yourself with this easy craft? Let’s get started!

Credit: www.youtube.com
Materials Needed
Making a paper tent is a simple and fun craft. You only need a few basic materials. These items are easy to find at home or in a store.
Gathering the right materials helps you build a strong and neat paper tent. Below are the materials you will need.
Paper
Choose a sheet of paper that is sturdy but easy to fold. Cardstock or construction paper works well. Avoid very thin paper because it can tear easily.
Scissors
Scissors help you cut the paper cleanly. Use scissors that are sharp enough to cut without ripping the paper.
Tape Or Glue
Use tape or glue to hold the paper tent together. Clear tape is easy to use and clean. Glue works well but needs time to dry.
Ruler And Pencil
A ruler helps you measure and fold the paper precisely. A pencil lets you mark the paper before cutting or folding.
- Ruler for straight lines
- Pencil for marking folds and cuts
Optional Decorations
You can decorate your paper tent with these items:
| Item | Use |
| Markers | Color and design |
| Stickers | Add fun shapes |
| Glitter | Make it sparkle |
Choosing The Right Paper
Making a paper tent starts with picking the right paper. The paper must be strong enough to stand on its own.
Choosing the correct paper helps your tent look neat and last longer. Not all paper types work well for this craft.
Paper Weight And Thickness
Paper weight affects how sturdy your tent will be. Thick paper holds shape better than thin paper.
Look for paper labeled as cardstock or heavy paper. These types are best for making paper tents.
- Light paper may fold easily and collapse
- Heavy paper keeps the tent stable
- Cardstock between 80-110 lb is ideal
Paper Size And Shape
Choose paper size that fits your desired tent size. Larger paper makes bigger tents.
Square or rectangular sheets work best for folding and cutting. Avoid irregular shapes.
- Use standard 8.5 x 11 inch paper for small tents
- Try larger sheets for bigger projects
- Keep paper edges straight and smooth
Paper Texture And Finish
Paper texture changes how your tent feels and looks. Smooth paper is easier to fold.
Matte finish paper prevents glare and looks clean. Glossy paper can be slippery to work with.
- Choose smooth, matte paper for better folding
- Rough texture may cause uneven folds
- Glossy paper might tear more easily
Color And Pattern
Pick colors or patterns that suit your project style. Plain colors show folds clearly.
Patterns add fun but can hide fold lines. Choose light colors for easy folding.
- Solid colors highlight your tent shape
- Light shades make folding easier to see
- Patterns add style but may hide details
Folding The Tent Base
Making a paper tent is a fun and simple activity. It requires a few steps to fold the base correctly.
The tent base is the foundation of your paper tent. Ensure you fold it properly for stability.
Gather Your Materials
Before you start, have all materials ready. This ensures a smooth process.
- A4 paper sheet
- Flat surface to work on
- Ruler for accurate folds
Fold The Paper In Half
Take the paper and fold it in half lengthwise. Ensure the edges align perfectly.
Create The Tent Shape
Fold the corners to the center line. This forms the triangular tent shape.
Final Adjustments
Check your folds for accuracy. Make small adjustments if needed.
| Action | Result |
| Fold in half | Creates base line |
| Fold corners | Forms tent shape |
| Adjust edges | Ensures stability |
Creating The Tent Roof
The roof is the most important part of your paper tent. It protects the inside and gives the tent its shape.
Making the roof requires careful folding and cutting to fit the base perfectly.
Cut The Paper To Size
Start by choosing a paper size that matches your tent base. The roof should be slightly larger than the base.
Use a ruler and scissors to cut the paper into a square or rectangle shape.
Fold The Roof Into A Triangle
Fold the paper in half diagonally to make a triangle. This fold creates the peak of the tent roof.
Make sure the edges line up neatly to get a sharp fold.
Create Flaps To Attach The Roof
Unfold the triangle and cut small flaps along the edges. These flaps will help glue the roof to the tent base.
- Cut 1-inch flaps on each side
- Do not cut past the fold lines
- Make sure flaps are even in size
Glue The Roof To The Tent Base
Apply glue to the flaps and press them onto the tent base. Hold the paper until it sticks firmly.
Check that the roof stands straight and fits well over the base.
Assembling The Tent Parts
Making a paper tent is fun and easy. You need to put the parts together carefully.
Follow the steps to join each part. This helps the tent stand properly and look nice.
Folding The Tent Walls
Start by folding the paper along the marked lines. Make sharp creases to shape the walls.
Fold all sides evenly so the tent stands straight. Press the folds firmly with your fingers.
- Fold each wall on the dotted lines
- Make sure all edges line up
- Press the folds to keep the shape
Joining The Side Flaps
Use glue or tape to attach the side flaps. This connects the walls of the tent securely.
Hold the flaps for a few seconds to make sure they stick well. Check that the tent shape forms correctly.
- Apply glue on the flaps carefully
- Press the flaps to the inside walls
- Wait until the glue dries before moving
Attaching The Tent Roof
Place the roof piece on top of the folded walls. Align it with the edges for a neat fit.
Secure the roof by gluing or taping the tabs. Make sure the roof holds firmly on the tent body.
- Align roof edges with the walls
- Apply glue or tape to roof tabs
- Press tabs until fixed in place
Adding The Tent Base
Attach the base to the bottom of the tent. This helps the tent stand and stay balanced.
Glue the base evenly around the bottom edges. Check that the tent stands without falling over.
- Apply glue around the base edge
- Fit the base to the bottom carefully
- Hold until the base is firm
Adding Decorative Touches
Making a paper tent is fun, and you can make it look special. Adding decorations gives your paper tent a unique style.
Use simple ideas to add color, texture, and patterns. This makes your paper tent more attractive and interesting.
Use Colored Paper
Choose colored paper to make your tent stand out. You can pick one color or mix many colors.
Colored paper gives your tent a bright and happy look. It is easy to find and use.
- Red and yellow create a warm look
- Blue and green give a cool feel
- Pastel colors make it soft and gentle
Add Patterns With Markers
Use markers to draw patterns on the paper tent. Simple shapes like dots, stripes, and stars work well.
Patterns make the tent look lively. You can create your own designs or copy ones you like.
- Draw small dots for a polka-dot effect
- Use stripes for a classic look
- Try stars or hearts for fun shapes
Attach Stickers Or Cut-outs
Stickers and paper cut-outs add extra decoration. Pick shapes like flowers, animals, or geometric designs.
Glue these decorations on your paper tent to make it more interesting. They add texture and color easily.
- Use flower stickers for a natural look
- Paper stars add a festive touch
- Geometric cut-outs bring a modern style
Use Glitter Or Sequins
Glitter and sequins make your paper tent sparkle. Use them to highlight edges or patterns.
Apply glue first, then sprinkle glitter or place sequins. Let it dry well to avoid mess.
- Highlight tent edges with glitter
- Create shiny patterns with sequins
- Use glitter glue for easy application
Add Small Paper Accessories
Make small paper accessories like flags or flowers. Attach them to your paper tent for extra detail.
These little touches make your tent look creative and fun. Use tape or glue to fix them securely.
- Cut small flags and tape them on top
- Create paper flowers to stick on sides
- Make tiny paper animals for decoration
Tips For Durability
Making a paper tent is simple and fun. To keep it strong, follow some key tips. These tips help your paper tent last longer and hold its shape well.
Use the right materials and folding methods. Also, protect your tent from water and too much pressure. Let’s explore ways to make your paper tent durable.
Choose Strong Paper
Pick thick paper or cardstock. Thin paper tears easily and folds lose shape fast. Strong paper holds better and resists wear and tear.
Reinforce The Edges
Edges and corners get weak first. Add tape or glue strips along them. This prevents tearing and keeps the tent’s frame firm.
Use Folding Techniques That Add Strength
- Make sharp, clean folds to keep the shape
- Fold edges inward for extra support
- Create double layers at stress points
- Press folds firmly with a ruler or bone folder
Protect From Moisture
Paper weakens when wet. Keep your tent dry by applying a light coat of clear glue or spray sealant. This layer blocks water and adds firmness.
Support The Structure Inside
| Support Method | Benefits |
| Insert small sticks or straws | Keeps tent upright and stable |
| Add folded cardboard pieces | Reinforces weak spots and walls |
| Use tape at joints | Prevents parts from moving or falling |

Credit: parade.com
Creative Variations
Paper tents are simple to make and fun to customize. You can try many creative variations to make your paper tent unique.
These variations add style and function to your paper tent. You can use different designs, colors, and decorations.
Use Colored Or Patterned Paper
Instead of plain paper, use colored or patterned sheets. This makes your paper tent more attractive and eye-catching.
You can match the paper color to a theme or event. Patterns like stripes, dots, or floral add fun details.
Add Handwritten Or Printed Labels
Write names, messages, or drawings on your paper tent. This personal touch makes each tent special.
You can print labels on a computer or write with colorful markers. Use neat handwriting to keep it clear.
Create Mini Paper Tent Garlands
Make many small paper tents and string them together. This creates a fun garland to decorate a room or table.
Use different colors or patterns for each tent. Hang the garland across windows, walls, or shelves.
Incorporate Cut-out Windows
Cut small windows or shapes on the sides of your paper tent. This adds a creative, decorative effect.
You can place colored tissue paper behind the windows to let light shine through. This makes your tent look cozy.
Use Different Paper Textures
Try using different paper types like cardstock, construction paper, or recycled paper. Each texture gives a new feel.
Thicker paper makes the tent sturdier. Thin paper is easier to fold and decorate.
Decorate With Stickers Or Stamps
Add stickers or use stamps to decorate your paper tent. This is an easy way to add patterns or images.
Choose stickers that fit your theme. Use stamps with ink pads for a neat design.

Credit: www.youtube.com
Frequently Asked Questions
How Do You Start Making A Paper Tent?
Begin by folding a rectangular sheet in half lengthwise. Then fold the edges to form a triangle shape. This creates the basic tent structure. Secure folds with tape or glue for stability. Use sturdy paper for a durable tent.
What Materials Are Needed To Make A Paper Tent?
You need a sheet of sturdy paper, scissors, and adhesive like tape or glue. Optional materials include markers for decoration. Using thicker paper helps the tent hold shape better. Avoid thin paper to prevent collapsing.
Can Kids Safely Make Paper Tents At Home?
Yes, paper tents are safe and simple craft projects for kids. Supervision is recommended during cutting. This activity encourages creativity and fine motor skills. It’s a fun indoor activity that requires minimal materials.
How Long Does It Take To Make A Paper Tent?
Making a basic paper tent usually takes 5 to 10 minutes. Time varies with complexity and decoration. Beginners may take longer but it’s a quick, enjoyable craft. Practicing folds speeds up the process.
Conclusion
Making a paper tent is simple and fun. It only needs a few folds and some patience. You can use it for play, decoration, or learning. Try different paper sizes and colors to see what works best. Practice helps you improve your folding skills.
Keep your paper clean and flat for better results. Enjoy creating your own paper tent today. It’s a great way to spend time and be creative. Give it a try and see how easy it can be!