Are you ready to upgrade your kitchen with a sleek wall oven but unsure where to start? Mounting a wall oven might seem tricky, but with the right steps, you can do it yourself and save time and money.
Imagine having a stylish oven perfectly fitted at eye level, making cooking easier and your kitchen more modern. In this guide, you’ll discover simple, clear instructions to mount your wall oven safely and efficiently. Keep reading, and you’ll gain the confidence to transform your kitchen space with ease.
Preparation Before Installation
Mounting a wall oven needs careful preparation. This helps the process go smoothly.
Check everything before you start. This saves time and avoids mistakes.
Gathering Necessary Tools
Collect all tools before you begin the installation. This keeps you organized and ready.
- Screwdrivers (flat and Phillips)
- Drill with bits
- Measuring tape
- Level tool
- Stud finder
- Safety gloves and glasses
- Wrench or pliers
- Electrical tester
Checking Wall Oven Specifications
Read the oven manual to learn its size and power needs. This helps avoid problems later.
Note the weight, electrical requirements, and ventilation needs. These affect installation safety.
- Oven dimensions (height, width, depth)
- Electrical voltage and amperage
- Required circuit breaker size
- Ventilation or cooling instructions
- Mounting hardware included
Measuring The Installation Space
Measure the wall space where the oven will fit. Double-check width, height, and depth.
Check for studs, electrical outlets, and nearby cabinets. This ensures a safe, proper fit.
- Measure the cabinet opening width and height
- Check wall depth and clearance space
- Locate wall studs with stud finder
- Mark electrical outlet positions
- Ensure no plumbing or wires block the area
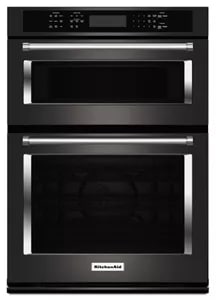
Credit: www.kitchenaid.ca
Safety Precautions
Mounting a wall oven requires careful attention to safety. Taking proper precautions helps avoid accidents.
Always prepare your workspace and equipment before starting the installation process.
Turning Off Power Supply
Always switch off the power supply before working on the oven. This prevents electric shocks and injuries.
- Locate the circuit breaker for the oven’s power line.
- Turn off the breaker completely.
- Use a voltage tester to confirm no current is running.
- Label the breaker to warn others not to turn it on.
Using Protective Gear
Wear the right protective gear to keep safe while installing the wall oven.
| Protective Gear | Purpose |
|---|---|
| Safety Gloves | Protect hands from sharp edges and electrical contacts |
| Safety Glasses | Shield eyes from dust and debris |
| Closed-Toe Shoes | Protect feet from falling tools or heavy parts |
| Dust Mask | Prevent inhaling dust during wall modifications |
Removing Old Oven
Taking out an old wall oven is a careful process. This guide helps you do it safely.
Before installing a new oven, the old one must be removed first. Follow these steps for a smooth process.
Disconnecting Electrical Connections
First, ensure the power is off at the main circuit breaker. This prevents any electrical hazards.
Locate the electrical junction box. Disconnect the wires carefully, taking note of their connections.
- Turn off power at the main breaker
- Open the junction box cover
- Disconnect and label the wires
- Use a voltage tester to confirm no power
Safely Taking Out The Existing Oven
Once the power is off and wires are disconnected, you can remove the oven. Be sure to have help for this step.
Ovens are heavy, so lift carefully. Use proper lifting techniques to avoid injury.
- Unscrew the oven from its mounting brackets
- Gently slide the oven out of the wall
- Ask a friend for help to lift the oven
- Place the oven on a sturdy surface for disposal
Mounting The Wall Oven
Mounting a wall oven requires care and attention. You need to make sure it is secure and level.
This guide will help you install the mounting bracket and secure the oven to the wall safely.
Installing The Mounting Bracket
First, find the right height for the oven on the wall. Use a level to mark the spots for the bracket.
Attach the mounting bracket to the wall studs using screws. This ensures the oven will hold firmly.
- Locate wall studs with a stud finder
- Mark screw holes on the wall
- Drill pilot holes for screws
- Attach bracket using long screws
- Check bracket is level before tightening
Securing The Oven To The Wall
After the bracket is installed, carefully lift the oven and place it on the bracket. Make sure it fits tightly.
Use screws to fasten the oven to the wall through the bracket. Double-check the oven is stable and level.
- Lift oven with help to avoid damage
- Slide oven onto mounting bracket
- Align screw holes on the oven and bracket
- Insert screws and tighten securely
- Test oven stability by gentle shaking
Connecting Electrical Wiring
Connecting electrical wiring is key to safely installing a wall oven. You must follow correct wiring steps to avoid hazards. Proper connections ensure the oven works well and stays safe.
This guide covers matching wire colors and ensuring proper grounding. These points help you connect the oven’s wiring correctly and safely.
Matching Wire Colors
Wire colors help you connect the oven to your home wiring. Each color has a specific role. You must connect wires with matching colors to avoid electric problems.
- Black wires are usually hot wires carrying current.
- Red wires can also be hot, often for a second live wire.
- White wires are neutral wires, returning current safely.
- Green or bare copper wires are ground wires for safety.
Check your oven’s manual for specific wire color codes. Use wire nuts to secure connections. Make sure all wires are tight and no copper is exposed.
Ensuring Proper Grounding
Grounding protects you from electric shocks. It directs stray electricity safely into the earth. Proper grounding is a must for your wall oven installation.
| Grounding Component | Purpose |
|---|---|
| Ground Wire | Connects oven to home’s grounding system |
| Metal Junction Box | Ensures oven is grounded if metal |
| Ground Screw | Fastens ground wire securely |
Attach the ground wire to the oven’s grounding screw. Connect the other end to your home’s grounding system. Check that all grounding points are tight and free of paint or rust.
Final Adjustments
After installing the wall oven, making final adjustments is important. These steps ensure your oven works safely and looks good.
This section covers leveling the oven and testing its functions. Proper care here avoids future problems.
Leveling The Oven
Leveling the oven keeps it stable and ensures even cooking. Use a spirit level tool to check.
Adjust the oven by turning the leveling legs or screws. Make small changes until it sits perfectly level.
- Place the level on the oven’s bottom edge.
- Check from side to side and front to back.
- Turn adjustment screws to fix any tilt.
- Recheck the level after each adjustment.
Testing The Oven Functions
Test the oven to confirm all controls and heating elements work well. This step ensures safety and performance.
Turn on the oven and try different settings. Listen for unusual sounds and watch for error messages.
- Set the oven to bake mode and check if it heats up.
- Try the broil setting and listen for the burner ignition.
- Use the timer and see if it counts down correctly.
- Check the oven light and door latch function.
Troubleshooting Common Issues
Mounting a wall oven can sometimes lead to problems that stop it from working right. Knowing how to spot and fix these issues helps you save time and money.
This guide covers common problems like the oven not heating, electrical issues, and alignment troubles.
Oven Not Heating
If your oven does not heat up, check if the power is on. Sometimes, the oven is plugged in but not switched on.
Look at the heating elements for damage or signs of wear. Damaged elements need replacement to heat properly.
- Verify the oven is plugged in and power is on
- Inspect heating elements for burns or breaks
- Check the oven temperature settings
- Test the oven with a different cooking mode
Electrical Problems
Electrical issues are common when mounting a wall oven. Loose connections or faulty wiring stop the oven from working.
Always turn off the power before inspecting wires. Look for loose, burnt, or disconnected wires behind the oven.
- Switch off the breaker before checking the oven
- Check all wire connections for tightness
- Look for signs of burning or damage
- Use a voltage tester to ensure power flow
- Call a professional if unsure about electrical repairs
Alignment Issues
Improper alignment can cause the oven door not to close fully. This leads to heat loss and uneven cooking.
Check if the oven is level and fits well in the wall opening. Adjust mounting brackets or screws to fix alignment.
- Use a level tool to check oven positioning
- Adjust mounting screws to shift the oven
- Make sure the oven door closes without gaps
- Inspect the door hinges for damage or wear

Credit: www.lowes.com
Maintenance Tips
Proper maintenance of a wall oven ensures it lasts longer and works efficiently. Follow these tips to keep your oven in great condition.
Regular cleaning and inspection are key parts of maintaining your wall oven. Learn how to care for your appliance effectively.
Cleaning After Installation
After installing your wall oven, it’s important to clean it thoroughly. This removes any dust or debris from the installation process.
Use a soft cloth and mild cleaner to wipe down the exterior and interior. Ensure the oven is cool before starting.
- Remove any packaging materials inside the oven
- Wipe surfaces with a damp cloth
- Check for any leftover installation dust
Regular Inspection
Inspect your wall oven regularly to catch any potential issues early. This helps maintain its performance and safety.
Look for signs of wear and tear on the oven door and seals. Check that the oven heats evenly and the controls work smoothly.
- Check the door seals for damage
- Ensure the oven heats evenly
- Test the controls regularly

Credit: www.frigidaire.com
Frequently Asked Questions
How Do I Prepare The Wall For Mounting An Oven?
First, measure the wall opening to fit the oven size precisely. Ensure the wall studs support the oven’s weight. Install electrical wiring and outlets according to local codes before mounting. Double-check measurements and structural support to avoid future issues.
What Tools Are Needed To Mount A Wall Oven?
You will need a drill, screwdriver, level, tape measure, stud finder, and mounting brackets. Safety gear like gloves and goggles is also recommended. Having these tools ready ensures a smooth and safe installation process.
Can I Mount A Wall Oven Myself Safely?
Yes, if you follow the manufacturer’s instructions closely. Ensure you have the right tools and support. Electrical connections should comply with local codes. If unsure, hire a professional to avoid safety risks and improper installation.
How Do I Ensure My Wall Oven Is Level?
Use a carpenter’s level across the oven’s top edge during installation. Adjust mounting brackets or shims until the oven is perfectly horizontal. A level oven ensures even cooking and avoids door alignment issues.
Conclusion
Mounting a wall oven can improve your kitchen’s look and function. Follow each step carefully to keep the process safe and smooth. Double-check measurements and secure all parts tightly. Take your time and ask for help if needed. Enjoy cooking with your new oven once it’s set up properly.
This simple project can make a big difference in your home.