Are you ready to tackle the task of removing your washer and dryer but don’t know where to start? You’re in the right place.
Taking these heavy appliances out might seem tricky, but with the right steps, you can do it safely and without hassle. Imagine saving time, avoiding damage, and feeling confident as you clear space for your next project. Keep reading, and you’ll discover simple, clear instructions that make the whole process smooth and stress-free.
Your laundry room makeover starts here.
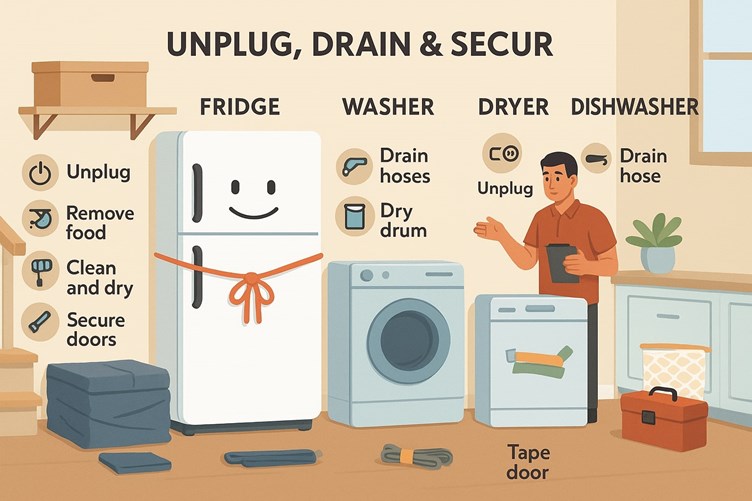
Credit: www.imoving.com
Prepare The Area
Before you remove your washer and dryer, it is important to prepare the area. This helps you work safely and avoid damage.
Start by making sure you have enough space and the right tools ready. This makes the removal process easier and quicker.
Clear Surrounding Space
Clear the area around your washer and dryer. This gives you room to move and prevents accidents.
- Remove any laundry baskets or items on top of the machines
- Move nearby furniture away from the machines
- Vacuum or sweep the floor to avoid slipping
- Make sure pets and children stay away from the area
Gather Necessary Tools
Having the right tools ready makes removing your washer and dryer safer and easier. Keep everything close by before you start.
| Tool | Purpose |
| Adjustable wrench | Disconnect water hoses |
| Screwdriver | Remove screws and panels |
| Bucket | Catch water from hoses |
| Work gloves | Protect your hands |
| Towel or rag | Clean up spills |

Credit: www.espares.co.uk
Turn Off Power And Water
Before removing your washer and dryer, you must turn off the power and water. This step keeps you safe and prevents damage.
Taking these precautions helps avoid electric shocks and water leaks during removal.
Unplug The Appliances
Locate the power cords of your washer and dryer. Then, carefully unplug them from the wall outlets. Do not pull the cords; grip the plug firmly.
- Find the power outlet behind the appliances.
- Switch off the circuit breaker if needed.
- Unplug the washer and dryer plugs safely.
Shut Off Water Supply
Turn off the water valves connected to your washer. This stops water flow and prevents leaks when disconnecting hoses.
| Valve Type | Location | Action |
| Hot Water Valve | Behind washer | Turn clockwise to close |
| Cold Water Valve | Behind washer | Turn clockwise to close |
Disconnect Water Hoses
Removing your washer and dryer requires you to disconnect the water hoses safely. This step prevents water spills and damage.
Understanding how to release water pressure and detach the hot and cold hoses will make the process easier.
Release Water Pressure
First, turn off the water supply valves behind the washer. This stops water flow to the hoses.
Next, open the washer’s water faucets to release any pressure. This helps avoid water sprays when disconnecting.
Detach Hot And Cold Hoses
Use a wrench to loosen the hose connectors from the washer’s water inlets. Turn them counterclockwise.
Remove both the hot and cold water hoses carefully. Keep a towel nearby to catch any water left inside.
- Loosen hot water hose (usually marked red)
- Loosen cold water hose (usually marked blue)
- Pull hoses away from the washer gently
- Place hoses on a dry surface to prevent water spills
Disconnect Dryer Vent
Disconnecting the dryer vent is important before moving your dryer. It stops air leaks and keeps your home safe.
Follow simple steps to remove the vent safely and avoid damage.
Remove Vent Clamp
The vent clamp holds the vent hose tightly to the dryer. Removing it lets you free the hose.
Use pliers or a screwdriver to loosen the clamp. Turn the clamp screw counterclockwise until loose.
- Find the metal clamp around the vent hose connection
- Use pliers or a screwdriver to loosen the clamp
- Turn the screw counterclockwise to release the clamp
- Slide the clamp back along the hose
Separate Vent Hose
After loosening the clamp, gently pull the vent hose away from the dryer. Be careful not to tear the hose.
If the hose is stuck, twist it slightly to break the seal. Then pull it free from the vent outlet.
- Grip the vent hose near the dryer connection
- Twist the hose gently if stuck
- Pull the hose straight off the vent
- Move the hose away to clear the area
Move Appliances Safely
Moving washers and dryers needs care to avoid injury and damage. Use safe methods to protect yourself and your floors.
Proper lifting and the right tools make the job easier. Follow these tips to move your appliances safely.
Lift With Proper Technique
Bend your knees and keep your back straight when lifting. Use your legs to lift, not your back. Keep the appliance close to your body for better balance.
- Stand close to the appliance with feet shoulder-width apart.
- Bend at the knees, not the waist.
- Grip the appliance firmly on both sides.
- Lift slowly using your leg muscles.
- Keep your back straight and avoid twisting.
- Ask for help if the appliance is too heavy.
Use Appliance Dolly Or Sliders
Appliance dollies and sliders help move washers and dryers without lifting. They protect floors and reduce strain on your body.
| Tool | Benefits | When to Use |
| Appliance Dolly | Supports heavy weight, easy to steer, reduces lifting | Moving appliances long distances or over steps |
| Sliders | Protect floors, reduce friction, simple to use | Sliding appliances across flat surfaces |
Check For Remaining Connections
Removing a washer and dryer involves checking for connections. You must ensure no connections are left attached.
It’s crucial to inspect all electrical and water connections. This will prevent damage or accidents.
Inspect Electrical Cords
First, find where the washer and dryer plug into the wall. Carefully unplug both appliances to avoid shocks.
Check the cords for any signs of wear or damage. If they are damaged, they need repair before further use.
- Ensure all cords are unplugged
- Look for frayed or exposed wires
- Replace any damaged cords immediately
Look For Drain Hose Attachments
Locate the drain hose at the back of your washer. This hose usually connects to a wall drain or sink.
Detach the drain hose carefully to avoid spills. Make sure the hose is clear of clogs before storing it.
- Disconnect the hose from the wall drain
- Check for any blockages inside the hose
- Wipe the hose clean before storage

Credit: www.youtube.com
Frequently Asked Questions
How Do I Disconnect A Washer Safely?
Turn off the water supply and unplug the washer first. Then, detach the hoses carefully to avoid leaks or spills.
What Tools Are Needed To Remove A Dryer?
You typically need a screwdriver, wrench, and possibly pliers to disconnect the dryer from its vent and power source.
Can I Remove Washer And Dryer Alone?
Yes, but it’s easier with help. Washers and dryers are heavy and bulky, so assistance improves safety and efficiency.
How To Avoid Water Damage When Removing A Washer?
Turn off water valves and drain hoses completely. Place towels or a bucket to catch any residual water.
Conclusion
Removing your washer and dryer can be simple and safe. Follow each step with care and patience. Always turn off power and water before starting. Use the right tools to avoid damage or injury. Take your time to disconnect hoses and cords properly.
Ask for help if the machines feel heavy. Doing it yourself saves money and gives a sense of control. Now, you can move or replace your washer and dryer easily. Keep this guide handy for future use. Ready to take on the task?
You’ve got this!