Is your garden hose leaking again? A small drip might seem harmless, but over time, it wastes water and raises your bills.
Fixing that leak yourself is easier than you think. With just a few simple tools and steps, you can save money and keep your garden healthy. Keep reading to learn how to stop that annoying leak fast and get your hose working like new.

Credit: www.familyhandyman.com
Identify The Leak Source
Fixing a garden hose leak starts with finding where the water escapes. You need to carefully check the hose to spot the leak.
Leaks can happen at different points. Knowing the exact spot helps you repair the hose correctly and save water.
Check Hose Connections
Look at where the hose connects to the faucet and the nozzle. These spots often cause leaks if they are loose or damaged.
Make sure the connections are tight. If the washers inside are worn out, replace them to stop leaks.
- Turn off water before checking connections
- Unscrew and inspect the washer
- Replace damaged washers
- Tighten the connection firmly
Inspect The Hose Length
Run your hands along the hose to feel for wet spots or bubbles. These can show where water is leaking.
Look for places where the hose feels soft or swollen. These areas often have hidden leaks inside the hose wall.
- Lay the hose flat on the ground
- Slowly run your hand from one end to the other
- Mark any soft or wet spots
- Check those areas closely for damage
Look For Punctures And Cracks
Small holes or cracks cause water to spray out. Check the hose surface in daylight to spot these problems.
If you find a puncture, you can patch it. Cracks may need a hose replacement if they are large.
- Examine the entire hose closely
- Use a flashlight for better view
- Look for tiny holes or splits
- Mark damaged spots for repair
Gather Necessary Tools
Fixing a garden hose leak starts with the right tools. Gather everything before you begin. This saves time and makes the job easier.
Below are the main supplies you need. There are also some extra tools for tougher leaks.
Essential Repair Supplies
These basic tools help you fix most garden hose leaks quickly. Keep them close at hand for a smooth repair.
- Garden hose repair kit
- Utility knife or scissors
- Flathead screwdriver
- Adjustable wrench
- Replacement washers
- Rubber tape or hose repair tape
Optional Tools For Tough Leaks
Some leaks need extra tools to fix. These tools give you more control and help with stubborn problems.
| Tool | Use |
| Pliers | Grip and twist tough fittings |
| Pipe cutter | Cut clean hose ends for patching |
| Heat gun | Shrink hose connectors for tight seals |
| Silicone lubricant | Make fittings slide on easier |
Fixing Small Punctures
Garden hoses can develop small leaks over time. Fixing these leaks is easy and saves you from buying a new hose. Here are two methods to repair small punctures in your garden hose.
These methods are quick and require minimal tools. You can use waterproof tape or a hose repair kit to stop leaks effectively.
Using Waterproof Tape
Waterproof tape is a simple solution for small hose leaks. It is affordable and easy to apply. Follow these steps to fix your hose using waterproof tape.
- Turn off the water supply to the hose.
- Clean and dry the area around the puncture.
- Wrap the waterproof tape tightly around the leak.
- Ensure the tape overlaps itself for a secure seal.
- Turn the water on to check for leaks.
Applying Hose Repair Kits
Hose repair kits include everything you need to fix leaks. They are suitable for larger holes and tears. Here is how to use a hose repair kit.
Items usually found in a hose repair kit:
| Item | Purpose |
| Coupling | Connects hose ends |
| Clamps | Secures the coupling |
| Instructions | Guides you through the process |
To use the kit, first cut the hose at the leak. Insert the coupling into the hose ends and secure it with clamps. Follow the kit instructions for best results.

Credit: www.familyhandyman.com
Repairing Larger Cracks
Larger cracks in a garden hose can cause serious leaks. Fixing these cracks keeps water flowing well.
Two main ways to repair large cracks are cutting and rejoining, or replacing damaged sections.
Cutting And Rejoining The Hose
Cutting out the cracked part can stop leaks quickly. Use a sharp knife or scissors for a clean cut.
After cutting, join the two hose ends with a hose connector. Push the hose ends firmly into the connector.
- Cut the hose straight across on both sides of the crack
- Insert a hose connector inside each cut end
- Secure the connector with hose clamps if needed
- Check for leaks before use
Replacing Damaged Sections
If the crack is too large, replace that hose section. This keeps the hose strong and leak-free.
Cut out the damaged area completely. Use a new hose piece and connectors to join the ends.
- Measure the damaged area carefully
- Cut out the cracked section neatly
- Attach a new hose piece with connectors on both sides
- Tighten clamps to prevent leaks
Sealing Leaky Hose Fittings
Garden hoses often leak at the fittings. These leaks waste water and cause frustration. Fixing them is simple and quick. You can save water by sealing the leaks properly.
Two common ways to stop leaks are tightening loose connections and using thread seal tape. Both methods work well to keep your hose leak-free.
Tightening Loose Connections
Leaks often happen because the hose fittings are loose. Check the connection points where the hose meets the faucet or nozzle.
Use a wrench or your hands to turn the fittings clockwise. Tighten them enough to stop water from dripping but avoid over-tightening. Over-tightening can damage the fittings.
- Turn off the water supply before tightening
- Use a wrench for metal fittings
- Hand-tighten plastic fittings carefully
- Test for leaks after tightening
Using Thread Seal Tape
Thread seal tape, also called plumber’s tape, helps seal hose threads. It fills small gaps that cause leaks at the fittings.
Wrap the tape around the male threads of the hose fitting. Wrap it 3-5 times in the direction of the threads. Then screw the fitting back onto the hose or faucet.
- Clean threads before applying tape
- Wrap tape tightly without overlapping too much
- Wrap in the same direction as screwing
- Do not use too much tape to avoid damage
Preventing Future Leaks
Fixing a garden hose leak is only part of the job. Stopping leaks from coming back is key. Good care and smart storage help keep your hose safe.
Follow simple habits to keep your hose working well for a long time. These tips cut down wear and tear and stop damage.
Proper Hose Storage
How you store your garden hose affects its life. Keep it clean and dry to avoid cracks and leaks. Avoid tight bends that can cause weak spots.
- Drain water from the hose before storing.
- Coil the hose loosely in large loops.
- Store in a shaded, cool place away from sun and frost.
- Use a hose reel or hanger to keep it off the ground.
- Do not leave the hose under heavy objects or sharp edges.
Regular Maintenance Tips
Check your hose often for small cracks or leaks. Clean it to stop dirt build-up that wears out the material. Repair small leaks fast to avoid bigger issues.
| Maintenance Task | How Often | Why |
|---|---|---|
| Inspect hose for cracks or holes | Every month | Find leaks early to fix quickly |
| Flush hose with clean water | After heavy use | Remove dirt and debris inside |
| Check connectors and washers | Every 3 months | Ensure tight seal to stop drips |
| Store hose properly | After each use | Prevent damage from weather and kinks |
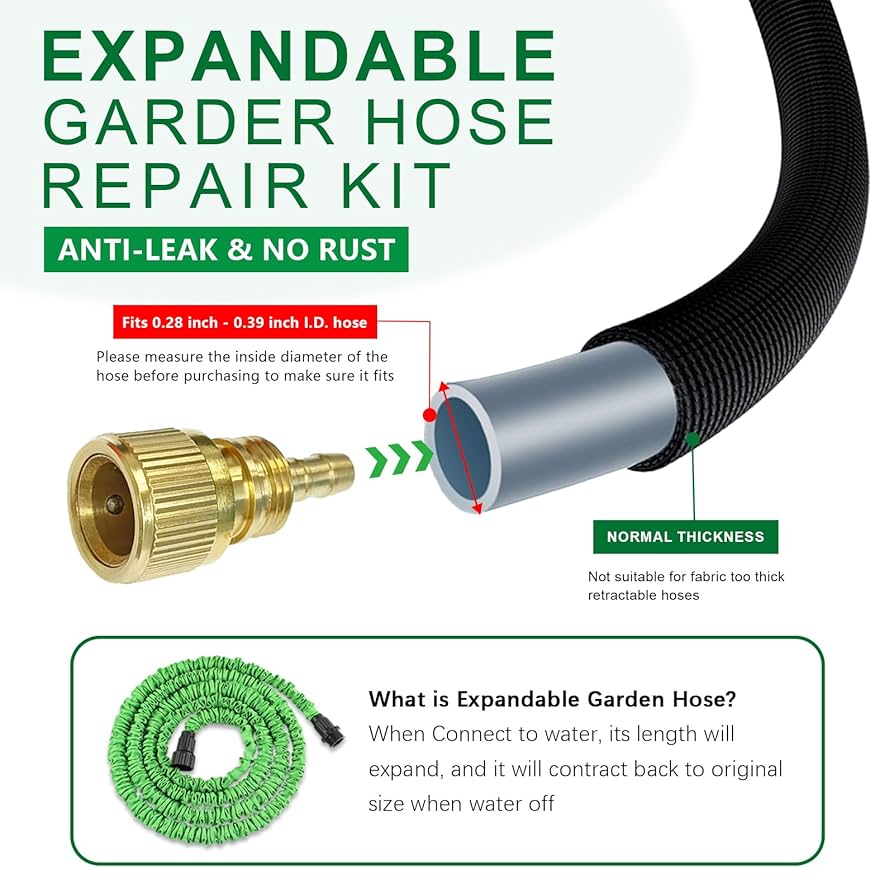
Credit: www.amazon.com
Frequently Asked Questions
How Do I Find A Leak In My Garden Hose?
Check for wet spots or water spraying from the hose. Run water through it and inspect carefully. Look for cracks, holes, or worn areas where water escapes.
What Materials Do I Need To Fix A Garden Hose Leak?
You need hose repair tape, a hose mender, or waterproof adhesive. Sometimes, replacement washers or clamps are useful for sealing leaks effectively.
Can I Repair A Garden Hose Leak Without Tools?
Yes, temporary fixes like using waterproof tape or hose repair tape can work. However, for a permanent fix, basic tools and parts are recommended.
How Long Does A Garden Hose Repair Usually Take?
Most repairs take 10 to 20 minutes. Simple fixes like patching holes or replacing washers are quick and easy.
Conclusion
Fixing a garden hose leak saves water and money. Small leaks are easy to repair with basic tools. Regular checks help catch problems early. A tight seal stops water from dripping out. Use the right materials for a long-lasting fix.
Enjoy watering your plants without wasting water. Keep your garden hose in good shape year-round. Simple steps make your hose work like new. Try these tips and see the difference today.