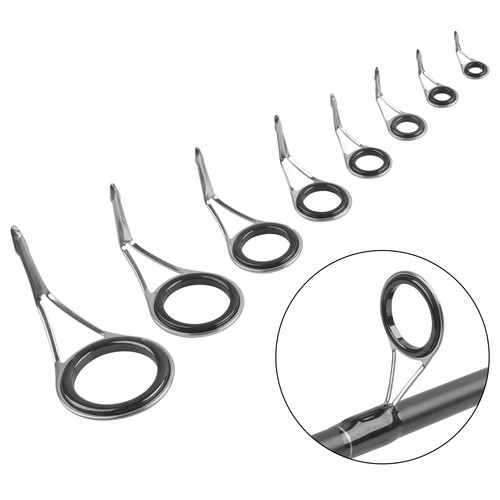
Have you ever noticed a damaged or broken eye on your fishing rod? It can be frustrating when your trusted rod isn’t working right because of a small but important part.
The good news is, you don’t need to buy a new rod or pay for expensive repairs. You can replace the eye yourself, saving time and money. In this guide, you’ll learn simple, step-by-step instructions to fix your fishing rod quickly and easily.
Keep reading, and you’ll be back to casting your line in no time!

Credit: www.marukyu.co.uk
Tools Needed
Replacing the eye on a fishing rod requires specific tools. Using the right tools makes the job easier and safer.
Gathering all necessary equipment before starting helps avoid interruptions. Prepare your workspace and tools first.
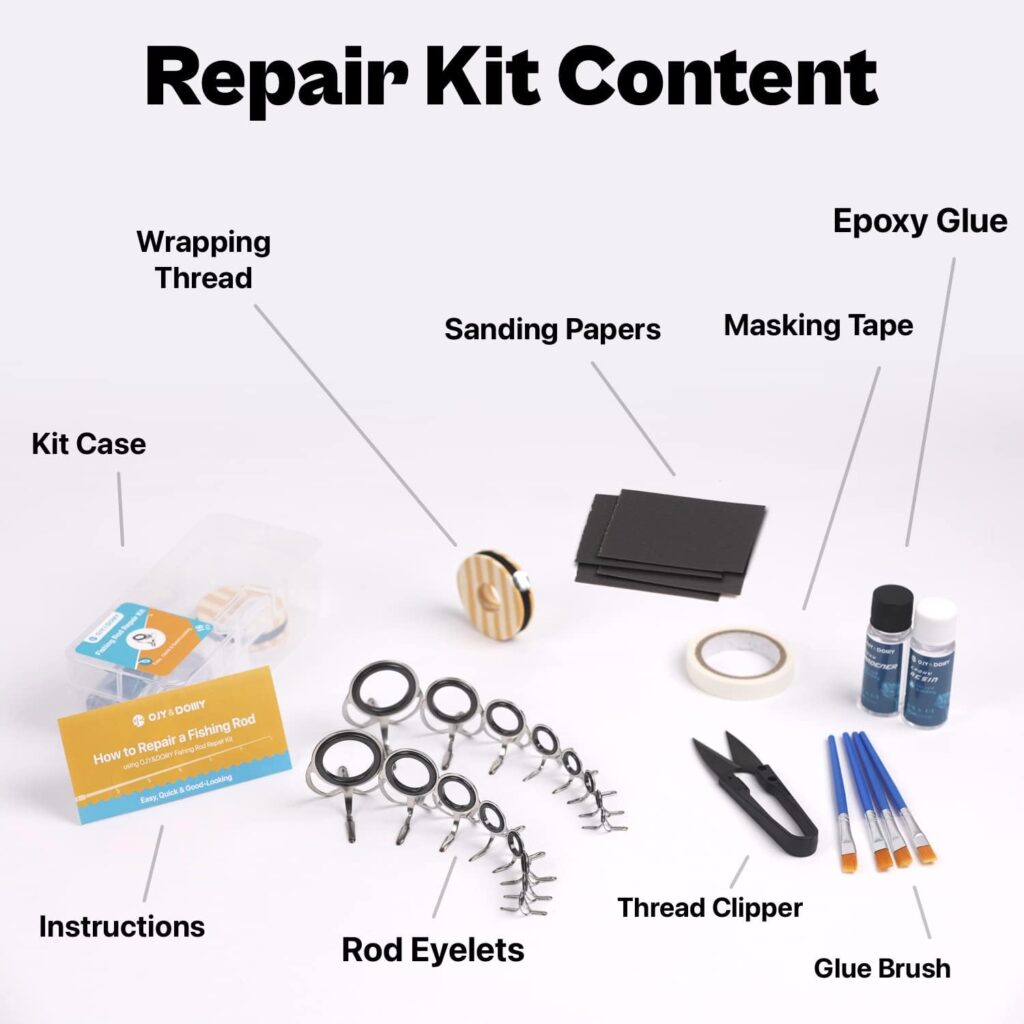
Essential Equipment
These tools are must-haves for replacing a fishing rod eye. They help remove the old eye and install the new one properly.
- Replacement fishing rod eye (guide)
- Heat gun or lighter
- Utility knife or razor blade
- Thread for wrapping the eye
- Epoxy or rod finish
- Small brush for epoxy application
- Fine sandpaper
Optional Supplies
These supplies are not always necessary but can improve the repair quality. They help with precision and finishing touches.
| Supply | Purpose |
|---|---|
| Masking tape | Protects rod from scratches during repair |
| Rod drying motor | Ensures even drying of epoxy finish |
| Magnifying glass | Helps see small details clearly |
| Small pliers | Assist in removing old eye |
Removing The Old Eye
Replacing the eye on a fishing rod starts with removing the old one. This task needs care to avoid damage to the rod. Follow the right steps to loosen the wrapping and cut the thread safely.
Take your time with each step. Proper removal helps prepare the rod for the new eye installation.
Loosening The Wrapping
Start by softening the thread wrapping that holds the eye in place. Use a small amount of rubbing alcohol or heat from a hairdryer. This makes the thread easier to handle and less likely to break suddenly.
- Apply rubbing alcohol to the thread wrapping with a cotton swab.
- Wait a few minutes for the liquid to soak in.
- If using heat, keep the hairdryer moving to avoid damage.
- Check if the thread feels softer and easier to move.
- Gently try to lift the edge of the wrapping with a small pick or needle.
Cutting The Thread
After loosening the wrapping, carefully cut the thread to remove the old eye. Use sharp scissors or a craft knife. Cut along the thread without harming the rod blank underneath.
| Tool | Use |
| Sharp scissors | Cut thread cleanly and precisely |
| Craft knife | Make thin cuts in tight areas |
| Tweezers | Pull away cut thread pieces |
| Cotton swab | Apply rubbing alcohol or clean surface |
Preparing The Rod
Replacing the eye on a fishing rod requires careful preparation. The first step is to make sure the rod is ready for the new eye.
Proper preparation will make the replacement process smooth and effective, ensuring the rod performs well during your next fishing trip.
Cleaning The Area
Before you replace the eye, clean the area around the old eye. This removes dirt and debris that could interfere with the new eye’s installation.
- Use a soft cloth to gently wipe the rod.
- Apply a mild cleaning solution for stubborn dirt.
- Make sure the area is completely dry before proceeding.
Inspecting For Damage
Check the rod for any damage that might affect the new eye. Look for cracks, splits, or worn-out areas.
| Damage Type | Action Required |
| Crack | Repair before replacing eye |
| Split | Consult a professional |
| Wear | Consider rod replacement |
Choosing A Replacement Eye
Replacing the eye on a fishing rod needs care. The right eye keeps the line smooth and strong.
Picking a good replacement eye helps your rod work well and last longer.
Matching Size And Style
Choose an eye that matches the size of the old one. The diameter and height should fit your rod.
- Measure the outer diameter of the broken eye.
- Check the inner ring size for the line.
- Match the foot length to fit the rod frame.
- Pick the same style, such as single or double foot.
Selecting Material
The material affects the eye’s strength and smoothness. Choose one that fits your fishing needs.
| Material | Features | Best Use |
| Stainless Steel | Strong and rust-resistant | Saltwater fishing |
| Ceramic | Very smooth for line | Light line, freshwater |
| Aluminum Oxide | Durable and low friction | All types of fishing |
| Titanium | Lightweight and strong | High-end rods |
Attaching The New Eye
Replacing the eye on a fishing rod takes patience and care. Attaching the new eye properly keeps the rod strong and balanced.
Focus on placing the guide correctly and wrapping it tightly. These steps help the eye stay secure during fishing.
Positioning The Guide
Place the new guide where the old one was removed. It should line up with the other guides on the rod.
Make sure the guide sits straight and faces the rod tip. This helps the fishing line move smoothly.
- Check the distance from the reel seat to the guide
- Align the guide with the rod’s spine
- Use tape to hold the guide in place before wrapping
Wrapping Techniques
Use strong thread to wrap the guide foot to the rod blank. Wrap tightly and evenly for a secure fit.
Start with a few tight wraps, then cover the entire foot of the guide. Finish with a few locking wraps to hold it.
- Keep the thread tight but not too tight to damage the rod
- Wrap in smooth, even layers without gaps
- Secure the end with a whip finish or glue

Credit: www.ilikeitlikethat.com
Securing The Wrapping
Securing the wrapping on a fishing rod eye is important for strength. It keeps the guide firmly in place during use.
This guide covers two key methods: applying thread sealant and using epoxy for durability.
Applying Thread Sealant
Thread sealant helps hold the wrapping thread tightly. It stops the thread from loosening over time.
- Apply a thin layer of sealant on the wrapped thread.
- Use a brush or toothpick for even coverage.
- Let the sealant dry completely before moving on.
- Check if the thread feels firm and secure.
Using Epoxy For Durability
Epoxy adds a hard, protective coat over the wrapping. It prevents damage from water and wear.
| Type of Epoxy | Dry Time | Durability |
| Thin Coat Epoxy | 6-8 hours | Good for light use |
| Thick Coat Epoxy | 12-24 hours | Best for heavy use |
| UV Resistant Epoxy | 8-10 hours | Protects against sun damage |
Apply epoxy with a small brush. Cover the entire wrapping area. Let it dry fully before using the rod.
Final Checks
After replacing the eye on your fishing rod, it is important to do final checks. These checks make sure the eye is fixed well and ready for fishing.
Careful inspection helps avoid damage and improves your fishing experience. Focus on alignment and strength before using the rod.
Ensuring Alignment
Check that the new eye lines up with the other guides on the rod. Proper alignment helps the fishing line move smoothly.
Look along the rod from handle to tip. The new eye should be straight with the rest.
- Place the rod on a flat surface.
- Look down the rod to check the eye’s position.
- Adjust if the eye is not in line.
Testing Strength
Pull gently on the replaced eye to test its strength. The eye must stay firmly in place under pressure.
Do not use too much force. The goal is to ensure the eye is secure for regular fishing use.
- Hold the rod steady.
- Pull the eye carefully in different directions.
- Watch for any movement or looseness.
Maintenance Tips
Keeping your fishing rod in good shape helps it last longer. Regular care stops big problems from starting.
Replacing the eye on a fishing rod is easy if you check it often. Use simple steps to keep it safe.
Regular Inspections
Look at your rod’s eyes before every fishing trip. Check for cracks, rust, or loose parts. This helps catch damage early.
- Run your finger gently over each eye to feel for rough spots.
- Look closely for bends or breaks in the eye frame.
- Check if the eye is firmly glued or wrapped to the rod.
- Inspect for rust or corrosion on metal parts.
Preventing Future Damage
Protect your fishing rod eyes to avoid frequent replacements. Simple habits keep them strong and clean.
| Tip | Action |
| Clean eyes | Wipe with a soft cloth after use to remove dirt and salt. |
| Store properly | Keep rod in a case or rack to prevent bending or impact. |
| Avoid hard impacts | Do not drop or hit the rod against hard surfaces. |
| Use rod covers | Protect eyes during transport to stop scratches. |
Credit: collegeofems.com
Frequently Asked Questions
How Do I Remove The Old Eye On My Fishing Rod?
To remove the old eye, heat the epoxy around it carefully. Use pliers to gently twist and pull the eye off. Avoid damaging the rod blank during removal.
What Tools Do I Need To Replace A Fishing Rod Eye?
You need replacement rod eyes, epoxy glue, pliers, sandpaper, and a heat source like a lighter or heat gun. These help in removing and attaching the new eye securely.
How To Choose The Right Replacement Eye For My Rod?
Match the new eye size and type with the original one. Consider the rod’s action and line weight for compatibility. This ensures smooth line flow and rod performance.
How Long Should Epoxy Take To Dry On A Fishing Rod Eye?
Epoxy typically dries within 24 hours. Ensure the rod is stable and undisturbed during this period. Proper drying guarantees a strong, lasting bond for the new eye.
Conclusion
Replacing the eye on your fishing rod keeps it working well. A new eye guide helps your line run smooth and strong. Take your time and follow the steps carefully. With the right tools, the job becomes easy. Your rod will feel like new again.
Ready to fish without worry. Keep practicing to improve your skills. Simple fixes can save money and extend gear life. Enjoy every fishing trip with confidence and ease.