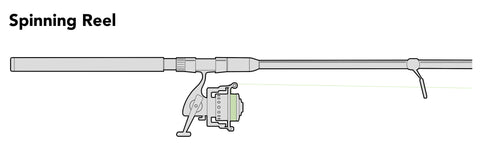
You love fishing, but a broken or worn-out line can quickly ruin your day on the water. Knowing how to restring a fishing rod yourself saves you time, money, and frustration.
Imagine the confidence you’ll feel when your rod is ready to cast perfectly every time. In this guide, you’ll discover simple, step-by-step instructions to restring your fishing rod like a pro—even if you’ve never done it before. Stick with me, and you’ll never have to wait for repairs again.
Let’s get your fishing rod back in top shape!

Credit: www.reddit.com
Choosing The Right Fishing Line
Choosing the right fishing line is important for a good fishing experience. The line must fit your rod and reel well. It also needs to match the type of fish you want to catch.
This guide helps you pick the right line by looking at types, strength, length, and matching it to your gear.
Types Of Fishing Lines
There are three main types of fishing lines: monofilament, fluorocarbon, and braided. Each has different features for fishing situations.
- Monofilament:Soft, stretchy, and easy to handle. Good for beginners.
- Fluorocarbon:Almost invisible underwater. Great for clear water fishing.
- Braided:Very strong and thin. Best for heavy cover fishing.
Line Strength And Length
Line strength is measured by pound test. It shows how much weight the line can hold before breaking. Choose strength based on the fish size.
| Fish Type | Recommended Line Strength (lbs) | Suggested Line Length (yards) |
|---|---|---|
| Small fish (trout, panfish) | 4–8 | 100–150 |
| Medium fish (bass, walleye) | 8–15 | 150–200 |
| Large fish (pike, catfish) | 15–30 | 200–300 |
Matching Line To Rod And Reel
Your fishing line must match the rod and reel’s capacity. Check the rod’s label for line weight limits. Also, see the reel spool size for line length.
Using too heavy a line can strain the rod and reel. Too light a line can break easily. Choose a line that fits inside the rod’s recommended range.

Credit: www.youtube.com
Gathering Essential Tools
Restringing a fishing rod needs the right tools to make the job easy. Before you start, gather everything you need. This helps you work smoothly without stopping.
Having a clean space and good lighting also helps. It keeps your tools organized and your work clear. Let’s look at the tools and workspace setup.
Tools You’ll Need
These tools help you remove the old line and add the new one safely. You do not need many, but each one is important.
- Fishing line spool
- Line cutter or scissors
- Rod holder or clamp
- Reel grease or lubricant
- Needle-nose pliers
- Small screwdriver
Setting Up Your Workspace
A good workspace makes restringing easier and safer. Pick a flat, clean table with space for your rod and tools.
| Workspace Element | Why It Matters |
|---|---|
| Flat Surface | Prevents rod from rolling or falling |
| Good Lighting | Helps you see knots and guides clearly |
| Tool Tray | Keeps small tools organized and easy to find |
| Comfortable Chair | Supports your back during the restringing process |
Keep your tools close and avoid clutter. This setup lets you focus on restringing without distractions.
Removing Old Line
Removing the old fishing line is an important step before restringing your rod. Old line can be weak and cause problems during fishing.
Taking the time to remove it carefully helps keep your rod in good shape and ready for a new line.
Detaching The Line From The Reel
Start by opening the bail of your spinning reel or disengaging the drag on a baitcasting reel. This allows you to access the line easily.
Cut the line near the reel spool. Then, pull the line slowly off the reel by hand or turn the handle to unwind it.
- Open the bail or disengage the drag
- Cut the old line close to the reel
- Pull the line off by hand or reel it in
- Dispose of the old line safely
Clearing The Guides
After removing the line from the reel, check the rod guides for any leftover line pieces. These can get stuck and cause tangles later.
Use your fingers or a soft cloth to clear out any bits of old line from each guide. Make sure the guides are clean and free of debris.
- Inspect each guide carefully
- Remove any leftover line pieces
- Wipe guides clean with a cloth
- Check for damage or wear on guides
Threading The New Line
Threading the new line on your fishing rod is a key step. It helps you cast smoothly and catch fish easily.
This guide shows how to start at the reel and guide the line through the rod eyes.
Starting At The Reel
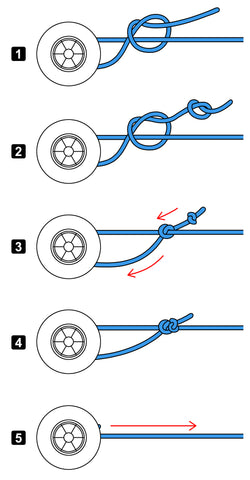
Begin by attaching the new fishing line to the reel spool. Make sure it is tight and secure.
- Open the reel bail arm to allow line placement.
- Tie the line to the spool using a strong knot.
- Close the bail arm and start winding the line.
- Keep tension on the line while winding to avoid loose loops.
- Fill the spool to about 80% capacity to prevent tangles.
Guiding Line Through Rod Eyes
After winding, thread the line through each rod eye from bottom to top. This keeps the line aligned for casting.
| Tip | Purpose |
| Thread slowly | Prevents tangles and snags |
| Use your fingers | Guide line smoothly through small eyes |
| Check eye rings | Remove debris or damage before threading |
Tying Secure Knots
Tying knots correctly is important for fishing. Secure knots keep your line strong and your catch safe. Learning a few key knots helps you restring your fishing rod with confidence.
This guide covers basic knots for beginners and advanced knots that add strength. Each knot has its use and method to tie it properly.
Basic Knots For Beginners
Start with simple knots that are easy to learn. These knots are good for tying hooks, lures, and leaders. Practice these to build your skills.
- Improved Clinch Knot:Good for attaching the line to the hook or lure.
- Palomar Knot:Strong and easy to tie, ideal for braided lines.
- Uni Knot:Versatile and can join two lines or tie to a hook.
Advanced Knots For Strength
Advanced knots give extra strength and reliability. Use these knots for heavy fish or rough conditions. They help avoid line slipping or breaking.
| Knot | Use | Strength |
| Double Uni Knot | Joining two lines of different diameters | High |
| Albright Knot | Connecting heavy and light lines | Very High |
| Snell Knot | Attaching hook to leader for better hook setting | Strong |
Spooling The Reel Properly
Spooling your fishing reel with line is important for a smooth fishing experience. Proper spooling helps avoid tangles and line damage. It also improves casting distance and accuracy.
Focus on keeping the right tension and preventing twists as you spool. These steps will make your fishing setup more reliable and enjoyable.
Maintaining Tension
Keeping tension on the line while spooling is key. Loose line can cause loops and tangles. Too much tension might damage the line or reel.
- Attach the line to the reel spool securely.
- Hold the line spool tightly with your fingers or a cloth.
- Keep firm pressure on the line while turning the reel handle.
- Check that the line winds evenly across the spool width.
- Stop occasionally to adjust tension and prevent slack.
Avoiding Line Twist
Line twist can cause tangles and reduce casting performance. Proper spooling technique helps avoid this problem.
| Cause of Line Twist | How to Avoid It |
|---|---|
| Reel spool spins backward | Turn the reel handle in the correct direction |
| Loose or slack line | Maintain steady tension on the line |
| Incorrect attachment of line | Tie the line properly to the spool |
| Line spool unwinds freely | Keep the line spool tight during spooling |
Testing Your Setup
After restringing your fishing rod, it is important to test your setup. Testing ensures the line is secure and the rod works well.
Try simple checks before fishing to avoid problems on the water. This helps you fish with confidence.
Checking Line Tension
Check the line tension by gently pulling on the line. The tension should feel firm but not too tight.
Loose line can cause tangles and poor casting. Too tight line may break or damage the rod.
- Pull the line slowly to feel resistance
- Look for any slack or weak spots
- Adjust the reel drag if needed
- Make sure the line moves smoothly through guides
Performing Casting Trials
Practice casting in an open area to test the rod and line. This helps you see how the setup performs.
Watch how the line flows and how far you can cast. Check for any snags or unusual resistance.
- Cast several times with different strengths
- Listen for any unusual sounds from the reel or guides
- Notice if the line tangles or gets stuck
- Make small adjustments to improve casting smoothness
Credit: www.tunet.cult.cu
Maintenance Tips For Longevity
Taking care of your fishing rod can keep it working well for years. Regular maintenance helps prevent damage and ensures smooth fishing trips.
Below are simple tips to maintain your fishing rod by checking the line and storing it properly.
Regular Line Inspection
Check your fishing line before every outing. Look for any signs of wear or damage that could cause it to break.
- Look for frays or cuts along the line.
- Check knots to make sure they are tight and secure.
- Replace the line if it feels weak or damaged.
- Keep the line clean from dirt and debris.
- Use the correct line strength for your fishing type.
Cleaning And Storage Advice
Cleaning your rod after use removes dirt and salt that cause damage. Proper storage keeps it safe from moisture and bending.
| Cleaning Tips | Storage Tips |
| Wipe rod with a damp cloth after fishing | Store rod in a dry place |
| Use mild soap for stubborn dirt | Keep rod off the floor to avoid bending |
| Rinse rod with fresh water if used in saltwater | Use a rod rack or holder for support |
| Dry rod completely before storing | Avoid exposure to direct sunlight |
Frequently Asked Questions
How Do I Choose The Right Fishing Line For Restringing?
Select fishing line based on your target fish species and rod type. Consider line strength, thickness, and material for best performance.
What Tools Are Needed To Restring A Fishing Rod?
You need new fishing line, scissors, a reel, and possibly pliers or a knot-tying tool for easier restringing.
How Do I Remove Old Fishing Line Safely?
Cut the old line near the reel and unwind it slowly. Dispose of it properly to avoid tangles and pollution.
How To Tie A Strong Knot When Restringing?
Use knots like the improved clinch or Palomar knot. These knots offer strength and reliability for fishing.
Conclusion
Restringing a fishing rod can seem tricky at first. But with patience, it becomes easier. Follow each step carefully. Gather all your tools beforehand. Take your time and double-check your work. Proper stringing ensures better fishing experiences. Feel confident and ready for your next fishing trip.
Practice makes you more skilled. Don’t rush; enjoy the process. The more you practice, the better you get. Now, go and enjoy the waters. Happy fishing!