Setting up your fly fishing line the right way can make all the difference between a frustrating day by the water and an exciting catch. If you’ve ever felt tangled, confused, or unsure about how to get your line ready, you’re not alone.
But don’t worry—this guide is made just for you. By following simple, clear steps, you’ll learn how to set up your fly fishing line quickly and confidently. Imagine casting smoothly and feeling that thrilling tug on your line—sounds good, right?
Keep reading to unlock the secrets that will turn your fly fishing experience into pure enjoyment.
Choosing The Right Fly Line
Fly fishing is a rewarding outdoor activity. Choosing the right fly line is essential for success. The line affects casting distance and presentation.
Understanding different types of fly lines helps in making an informed choice. You must match the line to your rod and reel. Consider the water and fish species for best results.
Types Of Fly Lines
Fly lines come in various types, each suited for specific conditions and techniques. Knowing these types helps in selecting the right one.
- Floating Lines: Best for surface fishing.
- Sinking Lines: Ideal for deep water.
- Sink-Tip Lines: Useful for mixed depths.
Matching Line To Rod And Reel
Choosing a fly line that matches your rod and reel is crucial. This ensures balance and ease of casting.
| Rod Weight | Line Weight |
| 2-4 | Light Line |
| 5-6 | Medium Line |
| 7-9 | Heavy Line |
Considering Water And Fish Species
Different water conditions and fish species demand specific fly lines. Select a line based on the environment and the target fish.
Preparing Your Equipment
Setting up your fly fishing line starts with preparing the right gear. Taking time to check and ready your tools helps you fish better. Good preparation means fewer problems on the water.
Focus on your rod, reel, leader, tippet, and overall gear condition. Each part plays a key role in your fly fishing experience.
Inspecting The Rod And Reel
Look over your rod carefully. Check for cracks or damage in the blank. Make sure the guides are straight and not cracked. Spin the reel to see if it moves smoothly and the drag works well.
- Check the rod for any cracks or breaks.
- Inspect the guides for damage or bends.
- Test the reel’s smoothness and drag system.
- Ensure the reel is securely attached to the rod.
Selecting The Leader And Tippet
Choose a leader that matches your fly line weight. Pick a tippet thin enough for your target fish but strong enough to hold. Leaders and tippets come in various lengths and strengths for different conditions.
| Type | Length | Strength (lbs) | Use |
| Standard Leader | 9 feet | 4-6 | General fishing |
| Short Leader | 7 feet | 3-5 | Clear water, small flies |
| Long Leader | 12 feet | 2-4 | Skittish fish, delicate presentations |
| Tippet | Variable | 2-6 | Final connection to fly |
Cleaning And Maintaining Gear
Keep your gear clean and working well. Rinse your rod and reel with fresh water after use. Dry them before storing. Lubricate reel parts to prevent rust. Replace worn leaders and tippets often.
- Rinse rod and reel with fresh water after fishing.
- Dry all parts thoroughly before storage.
- Apply reel oil to moving parts regularly.
- Check and replace leaders and tippets as needed.
- Store equipment in a cool, dry place.
Attaching The Fly Line
Attaching the fly line correctly is key for a good fishing experience. It helps your line flow smoothly and casts better.
This guide covers spooling the reel, securing the backing, and connecting the fly line to the backing.
Spooling The Reel
Start by placing the reel on a stable surface. Keep the backing spool tight to avoid tangles. Slowly wind the backing onto the reel evenly.
- Attach the backing to the reel spool with an arbor knot.
- Hold the backing spool tight to keep tension.
- Wind the backing evenly until you have enough length.
Securing The Backing
Secure the backing with a strong knot. Use a nail knot or an improved clinch knot to connect the fly line.
| Knot Type | Use | Strength |
|---|---|---|
| Arbor Knot | Attach backing to reel | Strong |
| Nail Knot | Connect backing to fly line | Very Strong |
| Improved Clinch Knot | Secure fly line to backing | Reliable |
Connecting The Fly Line To Backing
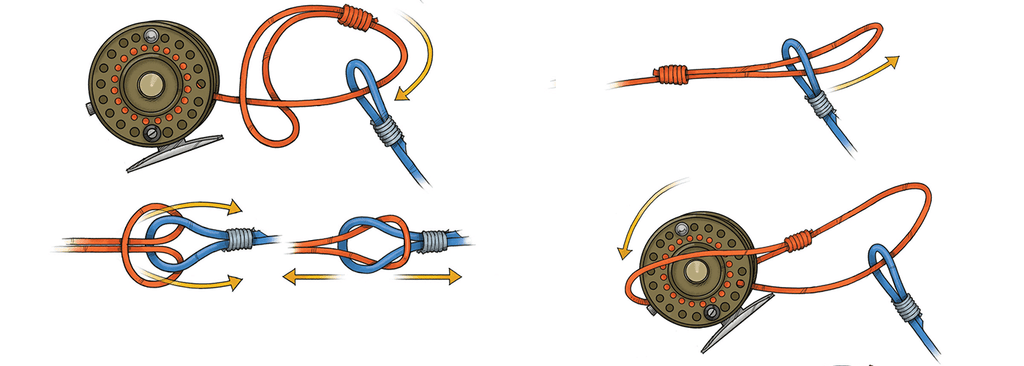
Use the nail knot to join the fly line to the backing. This knot is smooth and strong for casting.
- Thread the fly line and backing together.
- Wrap the fly line around backing five to seven times.
- Pass the end through the loop near the backing.
- Tighten the knot while keeping tension.
- Trim any excess line.
Credit: calflyfisher.com
Setting Up The Leader And Tippet
Setting up the leader and tippet correctly is key to fly fishing success. These parts connect your fly line to the fly. They help present the fly naturally to the fish.
This guide covers how to choose the right leader length and strength, tie the leader to the fly line, and add the tippet.
Choosing Leader Length And Strength
The leader must be the right length and strength for the fish and water conditions. Too short or too thick can scare fish. Too long or too thin might break easily.
- Use 7.5 to 9 feet for most trout fishing
- Choose lighter strength for small fish and clear water
- Pick heavier strength for bigger fish and rough water
- Match the leader strength to your tippet for smooth casting
Tying Leader To Fly Line
Attach the leader to the fly line with a strong, smooth knot. The knot should pass easily through guides and not slip.
- Use a loop-to-loop connection if your fly line has a loop at the end
- If no loop, tie a nail knot to connect leader to fly line
- Make sure the knot is tight and trimmed close to avoid snags
- Test the knot by pulling gently before fishing
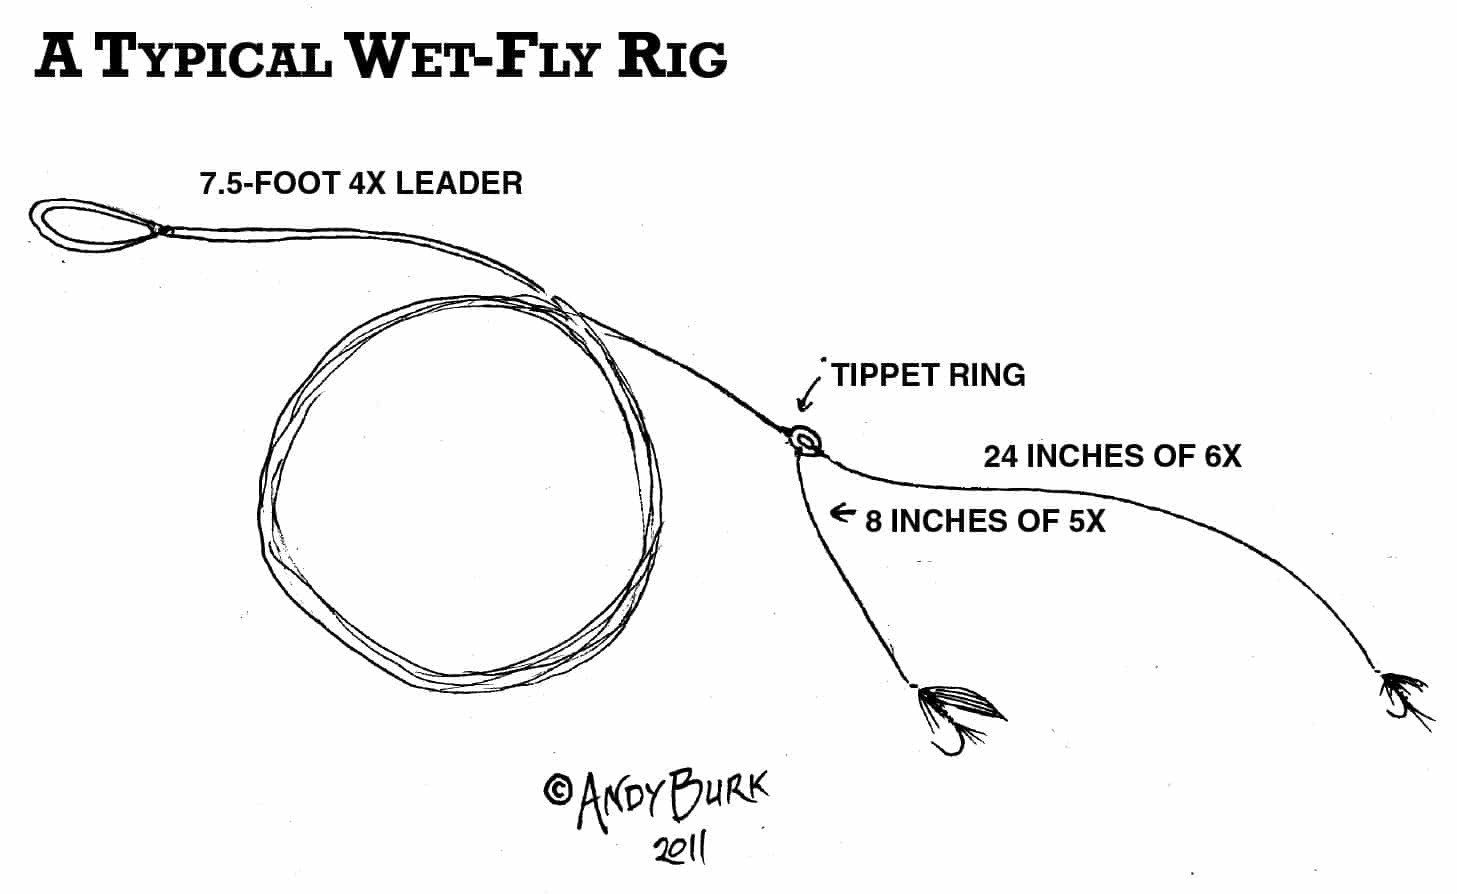
Adding The Tippet
The tippet extends the leader and holds the fly. You must add it carefully for a natural drift and strong connection.
| Tippet Size | Fish Type | Water Type |
|---|---|---|
| 5X | Small Trout | Clear Streams |
| 4X | Medium Trout | Most Rivers |
| 3X | Large Trout, Bass | Rough Water |
| 2X | Steelhead, Salmon | Fast Currents |
Tie the tippet to the leader using a blood knot or surgeon’s knot. Keep the knot small and neat. Trim tag ends close to the knot.
Attaching The Fly
Attaching the fly to your fishing line is a key skill for fly fishing. It helps the fly move naturally in the water and attract fish. This guide shows how to attach the fly correctly.
We will cover how to select the right fly, tie it to the tippet, and check the knot for security. Each part is important for a successful fishing experience.
Selecting The Right Fly
Choose a fly that matches the fish you want to catch and the water where you fish. Different flies work better in different places and seasons.
- Look at the local insects and fish food
- Pick a fly size similar to natural prey
- Match the fly color to the water and light
- Use dry flies for surface fishing
- Use wet flies or nymphs for underwater fishing
Tying The Fly To The Tippet
Tying a strong, neat knot keeps the fly secure on the tippet. The knot must not slip or weaken the line.
- Pass the tippet through the eye of the fly hook
- Make a loop and wrap the tag end around the standing line 5-7 times
- Thread the tag end back through the loop near the hook eye
- Moisten the knot with water or saliva
- Pull both ends slowly to tighten the knot
- Trim the excess tag end close to the knot
Checking Knot Security
Check your knot before casting to avoid losing the fly or fish. A weak knot can fail under tension.
| Check Point | What to Look For |
|---|---|
| Knot Tightness | The knot should be firm without gaps or loose loops. |
| Line Damage | Look for any frays or cuts near the knot. |
| Tag End Length | Keep about 2-3 mm of tag end after trimming. |
| Fly Movement | The fly should hang straight and not twist the line. |

Credit: jacksonholeflycompany.com
Adjusting Line For Casting
Setting up your fly fishing line correctly helps you cast better. Adjusting the line makes your casts smooth and accurate.
Focus on how much line you let out, how tight the line is, and your casting moves.
Measuring Line Out
Pull out enough line from the reel before you start casting. Too little line limits your cast distance.
Usually, 20 to 30 feet of line out is good to start. Adjust this based on your casting space and target.
- Start with 20-30 feet of line out
- Make sure the line is straight and not tangled
- Adjust length for wind or obstacles
Managing Line Tension
Keep the line tight but not too tight when casting. This helps control the fly and avoids slack.
Too much tension can cause the line to snap back. Too little tension makes the line droop and lose energy.
- Hold the line firmly with your fingers
- Keep the line straight during the cast
- Adjust tension by controlling your hand speed
Practicing Basic Casting Techniques
Practice simple casts to improve your control and accuracy. Start with short casts and increase distance slowly.
Focus on smooth, steady movements. Avoid jerky or fast motions that can tangle the line.
- Use a back cast and forward cast motion
- Pause briefly at the end of the back cast
- Keep your wrist firm and use your arm
Common Mistakes To Avoid
Setting up your fly fishing line correctly makes fishing easier and more fun. Many beginners make simple mistakes that hurt their experience.
This guide covers common errors to avoid. Fixing these will help you fish better and protect your gear.
Overloading The Rod
Putting too much line or too heavy a line on your rod can cause problems. The rod may bend too much or break.
- Check the rod’s weight rating before choosing line.
- Do not use heavy line on a light rod.
- Avoid putting extra backing that is too thick or heavy.
- Keep the line weight within the rod’s limits for smooth casting.
Incorrect Knot Tying
Tying the wrong knots or tying knots poorly can cause your line to break or lose fish. Learn the right knots and practice them.
| Knot Name | Use | Tip |
| Improved Clinch Knot | Attach fly to tippet | Wet line before tightening |
| Albright Knot | Join backing to fly line | Keep loops neat and tight |
| Nail Knot | Attach leader to fly line | Use a tool to hold loops steady |
Ignoring Line Maintenance
Fly lines need care to last and work well. Dirt, salt, and sun damage them. Cleaning and checking your line is important.
- Rinse your line with fresh water after fishing.
- Use a cloth to wipe off dirt and debris.
- Check for cracks or wear before each use.
- Store your line in a cool, dry place away from sunlight.

Credit: calflyfisher.com
Tips For Better Casting Performance
Fly fishing requires smooth and precise casting for success. Good casting helps the line land softly on the water.
These tips will help you improve your casting by handling the line well, timing your casts, and dealing with wind.
Smooth Line Handling
Handle your fly line with care to avoid tangles and snags. Smooth line movement makes casting easier and more accurate.
- Keep your line clean and dry for better glide
- Use your fingers gently to control the line
- Practice a steady wrist motion for smooth casts
- Check your reel and guides for any rough spots
Timing Your Casts
Good timing helps place the fly exactly where you want it. Watch your rod tip and line to know when to stop and start.
- Start the forward cast when the line straightens behind you
- Stop the rod quickly to let the line shoot forward
- Pause briefly to let the line unfold in the air
- Lower the rod tip to place the fly softly on the water
Adapting To Wind Conditions
Wind can push your line off course. Adjust your casting to keep control and accuracy.
| Wind Direction | Casting Tip |
| Headwind | Use shorter casts and more power |
| Tailwind | Use longer casts and softer stops |
| Crosswind | Aim slightly upwind to counter drift |
Frequently Asked Questions
How Do I Choose The Right Fly Fishing Line?
Choose fly fishing line based on rod weight and fishing style. Match the line weight to the rod’s rating for balance. Consider floating, sinking, or intermediate lines depending on water conditions and target fish.
What Is The Best Way To Attach Fly Fishing Line?
Use a nail knot or loop-to-loop connection to attach the fly line securely. These knots maintain strength and allow smooth casting. Practice tying the knot to ensure a reliable, tangle-free connection.
How Do I Properly Spool Fly Fishing Line?
Remove old line completely before spooling new line. Attach the line to the reel’s arbor with an arbor knot. Wind the line evenly and tightly to avoid tangles and ensure smooth casting.
When Should I Replace My Fly Fishing Line?
Replace your fly line if it shows cracks, frays, or loses coating. Also, change it if casting becomes difficult or the line sinks unevenly. Regular replacement improves performance and protects your fishing gear.
Conclusion
Setting up your fly fishing line is simple with practice and patience. Start with the right gear and follow each step carefully. Make sure the line is clean and properly attached to the reel. Check the knots to avoid slipping or tangling.
Practice casting in a safe area to get comfortable. Enjoy the process and learn from each fishing trip. This helps improve your skills and makes fishing more fun. Keep your equipment in good shape for the best results every time.
Fly fishing can be relaxing and rewarding with the right setup.