Are you tired of dealing with thick, heavy hair that feels impossible to manage? Using thinning shears on your own hair can be a game-changer.
It’s a simple way to reduce bulk, add texture, and make your hair look lighter and more natural. But if you’ve never tried it before, you might feel unsure or worried about making mistakes. Don’t worry—this guide will walk you through easy, step-by-step tips so you can confidently use thinning shears at home.
Keep reading, and you’ll discover how to transform your hair without expensive salon visits or complicated tools.
Choosing The Right Thinning Shears
Thinning shears help reduce hair thickness and add texture. Picking the right pair makes trimming easier and safer.
Look at the type, size, and quality before you buy thinning shears. These factors affect your haircut results.
Types Of Thinning Shears
Thinning shears come in different types. Some have teeth on one blade only. Others have teeth on both blades for softer thinning.
- Single-tooth blade: Removes less hair, good for light thinning.
- Double-tooth blade: Removes more hair, best for thick hair.
- Texturizing shears: Have fewer teeth for adding texture.
Blade Size And Teeth Count
| Blade Size (inches) | Teeth Count | Best Use |
| 5.5 | 20-25 | General thinning for most hair types |
| 6.0 | 30-40 | Thick hair, more hair removal |
| 6.5 | 10-15 | Texturizing and soft thinning |
Choose blade size and teeth based on hair thickness. More teeth remove less hair and give a natural look.
Material And Quality
Good thinning shears last longer and cut smoothly. Look for shears made of stainless steel or high-carbon steel.
- Stainless steel: Rust-resistant and easy to clean.
- High-carbon steel: Strong and keeps sharp edges longer.
- Check for smooth blade movement to avoid hair damage.
Preparing Your Hair
Using thinning shears on your own hair can be simple. Start by preparing your hair correctly. This ensures the best results and minimizes mistakes.
Follow these steps to get your hair ready for thinning. Proper preparation makes cutting easier and safer.
Washing And Drying
Wash your hair with a gentle shampoo. Clean hair is easier to handle and cut.
Dry your hair completely before using thinning shears. Wet hair can cause uneven cuts.
Detangling And Sectioning
Comb your hair to remove all tangles. This prevents snagging when cutting.
Divide your hair into small sections. Use clips to hold each section. This makes it easier to manage.
- Start at the back and work towards the front
- Section hair evenly for consistent results
- Keep sections small for precision
Tools You’ll Need
Gather all the necessary tools before you start. This ensures a smooth process.
- Thinning shears
- Wide-tooth comb
- Hair clips
- Mirror
- Spray bottle with water (optional)
Techniques For Using Thinning Shears
Thinning shears help reduce bulk and add texture to hair. Using them on your own hair needs care and practice. This guide explains how to use thinning shears safely and effectively.
Follow simple techniques to hold the shears, thin your hair section by section, and avoid over-thinning. These steps make the process easier and protect your hair.
Holding The Shears Correctly
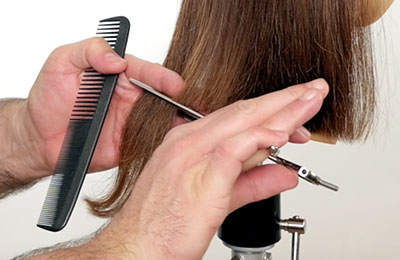
Hold the thinning shears like regular scissors but with a relaxed grip. Insert your thumb and ring finger into the holes. Keep your index and middle finger on the handle for control.
Keep your wrist steady and open the shears slowly. Avoid squeezing too hard to prevent cutting too much hair at once.
Section-by-section Thinning
Divide your hair into small sections before thinning. Work on one section at a time to have better control and even results.
- Comb the section to remove knots.
- Hold the section between your fingers.
- Open the shears and place them about halfway down the hair strand.
- Close the shears gently to thin the hair.
- Move down the section, repeating the thinning action every 1-2 inches.
- Check your progress frequently in the mirror.
Avoiding Over-thinning
Thinning too much can make hair look sparse or uneven. Use thinning shears sparingly, especially near the scalp.
| Common Mistakes | How to Avoid |
| Cutting too close to the roots | Start thinning at least 1 inch from scalp |
| Thinning large sections at once | Work on small sections only |
| Using too much pressure | Open and close shears gently |
| Ignoring hair texture | Adjust thinning based on hair type |

Credit: jatai.net
Target Areas For Thinning
Thinning shears help you manage thick hair by removing bulk. They make hair easier to style and lighter to wear. You can use thinning shears safely on certain parts of your hair.
Knowing where to use thinning shears improves your results. It keeps your hair looking natural and balanced. Below are key areas to focus on when thinning your own hair.
Thinning Thick Ends
Thick ends can make your hair look heavy or bulky. Thinning shears reduce this weight by cutting some strands at the ends. This creates a softer, lighter finish without changing your length.
To thin thick ends, take small sections of hair. Use the shears to snip lightly along the ends. Avoid cutting too much in one spot to keep a natural look.
Reducing Bulk At The Crown
The crown area often holds extra volume that can be hard to manage. Thinning here helps reduce bulk and lays the hair flat. This makes hairstyles look smoother and more polished.
- Divide hair at the crown into small sections.
- Open and close thinning shears gently as you cut.
- Work evenly to avoid patchy spots.
- Check in the mirror often to see the effect.
- Stop thinning once the bulk feels lighter.
Softening Bangs And Layers
Bangs and layers can look too sharp or thick. Thinning shears soften their edges for a natural flow. This technique adds movement without changing the shape.
| Hair Section | Effect of Thinning |
|---|---|
| Bangs | Reduces harsh lines and adds softness |
| Layers | Blends different lengths smoothly |
Common Mistakes To Avoid
Using thinning shears on your own hair can be tricky. Avoid common mistakes to get better results.
These errors can cause uneven cuts or damage your hair. Learn what to watch out for.
Cutting Too Much At Once
Cutting too much hair with thinning shears can leave your hair patchy. Take small sections to avoid this.
Thinning shears remove hair slowly. Snip gently and check your hair often.
- Work on thin layers of hair
- Make a few cuts, then stop to see the effect
- Repeat only if needed
Ignoring Hair Texture
Different hair textures need different thinning techniques. Curly hair needs less thinning than straight hair.
Know your hair type before cutting. This helps avoid frizz or uneven thinning.
- Straight hair can handle more thinning
- Curly hair needs gentle thinning
- Fine hair needs very little thinning
Using Dull Shears
Dull thinning shears pull hair instead of cutting it. This can cause damage and split ends.
Keep your shears sharp and clean. Replace or sharpen them if they feel dull.
- Sharp shears cut smoothly
- Dull shears cause hair breakage
- Regular maintenance extends tool life

Credit: jatai.net
Aftercare And Maintenance
Using thinning shears on your hair needs care afterwards. Proper aftercare helps your hair look its best. It also keeps your thinning shears working well for a long time.
This guide covers styling tips after thinning, how to clean your shears, and when to replace them.
Styling Tips Post-thinning
After thinning, your hair feels lighter and softer. Use gentle styles to keep your hair healthy. Avoid heavy products that can weigh hair down.
Try using a light mousse or spray to add volume without stiffness. Comb your hair softly to keep the texture smooth.
- Use light styling products like mousse or spray
- Comb hair gently to avoid breakage
- Avoid heavy wax or gels that add weight
- Let hair dry naturally when possible
Cleaning Your Shears
Clean your thinning shears after each use. Hair and oils can build up on the blades and reduce their sharpness. Use a soft cloth to wipe the blades clean.
You can also use a small brush to remove stuck hairs. Avoid using water directly on the shears to stop rust from forming.
- Wipe blades with a dry, soft cloth after use
- Use a brush to clear stuck hair
- Do not soak or rinse shears with water
- Apply a drop of oil to the pivot point weekly
When To Replace Your Thinning Shears
Replace your shears if they become dull or hard to use. Dull blades pull hair instead of cutting smoothly. This can hurt your hair and scalp.
Also, change them if the blades get damaged or the screw loosens and can’t be tightened. Good shears make thinning easier and safer.
- Blades pull or snag hair when cutting
- Blades show visible damage or rust
- Screw does not stay tight
- Shears feel loose or hard to open

Credit: www.youtube.com
Frequently Asked Questions
What Are Thinning Shears Used For On Hair?
Thinning shears reduce hair bulk without changing length. They create texture and blend layers for a natural look. These scissors remove some strands while leaving others intact, ideal for thick or heavy hair.
How Do I Hold Thinning Shears Correctly?
Hold thinning shears like regular scissors, placing your thumb and ring finger in the holes. Use your index and middle fingers for stability. Maintain a comfortable grip to control precise cuts and avoid hair damage.
Can I Thin My Hair At Home Safely?
Yes, with practice and care, you can thin your hair safely at home. Use small sections, cut slowly, and avoid over-thinning. Start with minimal cuts to prevent mistakes and achieve a balanced look.
How Often Should I Use Thinning Shears?
Use thinning shears every 4 to 6 weeks to maintain texture and reduce bulk. Overuse can cause uneven hair and damage. Regular trims keep hair manageable and healthy while preserving style.
Conclusion
Thinning shears help you control hair volume and texture easily. Use small sections and cut slowly for best results. Stay patient and avoid cutting too much at once. Practice often to feel more confident with the tool. Your hair will look lighter and more natural over time.
Keep your shears clean and sharp for smooth cuts. Enjoy styling your hair just the way you like. Remember, simple steps lead to great hair days.